Tuesday, 9 July 2024

The Battle of Chatham... Or not-

 - as the case might be...

Following the French decision to make some sort of showing in the face of the large enemy army approaching along the road from London (rather than scuttling back to Hastings) I have, as is my sad little wont, been looking at the geography and trying to put myself into the head of the commander of the French force at Chatham.

It's obvious that, given the scale and nature of the Game map, "Chatham" clearly means the whole Chatham/Rochester area  - i.e. the Royal Dockyard at Chatham, yes, but also the city and bridge at Rochester. Strangely the map does NOT show the River Medway as a potential issue in a military context (Odd, if you know the river. Odder still, if one knows one's history.).


Now, the Medway IS a significant obstacle (apparently more so by the 1700s than in Roman times). It was a navigable river (vessels up to 40 tons till the 1740s to Maidstone, navigable to Tonbridge) and there were (and still are) a limited number of crossing points downstream of Maidstone; these being (fluctuating?) ancient fords at Snodland & Wouldham, Aylesford (the clue is in the name - though there was a bridge there, seemingly built in the 14thC) and the important bridge at Rochester.


It therefore strikes me that not only would destroying the bridge at Rochester buy time for an army on the east bank, 
opening up options to the the French, but that doing so AND burning the Royal Dockyards at Chatham, would be both a blow to British power (whoever triumphs in the revolt - any British king is a potential enemy king) and a major propaganda coup. 

So, although the Government army is, in map terms, happy to attack the French, and the French happy to meet them, instead of jumping straight into a battle I'm going to go all "Yours To Reason Why" and look at the options open to Richelieu and let the dice decide. 


These options, looking at the real ground, rather than just the game map, seem to be:

1) Stand and fight in the Rochester/Chatham area. I doubt if George will want to fight a contested river crossing at the bridge itself, so to get him across the river the French would have to ALLOW him over (too much of a touch of The Battle of Maldon here..?). But there are obstacles on which to rest one's flanks and limit George's options once he is over the river. [Hmmm... Brave, but if the enemy mess it up, possibly a good option?]

2) Pull east of Rochester and make for the hills to the east of the city, positioning on rising ground and awaiting the enemy. [Brave and chivalrous, but possibly asking for a defeat, given the odds and chances of outflanking.]

(Note: It seems that there were no significant landward defences of the Royal Dockyards built until the 1750s, so hunkering down there - something which occurred to me given my knowledge of the site - is not, I think, a viable option.)

3) Destroy the bridge at Rochester and the Royal Dockyards before marching to the Tunbridge Wells box.

(As with other boxes on the game map this seems named for familiarity rather than accuracy. Tunbridge Wells was more a fashionable resort, than a strategic hub.

Tunbridge/Tonbridge  - the major junction, river crossing (and associated castle) might have been more apt for this box, but there we are).

[This option would involve marching through the
countryside/down country roads and possibly asking for being caught and brought to battle in the difficult ground of the Weald. Hmmm.. Knowing the ground I wouldn't fancy it myself.]

4) Ditto re. the bridge and dockyards, but march back to Hastings after all [What the Council voted NOT to do. As above, with the "retracing our steps" factor.].

5) Ditto re. the b. and d. and march along the north Kent coast, via Canterbury, to Ramsgate, destroying any Public Buildings or other facilities at Faversham, Ramsgate, Sandwich, Margate and Deal en route 
(Sandwich being one of the old Cinque Ports and the others being "Limbs", so a political coup, if not a major military one).

[
If making good time this could have legs for the French. The enemy would have to swing south to cross the Medway, giving time for the French to push quickly east along the clear, straight old Roman road; this route being easy to follow, well inhabited and being generally easy going, while providing a number of likely good battle sites if brought to ground. Entering Canterbury would be a coup of itself, as well as giving access to supplies.]


6) As above re. the bridge & docks, and march (again, via Canterbury) to Dover to destroy the port facilities there, and possibly take the castle (a major political coup). [Good to reasonable roads. The Canterbury factor. Dover Castle would be a HARD nut to crack - if properly garrisoned - but what a coup.]

No other obvious options come to mind at the moment. Decisions, decisions...

OK, let's assess the odds, and let the dice (3x6d) make a decision... 


Option 1 - Throw of 4 or 17.

Option 2 - Throw of 3 or 18.

Option 3 - Throw of 5 or 16.

Option 4 - Throw of 11 or 15.

Option 5 - Throw of 6 to 11.

Option 6 -  Throw of 12 to 14.

The dice say 10. Option 5.  OK.... In terms of the overall campaign game lets say I have three weeks before the next map move.

So, what to do now? Skip straight to the next Game Move? Why make life easy for myself..? 

So, I will revert to a simple, daily "War Diary" mode for this operation.

No Blitzkrieg here.. All movement is likely to take plaxce on road, and all will be 
relatively slow (on single carriageway with minimal alternative practical routes, so some units cannot move until others have moved and you are likely to have the "some are just setting off as some are arriving" situation.). I will be guided by the map, online resources for distances etc. - as well as details and locations.


Day One:
Government army leaves London. Stops at Shooters Hill.

French forces collect powder etc. from Royal Dockyard and stockpile at Rochester bridge. Begin burning of the dockyard.

Day Two:
Government army reaches vicinity Ebbsfleet near Gravesend.

French blow up bridge. Detachments continue with destruction at dockyards while main force moves east along the Canterbury road until Sittingbourne.

Day Three:
Royal army reaches Gads Hill. Rumours of destruction of bridge at Rochester and burning of the dockyard are confirmed.

French army reaches Faversham.

Day Four:

Government army marches for Snodland ford. Foot and horse to attempt crossing here. Wagons and guns to proceed to Aylesford.

French army detachments burn docks and town hall at Faversham while heavy wagons and main force marches to Harbeldown.

Day Five:
Government army foot assembles at Borstal. Cavalry sent to reconnoitre Rochester.

French army enters Canterbury. Guildhall burned. Army rests to allow stragglers and detachments to catch up.

Day Six: Government army foot enters Rochester. King inspects damage. Wagons etc. catch up main force.

French army reaches Wingham.

Day Seven:
Government army foot & horse reach Sittingbourne. Wagons etc. follow.

French army enters Sandwich. One brigade and cavalry dispatched to Isle of Thanet to carry out damage there. Fishing vessels commandeered and dispatches sent to France regarding current situation. Dockyard and town hall burned.

Day Eight:
Government army enters Faversham. King inspects damage. Army waits for any delayed wagons etc. to catch up.
 

Battle of Ramsgate - minor skirmish where the French "Brigade of Destruction" meet Ramsgate Garrison*.

Main French force rests. Council of War to decide next move. Inconclusive.

[I'm assuming there isn't a whole regiment at Ramsgate, but, again, the map box represents the whole Ramsgate/Sandwich/Deal castle/Sandown castle/Walmer castle complex, with men parcelled out in penny-packets. This seems reasonable. In terms of the Board Game rules this would be an "overun" anyway. Alas, I have no larger scale figures for this period, so a 1/72 skirmish game is out of the question.]


Day Nine:
Government army enters Canterbury. King inspects damage. Service in cathedral. Reports come in regarding French activity in Sandwich/Thanet area. Council of War. Options discussed include pushing for Dover, splitting force to deal with French destruction and retake Sandwich or concentrate on catching French army.
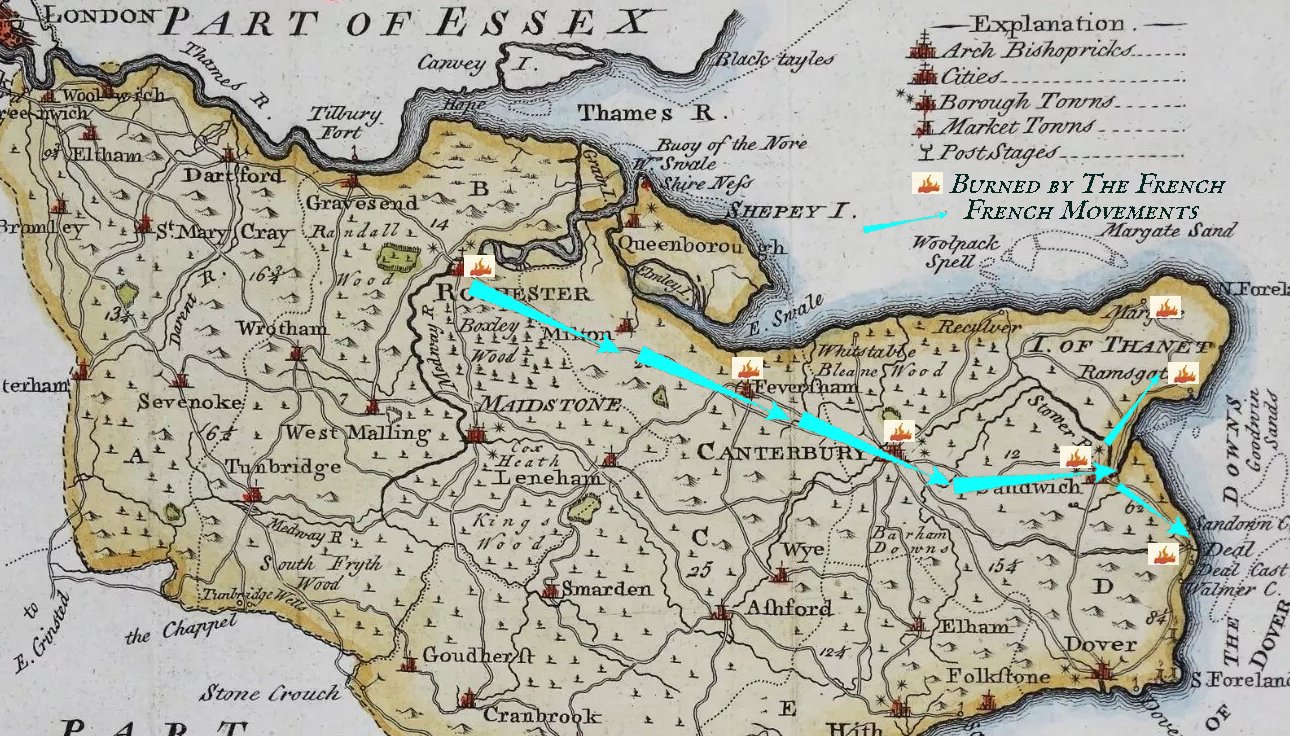
The French march to Deal. They have only battalion guns (OK, taking naval guns from Chatham and putting them on wagons would have slowed them down, but...) so can only make token bombardment of the castles at Sandown, Deal and Walmer. Are rejoined by the brigade sent to Thanet.


Day Ten:
Government army dispatches flying column on forced march to Dover under Albermarle. Arrives at nightfall and enters the castle. The King, the Hessians, two regiments of foot, the wagons and the heavy weapons remain at Canterbury..

Scouts bring news of Government forces at Dover and Canterbury. French Council of War. Moving to Dover seems pointless without heavy guns. The options appear to be to march to attack the King at Canterbury, to sit tight at Deal, to fall back to Sandwich or to move to Thanet and wait for reinforcements. The Council decides to do the latter.


So, no Battle Report for Chatham after all.... Sorry...

Next move on the Game Map could see action in Scotland or the Borders. There is a possible second wave of French coming. King George could decide to crush those pesky Frenchies cluttering up Kent. Who knows...? 


Saturday, 6 July 2024

The Jacobite Rebellion continued (again)....

April is the Cruellest Month:

In Scotland, as March ends, we still have a large Government army dominating the Glasgow-Edinburgh pinch-point and Government garrisons in The Great Glen, as well as a small, mainly Scots, Government force operating on the far north Scottish coast. 

Basically the Jacobites now only hold the Western Isles, the adjacent north east coastline (the sea routes between the islands being free for Jacobite use only because the Royal Navy has largely been pulled south to meet any French invasion), Inverness and Stirling (if only because Cope hasn't got round to destroying its small garrison yet).

An unbloodied  Highland army under Cromarty sits in MacLeod territory, well aware that it is outnumbered and outmatched by the forces at Cope's disposal.

In England a tiny Jacobite detachment still holds Carlisle, while Charles's “Army of England” sits at Alnwick, trying to make good its losses by recruiting locally and awaiting reinforcement from overseas.

Much of its Scottish element is now wondering why they are in England at all - not least because any hopes of a mass rising of Tories, Catholics and those otherwise discontented with the Government in support of the Stuarts south of the border have clearly been dashed.

A series of indecisive Jacobite Councils of War (four in total) throughout April shows how low spirits have sunk, with talk of Prince Charlie pulling out of England (likely abandoning much of the English and Scots elements of the army) and heading north, or for the continent, by ship.

Even news that that the French fleet has again sallied out into the Channel to try to gain control of the narrow seas and fought a successful action, forcing the Royal Navy to withdraw to port, does not lift their spirits. But no clear decisions are made.

As May arrives the Council finally decides something: Charlie and as many of the Irish and French (plus the gold of course) as can fit into the available ships are to sail for Scotland...

Murray, and the remaining Scots, Irish, French and guns, are to try to make their way back to the Highlands as best they can.

The English Jacobite volunteers are to be left (abandoned?) as garrisons at Newcastle & Berwick.

The plan, in so much as there is one, appears to be to build a force in Scotland, drive the Government supporters from the Highlands, retake Edinburgh and the Lowlands and try to negotiate a settlement... Hmmm.... Like THAT'S going to work... Unless....

Meanwhile, the Government armies are strangely inactive during all this.

Remember that French Invasion force..? Despite the Royal Navy trying to assemble a scratch fleet in the Channel, the French come out again, this time loaded with troops. There is another sea battle, with the Royal Navy being outnumbered and defeated. A few French ships and troops are lost, but the bulk of the Invasion Fleet are safe. Hooray!

Mid May the French make the Channel crossing, landing (unexpectedly) at Hastings (a good omen?)..*

[*Dice decision outside my control. The French are, of course, playing their own game. Basically a 2x6D test, avoiding garrisoned locations. Initial test possibilities are: 2-4 Land in Ireland. 5 - Land at Weymouth (threatening to cut off the South West; providing a possible safe haven/recruiting ground for Charlie there..?). 6 - A landing at Poole (threatening Southampton and Portsmouth). 7 – A landing at Brighton (to threaten Portsmouth and London. In reality I guess this means nearby Shoreham or Newhaven with their harbours, rather than the harbourless, decaying and relatively insignificant fishing town of Brighton itself). 8 – Land at Hastings (threatening London and Dover) 9-12: Push up into the North Sea..] 

The Government forces react swiftly. Troops in the north of England are rushed towards London. Troops at Southampton ditto.  The King moves to Windsor to meet the latter.  The fleet (at now vulnerable Portsmouth) moves to distant Plymouth. Hessian battalions, put onto ships in Holland, are diverted to London.  

Richelieu, in contrast, is slow off the mark* (waiting for the second wave?), and before he advances on London the Hessians and Albermarle (marching from the Midlands) arrive in London to meet the King marching from Windsor. There is no way the French can take the city against an army near twice their size. Richelieu remains at Chatham, considering his options.

Meanwhile, Murray has moved south to Newcastle again and Charlie has arrived on the Scottish mainland in the north west. There is now a major, mainly Highland, army at his command there.

 [*The Gov't get the initiative next map move. Dammit...]

The ships which brought the Hessians meet with the fleet from Plymouth – to run interference on any French reinforcement. 

The large army in London now advances towards Chatham. Richelieu, outnumbered about two to one calls a Council of War with his colonels. There is no doubt as to the Council's feelings. The majority of colonels are eager to fight.

It looks like we have "The Battle of Chatham" in the offing...... 


Thursday, 4 July 2024

The Battle of Scarborough (or "Say, are you going...?")...

 All's Fair at Scarboro'...

So... 

Cumberland has chosen his ground, to the west of Scarborough town on some low heights commanding the road from Whitby. Although, as the Jacobite army deploys on the morning of the 12th, it is clear that he is heavily outnumbered he has confidence in his Flanders veterans (if not in General Wade, now somewhere static in the Midlands). His plan? Who knows...


The Jacobite Plan:

The Jacobite plan is simple. While the guns and a slow advance by the Highlanders and Lowlanders fixes the enemy, the Irish Brigade (three foot regiments, a horse regiment and the combined detachments) and some guns, all under the command of Lord Clare (in French service, commander of the Irish Brigade) will follow the road till reaching the bend (the road swings south west then south east), deploy on the enemy's left then, after three salvos from Clare's guns, the Irish infantry and the Highlanders on the army's Left (under Drummond) will launch an attack. The outnumbered enemy, hit from front and flank, will surely collapse, and the cavalry can pursue (all they are likely good for, after their shock at Carlisle).


Cumberland's Choices:

Cumberland would seem to have five options;

1) To accept that the enemy is too powerful today, and conduct a fighting retreat towards York (he has positioned himself away from Scarborough itself, and can avoid being trapped there by falling back towards the York road). Risky though, if pressed too fast and hard.

2) To accept that the enemy is too powerful today, and conduct a fighting retreat towards Scarborough town.

Frankly, this seems to be the worst option as not only has he had no time (or, perhaps, foresight) to entrench or stockpile supplies there, but the castle is likely in poor condition and the enemy have heavy guns with them and could dominate the port from the heights to the south of the town; so preventing reinforcements by sea. With Wade patently unreliable that would likely be Cumberland's only hope for relief, supply or support if he is besieged, so denial of THAT would likely prove fatal.

3) To hold his ground and rely on the steady volleys of his men to blunt any enemy attack(s), before going at them with the bayonet.

However, the perhaps brittle (though perhaps vengeful) Highlanders, after their humiliation at Carlisle, are today backed by Irish and French regulars. If the Highlanders are steady, and the enemy use their numbers to outflank him, he could find himself very hard-pressed. On the other hand he has heavy guns himself, plus the battalion guns of his regiments, and his force is small (and thus compact), experienced and hence likely easy to move around in response to threats*.

4) To go on the attack himself and throw all but a holding force against the Jacobite left before their right has deployed sufficiently to be a threat. THIS is a gamble... But the lesser of four of the evils thus far..?

5) As above - but mirroring me, moving part of his force round MY left, to avoid my flank attack.

[*Note: The board game gives Cumberland a Three Rating, two higher than Murray, so that he will likely usually have more Command Points to throw at his men.] 

The enemy deploy* in two lines, with all of their battalion guns concentrated in two batteries and their heavy guns and cavalry on their left.

[*Game token draw and dice throw modified by IMP.] 

And so to Fight:

First moves, and my Irish Brigade makes reasonable progress along the Selby Road. I order the Highland Brigade forward, but they at once come under artillery fire. They suffer Disruption and are slowed, but no major harm done.

[The rules this time: last battle I used a combo of Crossfire/NMTB concepts for the pre-fighting manoeuvre stage, then my own variant of a merging of SP, for Activation etc. and Andy Callan's Loose Files & American Scramble tweaked for the Jacobite war. This time I'm going to take some of the Activation ideas from games using PIPs (eg. Live Free Or Die) and see how that goes. I expect it will be MUCH quicker than the SP token system, which though satisfying and fun may not be as quick in big battles. Specifically Solo aspects will be the “Decisions”; handled in my usual way of applying ad hoc IMP tests.]

Things are seeming to go well, but, oh.... It looks like Cumberland has plumped for Option 5. His second line forms itself into column and marches as if to flank my left. I organise my Highlanders, pushing them forward, while my own guns cause problems for the Government first line, which has shuffled along the slope a tad. Their guns respond, again disrupting the Highlanders.

Phase One

By move 4 the Irish have come off of the road and are marching deploy on the enemy's flank as planned. I order Drummond to get his Highlanders in line – I do NOT want a premature attack like last time. I also move the French Detachments forward to support the Highlanders.

Meanwhile, in dead ground and under the cover of some fences, with a slope to their front to make life difficult for me, Cumberland's second line forms a new battle line at an angle to that of the first line and their guns.

I now realise that the Irish are a LONG way away from the new enemy position. I suspect Cumberland regards his siege guns, and possibly his battalion guns, as expendable, so long as they slow the Irish down (though I bet they will be spiked before I can capture them). I also suspect that if I throw the Highlanders up the slope at Cumberland's new line (flanked as they will be by the enemy's guns) I may get a bloody nose. I need to get support over to them ASAP.

Cumberland continues to edge his line across while his guns batter my Highlanders, but behind the batteries the enemy limbers arrive on the table. Is Cumberland intending to pull back?

Over on my right the Irish have nearly reached the point where they should shuffle from column into line of attack. THIS of course, will slow them down, but there's no helping this; those are their orders.


The next two moves sees the Irish advancing in line, while my Highlanders keep themselves in order as salvos from the enemy guns drop ball among them. Few casualties, but they are getting frustrated, and want to charge. I continue to move up the French and Lowlanders to support and steady them.


[
Throughout the above I am having to use all my Command points/PIPS to keep the Highlanders' disruption markers low, and to keep the French, Lowlanders and Irish going, so I have none spare to get my own cannon firing. However, with the enemy pretty static their regulars can, to a degree, recover from DPs automatically, so there is little to be gained by bombarding - at THIS stage.].

"Unseen by me", the enemy siege guns have limbered, and are moving away from the advancing Irish. Otherwise the enemy remains pretty still. What is he planning?

As the game develops my Irish are a still a tad slow, and the enemy heavy guns are able to pull back a little, before unlimbering again.

I halt the Lowlanders, so that they can shift some of the disruption they accumulated marching at speed in line.


The enemy guns continue to harass my Irish and Highlanders - the latter suddenly launching a reckless charge up the slopes at the new enemy centre, part of which is protected by a palisade-type fence. Again their lack of discipline under fire has led to an early charge.


As my Highlanders charge the enemy loose a volley. Some units are relatively unscathed, others seriously disrupted by the fire.


At contact some Highland regiments are halted at the crest and driven back in disarray, the others only make it partly up the slope; whereupon THEY are counter-charged by one of the enemy regiments and themselves pushed back.


Two of my Highland regiments charge towards the new enemy left, but the combination of artillery hitting them on their approach, and close-combat, are too much for them, and they are forced back. Again, the Highlanders have let me down, with several regiments in my centre routed.

I move the French up, and they engage in a firefight with the enemy regiments. One Government regiment tries to work around the French flank - so, desperate, I charge it with my cavalry; but they are repulsed. After a couple of moves of fire the French pull back, having suffered badly in the exchange.


Meanwhile, the advancing Irish have been being hammered by the enemy cannon. Their own guns open fire on the enemy artillery (as does my main battery), causing some considerable damage and casualties among the toiling gunners, but not silencing the enemy guns. Then, just as I think I'm getting somewhere, the enemy throw their cavalry against my lead Irish regiment. Already in some disarray it recoils, as does its supporting unit, but the enemy horse break through, and the brigade commander Lord Clare is captured.


All in all things are not looking good. The enemy have now firmly positioned themselves on the heights to the east, which work against any assault. My best troops, the Irish, French and Highlanders, have suffered casualties and, in the case of the latter, been bested in close combat. I have a choice: attempt to attack again, or pull back.

The Irish form square, for fear of the enemy horse, but as they are still in enemy artillery range, they begin to suffer serious casualties from the cannon fire. The enemy cavalry reform, and pull back, but the damage has been done. The Irish  begins withdrawing.*

[*Test - it seems that the individual units, with their Brigade Commander gone, are NOT happy.]


In good news, Prince Charles rallies the fleeing Highlanders [Morale test]; but they are now some way from the battle lines. Also, the guns supporting the Irish again hit the enemy artillery.


My general figure (Murray) organises the Lowlanders and the remaining Highland units on his left, plus the French detachments, into assault columns before launching them at the enemy line. The Royal Ecossais charge - and force one enemy regiment on their right to pull back, dragging its neighbour with it as the latter tries to maintain the battle line.

In the enemy centre the enemy's weakest unit, a militia regiment, is likewise forced back by Cluny's Highlanders, but they do not break. Instead they launch a volley as my men sort themselves out for another charge – and then withstand that assault; holding off the Highlanders [For two turns! Lucky dice indeed for the militia...] before forcing THEM to retire..

Meanwhile, on the flanks of Cluny's men two other enemy regiments counter-charge their would-be assailants; driving them off with the bayonet. With enemy cannon shooting in from the flank, and these misfortunes, two of my units break, upsetting their neighbours. The second assault on the enemy position has been repulsed.

To cause further concern, the enemy cavalry are now threatening my battle line.

Phase Two - Three

With my regiments in disarray and casualties mounting things are looking difficult – again. IF the enemy press too hard too quickly (and with a bit of luck) I may be able to give them a bloody nose. But if Cumberland keeps his head, and his men in hand, I do not think I will win the day without having to attempt another assault. If the enemy pull back to their position on the slopes I fear the result – and I doubt if Cumberland would be foolish enough to come down from his position of vantage..

It begins to look as if the best I can hope for would be to (again) hold for a stalemate; gather my men into some kind of order and hold on the field to allow my stragglers and wounded to creep back overnight before heading back to Whitby, or even Newcastle.

I am well aware that, strategically, another indecisive fight and another retreat is bad news. The Jacobites COULD by-pass Cumberland and press southwards, but this would leave both him and Wade - not to mention the Government-controlled Lowlands - between our mainly Scots army and the Highland heartland. What message another failure would send to the French, and their forces sitting outside the Flanders ports, doesn't bear thinking about.


But Cumberland neither sits on his hands, nor acts rashly; instead (worst option for me) he makes a steady advance, giving fire when the opportunity arises, and hammering my men with his guns. A couple of Scots formations break (I am having to form ad hoc groupings, so that Highland/Lowland differentials are becoming irrelevant) as the enemy slowly moves down the hill towards them. On their flank they can see the enemy horse - always unsettling. 

I give ground as slowly as I can. The French and Royals are steady, as is one of my English Jacobite units (only because they haven't borne the brunt of the hand to hand, and have been small enough to escape the attention of the guns), but more Scots regiments break as casualties from roundshot and shell mount.


Army morale is now very low - over half my units have either routed (some are still running) or been forced to withdraw at some time, and nearly all have taken casualties from the enemy guns. The Highlanders have been bested at what THEY do best and are not happy. Despite the effect which that might have on morale I order my own guns to limber-up, to try to save them, and form a screen with my remaining units.

Luckily, Cumberland seems to have decided not to risk a full-on attack without preparing the ground with his guns and, while he organises this I am able to salvage the artillery and protect my routed and fleeing units from close pursuit. Slowly I pull my units back, sending instructions to Charlie, and the rallied Highlanders currently with him, to also withdraw. The Irish are already retracing their steps down the road..

Cumberland does not pursue, but holds the field. 

And THAT, effectively, is the end of the Battle of Scarborough.

Aftermath:


A LOT of recrimination in the Jacobite camp as we slog back towards Whitby. I blame the absent Clare for being too slow and cautious, and Drummond for not keeping his Highlanders in check. O'Sullivan, with the Lowlanders, could have been more supportive. My cavalry were useless (the loss of Elcho at Carlisle having an effect?).

The Prince was subdued and inactive through most of the battle (almost as if he didn't want to be there..), but at least he rallied the bulk of the routing Highlanders; and anyway, you don't diss The Quality....

The Butcher's Bill is steep. We were able to get our lightly-wounded away, but the tally of lost and missing is a blow. The returns indicate that:

The Lowland regiments suffered most of all (mainly from artillery and gunfire) with some 1,440 men lost.

The Highland regiments (guns, muskets and hand-to-hand) - 960 lost.

The Manchester Regiment - 60 men lost. The Scots & English Cavalry - 40 lost.

Many of these "lost" men will have been captured after the battle (taken while wounded, lurking in the woods or generally straggling). The enemy will likely be making their own breakdown or tally. Whatever the state of the Scots and Englishmen lost and in their hands, these men are now of no use to me.

The Irish regiments suffered very badly from the artillery and the enemy cavalry charge: 660 men lost (around 300 each from the two leading regiments, approx. 60 from the third unit). Approximately 50% of these men are currently held by the enemy as Prisoners of War, almost all of the regimental men being wounded in some way.*


(*Against the Prince's policy, and my wishes, the French have made an approach to the enemy under a Flag of Truce overnight to check on the fate of Clare, his staff, and others enlisted as French troops/auxiliaries and possibly in enemy hands. The enemy has been courteous enough to supply the French with the basic details given here. The French envoy apparently didn't ask about my Scots and English.)

The Irish's cavalry supports, who likewise suffered from artillery fire, suffered a loss of 180 men (two thirds of whom were captured; wounded or rounded up while dismounted and wandering about in unsuitable footwear).

Of the French infantry detachments 260 were captured on the field badly wounded and around 240 killed outright/died of wounds.

The 
Royal Ecossais lost 20 men wounded and captured.

Lord Clare and his staff were captured unharmed.

Estimated total Loss for The Army; 3,880 of all ranks.


[Note: The Government losses were low.

Their artillerymen suffered disproportionately; 20 wounded seriously, 40 light wounds, 20 dead. All due to the Jacobite guns' counter-battery fire.

Their infantry lost 160 dead and 120 seriously wounded (about 40 lightly wounded have returned to the ranks).

It might be noted that some three quarters of the Government foot casualties came from the militia regiment charged by the Highlanders, with whom they fought several rounds of vicious hand to hand combat.
]

Conclusion
:

Another tense game. The rules worked well and were much quicker. Are the guns overpowered? I need to do some more research.

Strategically this was a disaster for the Jacobites; badly bruised, their army pulls back to Alnwick, via Newcastle, to meet reinforcements (two Irish regiments from French Flanders) and lick its wounds.

Meanwhile, Cumberland marches across the Midlands to join Wade at Leicester, while in Scotland Cope moves to Stirling, then Perth.

In the Western Isles the clans attempt to concentrate.

Across the Channel in the Pas de Calais and the Normandy ports, the French regiments u
nder Richelieu wait for an opportunity to cross.

Things are NOT looking good for the rebellion....

So there we are. Map moves next. As always, thoughts, queries and comments are always welcome...

Thursday, 27 June 2024

The Jacobite Rebellion (cont'd)

Manoeuvres and Marching:

With late Autumn Charlie heads up to Berwick*, but it is all too clear that, with the troops from Ireland landing at Kirkbright and George moving his men to Edinburgh, the Government now has a major force, far too large to be tackled, blocking access to the Highlands. 

Next move George, leaving a large force at Edinburgh, sends part of his now large army to Falkirk, joining up with the force from Ireland and further blocking any moves northwards by Charles's army. Meanwhile, in the far north, more clans loyal to the Government are rapidly raising companies and Glasgow raises a loyalist regiment to bolster the Government garrison there. 

In the English Midlands more Government militia are being raised, and in Dutch Flanders Cumberland and more English and Scots redcoats are awaiting embarkation. Old man Wade moves up to York.

With French help only coming in dribs and drabs, the Jacobite are in a pickle. Some seven Highland regiments are stranded in the western isles, blocked by the constant presence of the Royal Navy's men of war patrolling the waters.

Other Highlander forces are scattered in the north east of Scotland awaiting a leader and though Atholl moves up to Fort William to gather the Highland units being recruited along the west coast mainland there, and Cromarty tries to do the same further north, this is a slow process, and with winter coming attrition may be an issue. 

With an enemy army too big to be tackled northwards, Charles's army moves south again, reaching Richmond (Yorks) in November, then pulling back to Teeside. 

[*As previously; player “decisions” are made by Councils of War and ad hoc decision tests for isolated leaders. Even my own side do not do exactly what I (Murray) want. The Council procedures have been covered elsewhere. An example of an ad hoc decision test would be (pic. Right click and "open as new tab" to enlarge.]

November and December sees the armies of both sides bed down in winter quarters to avoid Attrition, with the only action being the sending of leaders to collect stray units to consolidate. Charles remains in Teeside, the Government army in Scotland concentrates to spend the winter in Edinburgh. With sufficient forces in the north, and with Cumberland only across the north Sea, King George takes ship for England, leaving matters in the hands of his generals, 

Meanwhile reinforcements for both sides are building up on the other side of the Channel and North Sea. The French now commit several of their own regiments under Richelieu (translation: allowing them to sit near the Channel ports), so Nassau receives orders to get his six Dutch regiments home – and they, along with all Dutch ships, cease to be part of the Government force. 

On the plus side for the Jacobites the French threat both keeps Government forces in the south of England and pulls Royal Navy ships southwards – opening up access to the Western Isles.. 

As might be expected, activity in the wintertime is limited. In Scotland, as the year draws to a close, both sides try to gather their scattered Highland units. In England the Government commanders try to consolidate their equally scattered militia regiments. On the Continent the reinforcements for both sides are still building up, with Hessian regiments arriving at the Dutch ports to support George's government army.

However, to the Jacobite Council it is clear that time is NOT on their side, and the arrival of the French uncertain. It is decided to move south and try to smash Wade's army, operating in the Midlands, in the hope that doing so will prompt French action and allow a rendezvous with French allies from the Channel Ports and Flanders. But there is, for the latter plan, a fly in the ointment; the build up of Royal Navy squadrons in the Channel and North Sea. 

The French are out!!!

Come January Cope moves to Stirling, as Argyle and Lingonier are sent to gather loyal Government Highlanders in the south west of Highland Scotland. 

Suddenly the French decide to bite the bullet.. In January a large French fleet leaves the Channel Ports to confront the British Royal Navy. The fleets meet.

[How to fight this out...?  The board game has, of course, a simple Naval Combat table, but this battle will be critical, and part of me would like to make more of a meal of it.. But I don't have any period/near period ships models, and the game's naval units are MUCH less detailed than the land ones (which are individually named with variable individual unit strengths) making any “How many ships and of what type” assessment impossible without further, detailed research into the navy's of the period. Hmm.....

So I thought I'll nick an idea from another boardgame “Remember The Maine” and did a “line of battle” dice game.. Both sides line up their "ships" and there is a dice throw; a draw or +/- result of less than a differential of +2 means nothing. A plus 2 removes one SP from the loser.
] 

The French fleet takes losses. ANY loss of shipping is bad for the Jacobite cause, and, as the battle swings against them, and in accordance to French Naval Doctrine of keeping a fleet in being, the French pull away, back to port.

[I did do a CRT result out of curiosity: the French lost two tokens, one of which was captured, so slightly worse, but the above process was more interesting.] 

February, and the Jacobite army in England swings north to Newcastle again, to join up with reinforcements arrived from Flanders. 

The Jacobite Council dithers...

The army spends the rest of the month resting here, as their leaders discuss what to do next. Despite Murray's insistence that they need to strike at either Wade of Cumberland before they join forces the Council wavers.

[The usual "Council of War" system being employed.]

In Scotland Cromarty gathers clan regiments from the isles, while Athol pushes up the north east coast – dislodging Huske (previously despatched north to gather the Government clansmen together), who sends several Government Highland companies by ship to join Cope, who has left Stirling and pushed up the east coast towards Aberdeen, gobbling up the isolated Jacobite Lowland regiments there, while Huske himself pulls back to Tongue.

In England Cumberland marches to Scarborough (awaiting reinforcements?) but Wade does not move from Leicester to join him. 

March, and the French will still not venture onto the Channel. 

Cope takes Aberdeen. There are now no locations in Scotland below the Highland Line in Jacobite hands, and the forts along the Great Glen still have their Government garrisons in place (since their heavy losses at Stirling, Inverness and Carlisle the Jacobites seem to have no stomach for assaulting fortifications).

Meanwhile, at Newcastle Murray at LAST persuades the Council to act. The Jacobites push south to meet Cumberland's smaller army in the vicinity of Scarborough.

For reasons best known to Cumberland (perhaps he fears losing face, or being harassed if he pulled away, or losing contact with the eastern ports – and reinforcements from Flanders if he fell back?) he decides to stand.
(Me, I'd have pulled back towards the Midlands to meet Wade, but the Dice have ruled, so....)

The Battle of Scarborough (prep.).

Were I Cumberland this NOT the place to fight a battle. Hunkering down in the ruined castle or the town is out (a trap). There ARE steep slopes (almost escarpments) to the south west, and the wooded protuberance of Oliver's Mount, but only an idiot would assault those I reckon, so Murray would likely occupy the town, then pull back rather than do so. Perhaps the rising ground in the vicinity of Falsgrave (where the old road from Whitby/Scalby comes south, then east) might be better, but flanks are likely to be exposed..   

Advancing to meet the enemy through the reasonably flat, open land (according to the maps seen thus far) to the north of the immediate Scarborough area seems foolish. However, the slopes above Scalby Beck look promising in places - and perhaps not daunting enough to put off an an enemy (?), but they look wooded and scrubby, as do the slopes by the old ECW star fort. Possible C&C issues...

Or there are the slopes near Peasholm beck, one flank refused, one protected by the little low-land/sea girt peninsular there (?). 

Decision time; I'm going to stick Cumberland on a reasonably gentle slope, using the Falsgrave area as a basis for the game table. Watch this space.


Sunday, 16 June 2024

In Other News....

My Table...

The last couple of days I've had a number of queries online regarding how I made the table shown in the recent battle report here. 


Just to satisfy anyone else's curiosity, here's a precis of what I did:

Stage 1) Boxes/books placed on the table for the heights, these overlaid with some cloth (sometimes I use a neoprene battle mat I have as an underlay instead) to soften the edges.

Stage 2) Home-made, cheap watered acrylic-dyed mat made of a cheap fleece material bought locally (the stuff they make fleeces out of) laid over all.

Stage 3) Woods (cheap Ebay trees, clump, clump stuck to those fibre things they put in the bottom of hanging baskets, bits of salvaged and dried moss & good old lichen), buildings (card - home made and about 40 years old now) just put on as per any other table.

Stage 4) Dried (used) tea leaves sprinkled as the road/track & field boundaries and the brown "fields" (using a bit of card where I need a straight edge).

Stage 5) The trickiest: the "gill" is painted cling-film just laid down where wanted and then edged/held down with clump material and tea leaves. ONE day I'll get round to making sections on card, but this is a really flexible way to make a one-off wee stream.

Stage 5) Set dressing: random bits of clump material and Irregular Miniature fences/hedgerows placed where wanted just to break up the field boundaries/add a bit of colour/variation. Decor really, but prettifies things a tad.....


All in all took about half an hour to 45 mins to actually set up, and packs away easy and quicker.

Folk might recall 
a guide I wrote up the other year re. to how I made a different (slightly more complex) table using the same basic principles.

https://denyers.blogspot.com/2021/03/making-scrubby-table.html

As always, if anyone has any queries please ask...

Funny Old World..

Also re online: with the Wonderful World of Social Media being what it is, I've left the Facebook Solo Wargaming group (the group formerly known as "Solo Wargames With Miniatures", now called solo wargaming discussions and ideas or something. I have difficulty keeping up..) to which I have been regularly contributing since 2017 (and whose members encouraged, the setting up of this Blog). Seemingly my "Battle of Carlisle" post here wasn't solo-orientated enough for the Admin. and got deleted. Why that one, and not the dozens of previous links here I've posted I don't know. Maybe the rules had changed (?). But since I'm too old (and cranky) to start second-guessing, away-wards I have stepped. Life's too short - and I was finding the constant reiterating of the same advice to folk new to solo (nobody searches old posts on FB these days it seems) a tad repetitive. But hey, ho. Onwards and upwards....

Anyhoo.. Before the post WAS expunged there was some discussion in the comments regarding the methods used in the last game, and a query as to whether I would be publishing any specific, detailed description of my way of working (as will have been seen on my posts here, I do note some technical issues/procedures as I go along, but don't do a blow-by-blow breakdown as this tends to interrupt the narrative). Although my methods are constantly evolving I am giving some thought to this, so if anyone is interested here please pass me a comment (if you don't want the actual comment published please note this). Cheers.  


Cheerfuller (?) News:

Some 20mm SCI-FI "Not Star-Trek" 3d prints and some 3D printed 6mm houses I ordered have come in.. So, MORE painting to do... IS that good news..? Hmmm.....

Watch this space..  

Friday, 14 June 2024

Post Battle Summary etc.

The Butcher's Bill:

Having assessed the casualties* from the late fight the Government army (surprisingly?) came off worse; approx. 300 dead or mortally wounded and over 500 wounded - the Holstein regiment suffering particularly, due to their repulse at the village and from being bombarded by the Jacobite guns. The Government cavalry also suffered (from their brawl with Elcho's horse and the volleys from the Lowlanders) as did Lascalls Regiment (enemy artillery and the charge by Cluny's regiment). 

The Jacobites fared better overall, with around 180 dead/mortally wounded/missing (a lot of the "missing" Highlanders turned up again) and roughly 600 wounded, but they also lost Elcho and Strathallan.

[*Dice test for each figure taken off the table; a simple 20 sided dice: 1-2 dead,  3-6 badly wounded (needing evacuation), 10-20 lightly wounded/unscathed. I keep playing around with this process as the real-life stats seem to be all over the place for this period. Part of me says I should be separating the figures removed into "caused by guns", "caused by small arms" caused by hand to hand" piles and having different throws for these categories. Needs more work.]

I now need to transfer the (detailed) casualties to the campaign tokens.


The Councils of War:

In true 18thC style both sides go to a Council of War* to discuss the next move. Straightforward enough of itself. However, as an extra complication for the Government forces, the Dutch have now realised that there were actual French troops 
among the Jacobites (albeit a small detachment - and below the Board Game "trigger" level - which didn't actually get involved in the combat). This may make Nassau, their commander, feel the need to contact his superiors for orders. This WILL affect matters for the Government, but the Jacobites don't know this.

[My usual card draw system.]  


Sooo.....

On the Government side Nassau (against the wishes of his colonels) says he needs to seek instructions, in case the terms of the Convention re. French involvement have come into play. This pretty much decides matters - despite Hawley, two of the cavalry colonels and Blakeney feeling more aggressive action is called for. The King is less gung-ho, however, and it is decided, given the situation with the Dutch (and the fact that the hoped for reinforcements for Ireland are still somewhere at sea), to march for Edinburgh - where there is a garrison and where supports, in the form of several British regiments from Flanders, are soon expected.  

The Jacobites, on the other hand, with Murray sitting on the fence, are pretty much in accord - apart from Charlie, who clearly would prefer some kind of action, but cannot actually muster any arguments to convince the somewhat negative Perth and O'Sullivan. It is decided to march for Newcastle, where, like the Government, they expect reinforcements from across the North Sea (Drummond, the
Royal-Ecossais and more Irish).

And so October comes to a close....


A Little 6mm Ancient Action..

Somewhere in Anatolia. . The army of Antiochus Elehohkhromahtistis has approached the free city of Erimoupolis with intent to subdue. The go...