Showing posts with label Rules. Show all posts

Wednesday, 13 July 2022

"This Ain't Zululand": The Prep.

The Trouble With Trekking...

A quick trip to Sander's Patch to test some rules.

Backstory & Mission:

Very basic this time. After discovery of gold within his domains the colonial power (against local advice) has decided to stamp on the Great King; and has thus gone to the trouble and expense of shifting an expeditionary force way up the Great River.

A British Column, consisting of wagons and impedimenta, plus an escort of about a regiment of redcoats, some Native Auxiliaries (horse and foot,) and a few cavalry is therefore approaching the River Tembi, intending to move from the south of the table to the north, burning the kraal, while en route to the Great King's main city.

There are hostiles reported in the area, in some strength; but their intentions (and locations) are unknown.

The Head of the Column must feel it's way across the table within Thirty Moves to be successful. Until Activated the Main Column will not enter the field. This is randomised so I do not know how long I will have to scout and "clear" potential ambush points (PAPs) before it arrives.

Wagons can break down and other hazards could delay progress.

Lt. Hawarden's Sketch Map 

The Field:

There is a clear wagon and cattle trail for the column to follow.

The terrain is generally flat, so some off-trail wagon movement is permitted.

Elevations include a scatter of rocky kopjes and some significant stretches of donga (the old Tembi riverbed). The ground is pretty open, with some patches of woodland along the River Tembi, which splits the Table. 

All kopjes, the donga and woodland patches (there are no Napier Grass patches - as I couldn't find any suitable terrain models in my boxes) could conceal hidden enemy and must be Scouted before deemed safe or tested for as Potential Ambush Points (PAPs) if approached.

Because the scouts are with the column (rather than me losing them scouting off-table) parallel Table-Edge tests must be made each move for each third of the table the column has traversed/is traversing. 

Randomising/Solo Stuff:

1) The Column: Incidents relating to the column will be handled by a dice throw per move and (on the appropriate throw indicating an incident has occurred) a test throw on the Convoy Table below.

2) Enemy Entry: Enemy units enter play only when a test reveals them. Every move a British unit is within fourteen inches of a Potential Ambush Point (see below) or within two feet of an east or west table edge test is made (1x6D). In the case of table edges a throw must be made for each 32 inches of table length falling within these parameters. On a throw of six a potential threat has been perceived and a Blind is placed.

This Blind tests (1x6D) each enemy move and if a six is thrown then at the start of the next enemy move a card is drawn and placed at the point where the threat has been perceived. After this point the Blind Card activates and moves as normal units.

On a card being "revealed" by proximity/within LoS of a friendly unit, the card is revealed; with any units prompted by the card type/value being placed (as per my standard Hidden Enemy Protocols but with one red Pip = one unit picked at random from the unit storage tray).

It is assumed that ALL Enemy Brigade Commanders will have been ordered to act aggressively. This will, however, be tempered by ad hoc Decision Throws based on conditions on the field as soon as any reverse has been experienced.


3) Scouting: Scouting (and other movement where Scouts have not already passed or cleared Potential Ambush points - see below) is dealt with as per my standard Hidden Enemy Procedures (see also above).

However, in addition toll PAP and table edge rules, because of possible long distance off-table threats, Scouts within three inches of a table edge or on a kopje plateau edge facing a table edge and within a foot of that edge may ALSO sight to off-table areas. Enemy seen in these areas may be engaged (long range fire). Enemy so spotted cannot return fire and MUST enter the table within one foot of the spotter; being so placed on a throw of 5-6 on a 1x6D test (per move). However, such units may be "Pinned" as per shooting rules, and thus denied entry to the Table.

4) Potential Ambush Points: There are several Potential Ambush Points (PAPs) on the table. These are:

Type 1) Any kopje plateau

Type 2) Any isolated patch of woodland, any large patch of scrub/Napier Grass, any isolated patch of rocky scrub and/or the main kraal

Type 4) Any donga or long stretch of woodland or rocky/scrubby slopes (e.g. kopje sides)

If not rendered harmless these can provide assembly points for Native Surprise Attacks. To be rendered harmless these features must be either Scouted, passed through or occupied.

To Scout a Type 1 PAP a British unit must climb to the actual plateau of the feature, then make a "Discovery Test". It must then move across the plateau to the furthest (in distance) edge from it's arrival point. It must then test again. Should a plateau contain any Type 2 or Type 4 PAP then these must be tested for separately as below.

To Scout a Type 2 PAP a British unit must move to within two inches of the edge of the feature, then make a "Discovery Test". It must then pass through the feature, making another test each move in which it ends it's turn in/remains in the feature, until a total of three tests have been made. Only after three tests have been passed without prompting and Ambush is the PAP deemed cleared.

To Scout a Type 4 PAP a British unit must either enter or move to the very edge of the feature then make a "Discovery Test". This is deemed to have cleared a six inch stretch of this kind of feature. To clear any further stretches further moves taking the unit/s along the feature must be made and tests taken per such move.

IF, at any time, an enemy force (including retreating/routed units) passes through/occupies a preciously "cleared" feature it reverts to being a PAP.

5) Wildlife: Apart from encounters on the Table above there is only one kind of wildlife of concern - a Wildebeest herd. These move randomly (basic six point 360 degree Spider Test) three inches a move. If spooked by a body of men (must be more than 12 strong) they will stampede away from them at six inches a move for three moves (six point half Spider Test for direction). The Convoy cannot pass through the herd, but must go round or halt to let them move on.

6) Convoy Arrival: Order of march will be written out in advance. Two moves in after the Scouts hit the table a 1x6D dice will be thrown. On a throw of "6" the lead element/s will arrive on the table at the Arrival Point.

However, IF a scout has been dispatched off-table with data re. seen enemy/enemy threats within 3 feet of the Arrival Point the Order of March MAY be changed by the Off-table Column Commander. This is represented by the following table.


7) Sub-Unit Commanders: As always Friendly sub unit commanders will be subject to ad hoc tests when detached or without orders and a decision is required. I (as General) will have no influence on these decisions if the sub commander is outside my Command Radius.

Units within Command Radius may also be affected by the following circumstances:

Unexpected sighting of enemy

Unexpected exposure to sudden, serious threat.

Ammunition issues

Enemy sub-commanders will be similarly affected.

The Enemy:

There may be no opposition, other than (maybe) at the kraal itself.

On the other hand a mass attack from the Regiments of the Great King is possible. Scout reports are inconclusive - not least because they have been ordered to stay close to the column.

Likely hostile strength is unknown but could consist of anything up to twenty of the Great King's regiments (or Fahwini) of warriors. These troops have in the past occasionally crossed spears with the Protectorate's Hausa Police, with mixed results, but have never pushed into "The Patch" in strength. Neither have they faced British regulars before. They can be expected to be confident and aggressive. 

Summary:

OK, the scene is set. The scenario rules laid out. Next Post; the game itself....


Friday, 21 January 2022

1776 And All That (Part Four)

Battle of Albany: Rules and Stuff....

The previous post was a general narrative, not a "dice by dice" commentary, but I'll set out some of the details below.

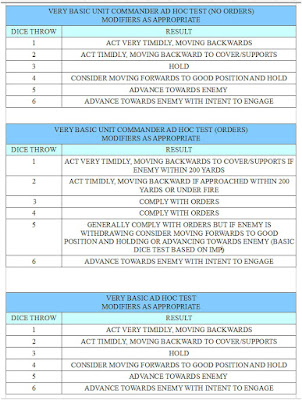
All "non me" decisions were made by using simple Ad Hoc Decision tables (see below). 

Activation of Generals/Brigade commanders - or detached/specialist units where appropriate - was by token using the 1 token per commander/unit, two blank token draw system; with drawing of tokens stopping when only two tokens remain in the tub.

Unit commanders/Leaders which had not moved/fired/carried out any action/been activated in a move can, automatically, fire/ remove disruption in line with their inherent abilities at move end. 

A note was kept of artillery ammunition used - limited to 12 salvoes per gun - but apart from tallying the number of moves expended and the special activities detailed below there was no bookkeeping.

The actual fighting/moving/morale rules were an amalgam of Andy Callan's LF&AAS and ideas nicked from SP/NMTB, plus house conventions.

a) Detached Town Force:

While the British were setting up on the table the detached force (two of Burgoyne's regiments) were sent to secure the warehouses in Albany. They arrived at the town gates at dawn.

How matters actually went for them was not revealed (to me/Burgoyne) until after Game Move six (i.e. no actual tests on progress were made until after Game Move move 6) and only then on a throw of 6 on a 1x6D test dice made at the END of each subsequent Game Move. 

At time of The Reveal the Detached Force tested for the circumstances below.

i) On arrival a 1x6d test is made to see if there were sentries at the town stockade/if they were awake.

1-2; they were absent, tucked up in bed.

3-4; they were asleep at their posts and the British lost one move in securing them quietly.

5; they were alert, fired a warning shot and sent a courier to alert Gates. If this occurred Gates will be informed of the presence of British troops in the town at the end of the fourth move after the British entered the town. The British lose a move to subduing the sentries. 

6; There were enemy militia units manning the stockade. If this occurred Gates will be informed of the presence of British troops in the town in four moves at the end of the fourth move after the British entering. Throw 1x6D for the number of Rebel militia companies present. On a result of a 6, roll again for more.

(This force number is cumulative with no upper limit. These units will be assumed to have been taken from Gates' force. IF Gates's whole force has already been deployed on the Table then companies making up this total units must be at once removed from any unengaged Rebel militia units thereon. Otherwise these units are not available to Gates.)

Resolve resulting combat on the 1776 CRT, each round of combat taking 4 table moves. 

IF the rebel militia defeat the British Detached Force then these units will arrive on the battlefield to support Gates with a throw of 6 on a 1x6D test at the end of each subsequent rebel move.

These militia units will arrive as a single force either on the track by the fort (held by Morgan) or on the access track from Albany previously used by the British (test for this). A Token for this force will be placed in the token tub and Activated as per normal rules.   

ii) If the British got into the town successfully then the Detached Force has to cover 1000 yards or so to get to the warehouse district. They march at 75yards  plus 1x6D x 25 yards per move.

Once the detached units enter the town itself they will test per move for problems, until the warehouses are secured, on the table below (if you cannot read any of the tables open them as new tab).

Once the warehouses are secured by the British the town is deemed taken and the Detached units and the town take no more part in the table battle.

b) Fraser and the Lights:

On move six Fraser moved off with the Light Companies, Jaegers/Rangers and Indians following waypoints marked on the Table. The rules I set for myself were as follows: 

Once he enters the woodland Fraser must test each subsequent move based on standard "Hidden Enemy" protocols (Throw a 1x6D each move. On a result of 6 a card draw takes place to see if he comes under attack), EXCEPT that all Red number cards under eight are removed from the deck and the following table used:


Note: the rebel companies activated on the above will be taken from as yet unactivated commanders on table.

If all commanders have already been activated it will be taken that these units are previously undiscovered local rebel units - i.e. reinforcements not shown on the Map Game. Such units will disperse at the end of the action and NOT subsequently appear on the Map.

However, whether this occurs or not Burgoyne (I) will have no idea of Fraser's actual progress or position on the Table until and unless:

1) There is a message from Fraser regarding his position and circumstances.

However, he will only report with updates if there is something salient to report (e.g. he has run into opposition in force greater than his own, come across enemy entrenchments etc. etc.). He will give a position, but may be out by a four inch radius - the centre point being calculated from the move distance from his start position towards his target, but adjusted for deviation (see below). This message will head towards Burgoyne at 8 inches per move.

2) The sound of reasonably extensive gunfire can be heard (say two moves' worth with at least four companies engaged).

Such an occurrence will be the result of him finding the flank of the main enemy position, as planned, and engaging OR his running into unexpected opposition generated by standard "Hidden Enemy" tests (taken each move). IF such gunfire is heard the location may be marked on the table but will only be approximate, i.e. within an eight inch radius of the calculated move distance centre point, adjusted for deviation (see below). 

3) His Indians raise a column of smoke indicating to Burgoyne that Fraser is in (or within six inches of) the agreed position to harass the enemy (the final waypoint).  

Calculating Fraser's position:

Once his position needs to be calculated he will, in theory, have moved four inches plus 1x6D inches per move between waypoints (these being already marked by "pules" of smoke on the table).

However, at the start of each move from a waypoint/his current position a 1x6D will be thrown to discover if he has deviated from his intended line of march.

On a result of 3 or 4 he makes a bee-line for the next Waypoint (no deviation). 

On a throw of 1 the line of march is 5 degrees off centre to the left of said bee-line, on a throw of 2 the line of march is 10 degrees off centre to the left.

On a throw of 5 the line of march is 5 degrees off centre to the right, on a throw of 6 the line of march is 10 degrees off centre to the right.  

Note: none of these calculations (neither the distance moved nor position relative to the Waypoints will be calculated UNTIL he has reported or gunfire is heard as per 1) or 2) above OR until after move 12. After move 12 test with a Dx6 per move. On the throw of a 6 some of his scouts have arrived at the planned destination and signalled - but the position of his main force must then be calculated and placed on the table. A Token for Fraser is then added to the token tub. .

c) Ad Hoc Tests

Throughout the game there were (as usual with me) a series of ad hoc tests whenever a decision was called for for a detached Leader/Unit and Enemy leader.

Some would be specifically slewed (like the Gates example shown on the game report. Others less so. here are some VERY basic examples.


Where appropriate many such tests will be based on IMP and use two dice, with probabilities matching likely decisions (as in the gates test table in the previous post). As always; queries etc. invited re. this. 

d) Gates's Plan

We knew Burgoyne's battle plan. Did Gates have an actual plan? Or was he winging it?

There has recently been some discussion on the FB solo Group about Solo AIs, and how their "decisions" need, in some folk's eyes, to follow some kind of logical sequence or flow or plan, rather than being random. I'll post MY (idiosyncratic?) thoughts on this, and the place (or absence) of sequence, flow, planning and logic in human affairs  - and especially regarding definitive pre. 20thC battle plans (other than "this is where we'll go, and see what happens") - another time.

Meanwhile, here is a brief account of the Battle of Albany by that little known military historian Lambert Funtnell (Bart.).


"And so, with cautious Clinton hesitating beyond the creek to the south, and the brash Burgoyne pressing from the northern lakes, it would have appeared that Gates, encamped on the slopes above Albany, had placed himself in a trap of his own making. But not so.

Knowing his man, Gates, no doubt instinctively, felt he could rely upon Burgoyne to make some dramatic, and no doubt dashing, venture against his entrenchments. And so proved to be the case. True, his local levies would not stand to meet the steel-tipped musketry of the mercenary enemy; but all the better, for the old fox had a plan.

Throwing forward a taunting line of skirmishers to the Paltroon Creek bottom he drew the enemy on. Down from their secure ridge the British and their foreign lackeys came. Across the murky creek they splashed, then crawled their slow and mud-clagged way up the steep slopes on which his embattled redoubts lay. In vain, their gunners squandered their precious shells against the unyielding earthworks, where Gates's militia bands waited.

Then, just as the wily fox had foreseen; while the weary redcoats breasted his very palisades, his swift-heeled, local sons of the soil, after taking a toll with their trusty, if rustic, flintlocks, rushed to the security of their drilled and regular brethren in blue, waiting in serried ranks on the Schenectady Road.


From here, gathering his charges like a trusty shepherd, brushing aside the half-hearted efforts Fraser's savage auxiliaries and scattering of light troops, Gates and his loyal regiments slipped from his assailants' fingers; leaving the exhausted Burgoyne and his lackeys, panting with impotent frustration on the hilltop."


Next Post will continue the map campaign....
 

Thursday, 16 September 2021

Woad on Woad...

 Some Celtic Shenanigans...

Before re-jigging the table completely, a little Celtic Playtime...

A couple of years ago I downloaded the (free) "Valiant Britons" rules by Jim Wallman (link http://jimwallman.org.uk/wargame/valiant%20britons.pdf ).

These are rules more akin to a simple RPG (or some of the campaign rules in TFLs' Dux Brit.) based on Tribal Chieftainship and one-upmanship; that is they  are more about gaining Kudos vis a vis rival chiefs than simple war - though that is the final test. 

However, as per usual I was looking at the rules to see if they could be tweaked and cannibalised - in this case to add a bit more colour, chrome and personality to my solo Celtic Campaigns.


So, without further ado: 

Backstory:

The Uphincurhardui have arranged to meet a rival tribe the Damdenemi in the Vale of Apples in a fight for the possession of the valley, and its two important Druidical sites. Neither side is out to wipe out the enemy - just establish dominance; so this is an almost ritualised meeting. In theory...

Normally the Uphincurhardui would expect to have the advantage of numbers, but this time the Damdenemi have brought along some German Mercenaries to boost their side. 

I'll "fight" the Us. The AI will play the Ds.; ordering 
is lads about based on Dice-led Decisions and IMP. I will set out both sides (positions diced for. My guys in red, the enemy in green). There is a thin skirmish line in front of each army, but these are really just decorative/there to run interference to over-bold chariot chiefs. They will have no effect on actual combat.

Prep. Rules & General Stuff:

In theory all chiefs should already have Valiant Britons Kudos Levels. I will decide the Starting Kudos levels for my chiefs with a dice throw.

I will use the Valiant Britons rules re. chieftain "showing-off to gain more Kudos" rules before the violent action starts.

Basically, in this preliminary phase each chief can attempt to carry out certain acts (chariot tricks, approaching and taunting the enemy etc. etc.). Success gains him/her Kudos (If used as part of a campaign - as the original rule set intends - this, and success in battle, also has long term benefits).

More Kudos Points can then give him more influence in the coming battle; basically by impressing his own side by his antics he will get more "Psycho Points" (aka Command Points/PIPS) at a ratio of 1PP per 5 Kudos.

For most battles i would have Activation procedures for my Chiefs. However, for this exercise I am using alternate "I Go U Go" turns, with all chiefs potentially Activated. However, see below.... 

I have solo-ised (as usual) and added some other random factors below as per my usual messing about....

Command points and Orders:

At the beginning of each move The High Chief for each side makes a throw for any additional Command Points/PPs/PIPS available to him for that move over and above his Normal rating  -  Minus 1CP/PP/PIP (hereafter CPs) per Wound he has received, per Challenge he has refused or Retreat/Recoil he has made.

He can then move/act/give orders to any Warbands within his Command Radius at a cost of 1CP per move/act or command passed to a Chief/Unit within 10" of his position or 2CP per command over 10" away. He can also apply spare CPs to inspire troops in combat - with extra bonuses if he joins in too....  

HOWEVER, this is a tribal force. If the Warband concerned is over eight inches from his actual figure a further test is required ("Will the Warband Chief Obey?").  This is a simple Dx6 test.  1-2 Order Ignored. 2-5 Order Complied with.

Any Warband Chief outside the High Chief's command radius tests individually each move to determine individual initiative/attitude (1x6D). 


 Independent Chief test (1x6D): 

Result of1-2: He holds position - UNLESS flanked or has falling back/routing friendlies on flank, in which case he and his command withdraws. He may turn to meet any incoming threat. 

Result of 3-4: He may adjust position to meet any threat (forward or back, whichever gives an advantage).  If a 4 he may advance towards any enemy withdrawing within 2ft of his position. Ad Hoc decision test based on IMP.

Result of 5:  He may advance towards any enemy within 2ft of his position. Ad Hoc decision test based on IMP where ness.

Result of 6:  He may advance towards any enemy within 2ft of his position or charge any within charge move. Ad Hoc decision test based on IMP where ness.


Challenges:
 

Any Chiefs (friendly or enemy) who approach within 6" of another enemy chief's command must make a 1x6D "Challenge Test" to engage in (or continue) individual combat.

Result of 1-2: He takes position behind his own command and shouts, but does nothing Bold.

Result of 3-4: He takes position to the flank of his own command and struts. 

Result of 5:  He takes position to the front of his own command and taunts. 

Result of 6: He issues a challenge to single combat to the enemy commander.

If a challenge has been issued to a Chief he must test (ax6D) for his own resolve. 

Result of 1-5: He refuses the challenge. His command must withdraw 2" next move.

Result of 4-6: He engages in single combat with the enemy commander.

Both of the above Tests are modified by:

-1 per existing Wound (of any type)

-1 each time his command has been pushed back in the last 8 moves

+1 each time in the last 8 moves his command has pushed back an enemy unit

+2 each enemy unit his command has routed previously

+ 1 per Wound he has inflicted on an enemy Chief this move

+1 if he has refused a challenge before

+2 if he is within 10" of his High Chief 

+3 if the enemy Chief has collapsed


Individual, Chief on Chief Combat:

Really basic. Each Chief throws a 1x6 dice and looks at the score, modifying if there are any Special Factors and with minus 1 per existing wound (of any type). There are up to three rounds of combat per move.

Result: Draw or difference of 1: Combat continues.

Result: Difference of 2: Loser steps back 1". Winner tests to continue combat as Challenge Procedure as above but adds 1 to his test throw. If he continues combat then fight again. If not they both just snarl at each other till next move.

Result: Difference of 3: Loser steps back 1" and receives a Combat Wound. Winner tests to continue combat as Challenge Procedure as above but adds 2 to his test throw. If he continues combat then fight again. If not they both just snarl at each other till next move.

While Chiefs are fighting their commands stand and watch.

Each Chief can take 2 Combat Wounds. A third kills him. A Chief who collapses can be killed IF the Winner follows up the Combat.  

(Note Combat Wounds are not the same as "crash wounds". It takes 5 Wounds of all types/any combination to Collapse a Chief and 6 to kill. Thus a Chief can take two Combat Wounds on top of two Crash Wound and still fight. Another Combat Wound and he dies. Another Crash Wound and he collapses.)

If a Chief kills another Chief he may take a Head. If he subsequently manages to get this head to one of the Altars at the side of the field he may obtain a Druidical Blessing.

Special Factors: 

High Chiefs and German Chiefs* add 1 to their Challenge Test and Combat throw.

Chiefs who have taken a Head add 1 to each Test and Combat throw. 

Druidical Blessing adds another plus 1 to each Test and Combat throw.  If an ordinary Chief kills a High Chief or a German Chief these benefits are doubled. 

All benefits (and negatives for Wounds) are cumulative.

(*High Chiefs and German Chiefs: as well as being wily survivors and canny fighters these Chiefs exude an element of charisma and are regarded with a degree of superstitious awe. This is enough to unsettle all but the boldest of warriors. They also have top of the range gear.....).


  Unit Combat:

In Valiant Britons the combat is simple. I didn't fancy my usual Dice-Fest and head-counting, so I also went Simple..

When two or more opposing bodies meet in combat there a Fight. There is NO head count. Instead both sides throw a dice for each of the the units making direct, base to base contact and count ranks. The result for each side is then modified (cumulatively) with:

+1 Testing Unit is Fanatic Crazee Guys

+1 Testing Unit are Scary Foreigners

-1 Testing Unit is being attacked on flank or rear 

-1 per occasion Testing Unit has been pushed back this Fight

+ 1 per two friendly supporting ranks in excess of the first two ranks (both sides)

+ 1 per PP being applied by a nearby Chieftain (both sides)

+1 if Testing Unit is higher Social Class than enemy unit being fought

+1 if Testing Unit is mailed, helmeted and shielded

-1 if Testing Unit Chief is skulking at the rear or has just refused a Challenge

+1 if Testing Unit Chief has just won a Challenge Fight and pushed back rival

+2 if Testing Unit Chief has just won a Challenge Fight and wounded rival

+3 if Testing Unit Chief has just won a Challenge Fight and killed rival/rival has collapsed

+1 if Testing Unit up-slope of enemy

Combat Results: 

If the scores are equal or the difference is less than 3 and this is the first or second round in this combat the fight continues into next move.

If the scores are equal or the difference is less than 3 and this is the third round in this combat BOTH parties withdraw 1". 

If the one side scores more than 3 higher than the other that side wins. The other side must withdraw at least 6" but can withdraw 8" if desired by the LOSER.

Pursuit:

When a loser withdraws the winner can chose to pursue if it throws a 5 or 6 on a 1x6D test.

If it pursues it causes casualties. Throw two dice per full rank in the leading unit. This is the number of potential casualties. Throw another die per individual possible casualty.  On a throw of 4-6 the potential casualty has indeed been hit. Each potential casualty then makes a Saving Throw to see if he has "Fallen".

Figure has Maille, Shield and Helm: 4-6 saves.

 Figure has Helm & shield: 5-6 saves.

All other 6 saves. 

IF the number of fallen exceeds 3 and IF the losing Chief has been adding his PPs to the fight he is deemed to have been leading from the front and may have been hit. Throw a 1x6D. If the result is less than the number of fallen the losing Chief has been killed.  

Unit Types:

In this game Unit Types are (in descending hierarchical order):

1) Chief's Companions.

2) Knightly Class 1 (helm, maille, shield, sword-bearing/sword & spear bearing)

3) Warrior Class 2 (helm, shield, sword-bearing/sword & spear bearing)

4) Mercenaries and Fanatic Crazee Guys (shield, sword/spear, nude)

5) Warrior Class 3 (shield, sword, clothed/half-clothed) 

6) Warrior Class 4 (shield, spear, clothed/half-clothed) 

7) Warrior Class 5 (shield/no shield, half-clothed, improvised weapons) 

8) Skirmishers

So much for the rules. Now for the game played....

The Game:

For the first couple of moves the enemy just sit there... So do we.... No doubt there is a lot of shouting going on, but no action on either side...

I try to prompt something - and inspire my lads to action - I decide to do something reckless; riding my chariot straight at the enemy, get into their missile range, then swiftly away - as kind of "counting coup" to gain Kudos..

But disaster...! The chariot rolls and I fall.... Not only this but I come under fire from the enemy skirmish line, am wounded, then wounded again as I re mount the chariot... I ride back - red-faced in more ways than one... As I am the first to try this particular trick I don't lose any actual Kudos, but it looks as if it wasn't for want of trying.


Next move I use one of my PPs to move a warrior unit up to the battle line.

But my action in playing the fool has prompted something; both my own and the enemy's sub-commanders bring up their chariots to join the game.. It's "Showing Off Time"...

For a couple of moves chariots with some of the sub-chieftains of both sides (Dice tests) go racing round the field while the chaps try stunts (again, dice decided based on the rules tables; a simple solo-isation) - some more successfully than others.


The High Chiefs of both armies stay out of this, but by the third move three chiefs (one of mine and two of the enemy) have gained enough cheers and Kudos to inspire their boys forward. The battle begins...

On my right there is a clash, with both armies' "Crazy Guys" advancing; the enemy's Crazys hitting my second helm/sword group, while my own skyclad bods have nobody to fight.. Yet.... 


On my left a large body of poorly-protected lesser warrior spears charge my helmeted, sword-bearing warriors, pushing them back.

The enemy Crazys over on my right are suddenly reinforced by a unit of lighter swordsmen, and my guys are slowly forced back.

My line has still not formed - but with some shouting (CP/PP expenditure) I stiffen my lads' resolve.

Meanwhile a whole bunch of enemy spears also races across on my left to charhe my swordsmen there. 


Things aren't looking too good for my side. My Centre Right sword guys hold, but my far Right Crazy guys still have nobody to fight (they do not go into the flank of the enemy Crazys because of an uncommitted enemy warrior unit to their front which would likely take advantage).

My swords are slowly pushed back by the reinforced enemy Crazys. 

Then, suddenly, the enemy general wakes up, and leads their mercenary group forward. At the same time their swords over on my right engage my Crazys...


The enemy mercenaries push forward, and drive back my centre left. Things are looking dicey...

My left is driven back slightly - the Damdenemi spears may be low class, but there are a lot of them and they are in deep formation...

Over on my right the combat is inconclusive. My swords are being pushed back, but then both groups separate, snarling at each other.

But then there is a change - my chieftain in charge of my right-hand swords issues a challenge. It is accepted by the chief of the enemy Crazys. There is a brief bout of swordplay as the lines watch... 


Meanwhile, using the slope to their advantage, my centre charges the mercenaries. 

My chief loses his single combat over on the right. My swords withdraw, chastened, but the enemy are failing to press home here, giving me a breather; but I'm not confident.


The mercenaries attack up the slope - but are held back!

The nemy spears on my left have also come to a standstill. 


I move some of my reserve up to plug my centre, then take the unit that has seen off the mercenaries and, leading from the front, charge into the flank of the enemy spears on my left. 

They are discomforted, and slowly withdraw.

In my centre my massed troops are upsetting the mercenaries. They falter - their commander losing resolve - and pull back. My men do not pursue, but then the enemy here pull back further.

On my right centre there are some more individual combats between chiefs, then one of my warrior bands is driven back in disarray, taking casualties, then breaks as it's Chief panics. But my Crazy Guys engage a group of enemy swords and push them back; evening-up the score..


I stabilise my line, shifting units about, but in the space of two moves everything has altered. The enemy commander seems to lose his bottle - he has hung about at the back for much of the game - and although his reserves move forward, his front has stalled.

Suddenly the unit on his far left/my right break; charged by my Crazy Guys..

My reserve, in the centre, presses forward - and the mercenaries give up, and head homewards. This is NOT expected. The enemy reserve moves forward, but, seeing this, halts, then likewise turns to head off, and over on my left the enemy spears withdraw, wavering but snarling.

Although the enemy's Crazy Bods and one of their sword units hold their centre, the rest of the Damdenemi army is pulling back..

The day is ours !!! Though nobody is more surprised than I.......


Conclusion:

That was great fun - and I'm going to have another play or two. No heads taken, but it was fun, fast and furious - all over in a couple of hours (unusual for one of my games).

I think the Valiant Britons is would be a fun set of rules and an interesting concept for a group of club to mess about with (that seems to be its intention), but the rules could also easily be played as a board game. Extra "chrome" in the form of pre-made characters/character cards could add colour if live opponents were lacking or for use in a solo campaign.

I solo-ised the Kudos-grabbing Stunts tables by the addition of simple dice tests to decide what stunts would be attempted by individual Chiefs (except for my figure. I had a choice there) and this worked.

The single combats felt right for the "flavour", and worked.

The simple combat mechanics likewise worked.

All in all, this had a nice feeling of being a ritualistic process - like a lot of so called "primitive warfare", rather than a knock-em down fight; which felt about right for this kind of low-level tribal clash....

I maybe need to think about applying some of my other "Tribal Army" 
conventions, but all in all I was happy with the feel of things. As I say, the Valiant Britons rule set is out there for free - and I had a lot of fun with them.. 

I have a set of the "Tribal" rules by Mana Press which I mean to try sometime, so, as always: watch this space - and any comments, thoughts or queries welcome. 


Sunday, 13 June 2021

Into The Woods...

A Hobbity Adventure..

I don't do a lot of Fantasy these days, but used to have lot of fun with Solo RPG campaigns. Anyhoo... After the impulsive 1/72 Halfling "conversions" mentioned the other week I thought they ought to have an outing, so.....

Fetching Marigold (or a L
ittle, Mini Fantasy Game for the Wee Folk).

Tobo Winterbourne of Bree is desperately seeking Marigold (Mari) Tumbledown, a renowned Halfing Lore-mistress and Midwife, to advise on his brother's wife's troubled pregnancy.

The difficulty is that, some six years back, Mari fell foul of the bureaucrats of the Breeland "Department of Little'un Affairs" over a "herbal licensing issue" (themselves seemingly having come under pressure from the town's Midwives' Guild, due to Mari's growing popularity with  child-bearing women of all sizes). As a result, Mari and her sisters left town in a huff, and have not been seen since.

Rumour has it that Mari and siblings have been living in a "converted" ancient burial mound surrounded by an arm of  The Old Forest. 


Here, protected from casual or bureaucratic interference from the outside world,  it is said they carry out their eldritch experiments undisturbed. Nobody really knows - or cares to investigate; due to 
tales of the horrors of the dark woodlands, the beasts therein and stories of the sisters' unnatural trafficking with all manner of strange creatures, from wraiths to talking trees.....

More prosaically, it is said that the sisters now make a living from commissions and unofficial, material support from Buckland; even from the family of the Master of Buckland himself. However, not only is THAT thought to be too far fetched, but a long festering feud between Tobo's family and Buckland folk prevents his party following up any leads in that direction....

The group must make their way through the countryside, brave the potential perils of the woods and find the sisters. They must then persuade Mari to come back with them to Bree in secret.

Having recruited the human woodsman and scout Greyhood as guide, the plan is to go west along the Great Road until the Old Forest comes into view (hopefully on the third day).

[Technical Notes: To get to/from the woods I ran a basic RPG style expedition test but these journeys were uneventful.

On arrival at the edge of the Forest the party must search for a path. There is a possible path every 6 inches of Forest (or path edge if they reach a dead end). Tests are made on a 1x6D. On a result of 5 or 6 a hidden path/track is found by Greyhood. Anyone else finds a path on a 6. Each 6 inches of edge can only be tested once.

The length of path visible is 3x6Dx inches long. Movement (unencumbered) is 6 inches plus 1x6D along the visible path.

Each move an Encounter test must be made on a Dx12. On a result of 12 consult the Encounter Table. Note that the further into the Forest the party goes the more the encounter result is affected.

On reaching the end of that visible path the Path Dice is thrown. Possible results are "Path Continues Straight", "Path Curves" (test for right or left), "Path Bends (90% bend ditto), "Dead End" and "Special".

A result of "Special" means make an Encounter Test, then test  on the Path Dice again. A further "Special" result means the path diverts towards the target.

On reaching the target Tobo must persuade Mari to come to Bree  - and her sisters to allow her to. This will be settled by Dice Tests. Each such test takes one whole move.

Each move represents 15 minutes. It will be dark in 10 hours from the first move. Resting in the Forest in the dark will increase the chance of encounters by adding 4 to the test throw (in addition to any other modifiers). It is assumed that trap/stationary encounters, if it is decided to rest in the Forest overnight, are due to someone discretely going into the Bush for personal reasons during the hours of darkness. In the event of an effective Encounter result test by dice throw for whoever is affected.]

The Story:

The group arrived at the Forest edge and started searching for paths. At first they were unsuccessful, but a couple of moves in Greyhood found a track leading into the woods.


The party followed this, but it came to a dead end on their second move along it. Not only this, but a Spike Trap was seen [Encounter and Observation Test]. Greyhood had spotted it, but  then triggered it while trying to disarm it. However, he managed to avoid taking any damage.

The group then searched both sides of the path for any side tracks, at last discovering one. They started to move along this (Greyhood leading) only to have another Spike Trap trigger, wounding Greyhood (the perils of leading from the front, I guess). 


The party followed the trail as it curved until....!!


They emerged once more into the open country...  So THAT was all a waste of time.

Going back along the track and searching for other paths led nowhere, so they had to leave the trees and beat along the Forest edge again hoping to locate a way in.

At last another track was found. 

They followed this as it meandered along, and they made good progress for about four moves. Things seemed to be progressing well. 


 Pressing forwards along the track on they reach.. another dead end.


But all is not lost... A little bashing along the foliage at the track sides they find another rough trail (roughly) headed in the right direction... Excellent. They make good progress.. 


Until.... Ooops... Greyhood failed to spot - and fell into - a Pit Trap.

This time he was seriously hurt. The Hobbits pulled him out, but he was too badly injured to move without aid. This was not looking good.


By-passing the pit Tobo followed the path, then, luckily, on the next path test they broke into a clearing just yards from the Pit. Carrying Greyhood to the (relative) safety of the open space they rested.


After some discussion it was decided to split the group. Tobo, Sam, Tam and Bob would press on along the clearing (a low, open ridge) to try to find Mari. Perri and Timmo will wait in the clearing to tend to and guard Greyhood.

Tobos' party moved onwards, keeping to the clearing as long as possible, then, luckily, finding a track in the right direction. Soon they reached a large clearing and... The old barrow. They had reached their target...


Then came the approach to the door of the Hobbit Home, and Tobo's negotiations  with Marigold and her sisters.. 


The Hobbit ladies are not too keen on the idea of marigold venturing back into Bree - and there is a long, and lively, discussion... 

Luckily the persasive powers of the Bree-landers, plus the handing over of ALL of Tobos's gifts, Mari eventually agreed to accompany the party back to Bree.

Another hour was lost as Mari packed, then the party set off. But by the time they reached Greyhood it was getting late. Mari patched the man up, but night was approaching, and Mari refused to sleep outside unnecessarily.

The group therefore returned to Marigold's home for the night, bringing Greyhood. Luckily all this coming and going - and the night itself -  proved uneventful...

The next morning the whole party set off. Following the path on which they had come they had no issues or encounters... 

and, on reaching the edge of the forest set off Bree-wards without incident... 


Summary:

Well, that was a fun little game. Nothing revolutionary, but I wanted to test out my "Lost In A Forest" ideas and the "Path Dice" and that worked well - if the path issue was a tad frustrating at times - as it should be; as anyone else who has got lost in a forest (inc. m'self; several times here in UK - including on one occasion alone in full Tudor kit - and once in Nigeria) will no doubt testify...

It also gave the the opportunity to get out and tidy up ALL my Temperate trees....

Do I hear the tread of legions calling while they're on the table....? Hmmm.....

As always, any comments or queries. 


A Little Action..

But not a lot... With the reenactment season in full swing, D&D commitments, bedding in the new cat and having to pen (and play in) a fa...