The Battle:
OK... Previous posts looked at how we got to where we are.
Burgoyne's (my) main force moves off just (two moves) before dawn.
However, on arrival "On The Field" there is a chance the
enemy will scupper British plans before things start by having units out n'
about on patrol or as a screen (someone like Arnold insisting the job
is done properly?).
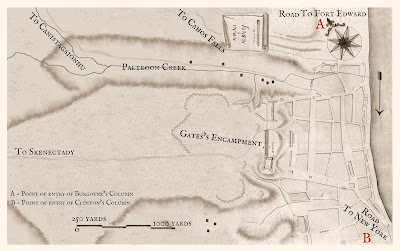
The British units start in column of march along the Cahos
Falls track, but screened/preceded by the Lights, Jaeger and Indians;
who will "clear the ground, testing per move as per my standard
Hidden Enemy protocols (but with a card deck of two black suits - as
dummy cards - and one suit of red cards, minus the Character Cards,
due to Gates's cautious personality).
As it happens this
whole process, including the unlimbering of the heavy guns and the
movement into their starting positions by the infantry, takes five
moves in total with no enemy interference. Maybe they're still abed? The battle proper can now commence.
The battle opens with a volley from the guns into the enemy camp. No casualties, but it got their attention.
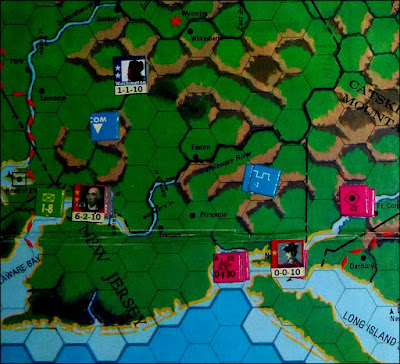
I randomly draw and place the various Rebel Commanders (their individual commands having been allocated on the Board Game board).
Over the next few moves three out of the four rebel brigades activate, but only Morgan (based in the old fort overlooking Albany) does anything active, moving two of his regiments towards the firing of the British cannon - possibly intending to pot at the artilleryists with his rifles. But to do this properly he would have to come down off the hill he is tasked to defend. He resists the temptation.
(Note: that in randomised initial positions for the rebel brigades Arnold - who would likely have been pro-active - drew to man the defences facing Clinton, off table...)
The others Colonial brigade commanders elect to keep their men out of the direct fire from my heavy guns and back from their entrenchment line. Probably a wise move if Gates isn't going to to order an attack.
With neither side willing to make a serious move time passes. Burgoyne is waiting to hear from the Town and Fraser. Gates is simply cautious.
By move six Burgoyne gets an update from the town (see next post for the process used). There was no resistance at the town stockade. The troops were stoned by children while marching through the streets at one stage, and some men returned fire without orders (their names have been taken for later punishment). Luckily no casualties ensued, and the warehouse district was secured without further incident.
Meanwhile Fraser is still somewhere out there in the woods.
Burgoyne now has a choice..
a) Call off today's attack on Gates's defences; holding position while sending more men into the town (perhaps the grenadiers?) in case Gates decides to move in that direction, meanwhile bringing up his supplies and back-up to nearer the town. At the same time he should be informing Clinton that the town is theirs, but that they should both coordinate an attack on Gates on the morrow. The only problem with calling off the attack is letting Fraser know.
b) Proceed with the original plan - but now that most of the enemy are visible it is very clear that Burgoyne does NOT have the three times superiority he ought to have to secure an attack on a fortified place. However, if Fraser paralyses Gates with his flank attack and distracts the commander of the main position, a sudden rush across the valley, following and supported by an all-out bombardment, might still succeed.
Burgoyne elects to stick with the plan.
Meanwhile, Gates, concerned by the tooled-up British force sitting on the hill opposite his position and the news from the town, moves himself and a Continental Army regiment up to the Main Redoubt. He starts positioning men to defend against an assault from the north. All this seems sensible.
Morgan's rifles push on to the creek, where they begin sniping at the grenadiers. Lincoln, commanding the small redoubt overlooking the bostals, following Morgan's example, orders a militia unit forward to harass Burgoyne's gunners. Both these moves are unauthorised by Gates, but he sees no reason to call them back.
The commander of the Grenadier brigade, von Riedesel, adjusts his line to meet the threat from the enemy skirmishers, who are now peppering his men, while the artillery opens fire on Lincoln's men as they make their way down the open slopes towards the cover by the creek.

As more rebel skirmishers reach the creek von Riedesel has sudden change of mind. Perhaps hoping to tempt the skirmishers into crossing the creek he withdraws his command to the reverse slope of the small ridge he is on and tries to keep his men's' spirits up (removing Disorder Markers caused by the sniping).
Up on the main ridge Gate's now makes what may prove to be the clinching move. Clearly concerned by the British across the creek, and, seeing the grenadiers taking advantage of the reverse slope, maybe he is wondering what else Burgoyne has concealed up his sleeve behind the track. Whatever the reason, Gates summons two Continental Army regiments from the woodland redoubt on the west up to the main ridge. This reduces the number of men guarding his flank, but will strengthen the Main Redoubt.
Unknown to Gates, it is still thought by the British colonels that the redcoats will likely get a very bloody nose if Burgoyne tries to assault with his five regiments against Gates's entrenched ten.
Burgoyne's guns, surprisingly, now exchange fire with Lincoln's militia, both sides taking hits, but the rain of heavy balls smashing though the trees around them, and the dropping howitzer shells are upsetting the inexperienced militiamen, who start to fall.
The next move von Riedesel reorganises his grenadiers in the safe area below the small ridge. Lincoln's skirmishers again open up on the gunners who, instructed by Burgoyne, also seek the safety of the reverse slope.
With the British gunners and grenadier on the reverse slope - and Lincoln's shaken skirmishers and Morgan's riflemen not being stupid enough to cross the creek - things have reached a stalemate in the valley.
Only the Continental Army two regiments summoned by Gates (and which have decided to go the long way round to the Main Redoubt by road, rather than cross country and up the steep rear face of the hill) are moving.
It is now approaching midday. Suddenly, near eastern edge of the woodland west of the redoubts there is a plume of smoke... Fraser has signalled that he is in position.
Burgoyne at once launches one of his British brigades and von Riedesel's grenadiers brigade down the ridge towards the stream, and brings back his artillery crews to their guns. The gambler makes his throw.....

Suddenly - and fortuitously for Burgoyne - there is a whooping and a hollering as Fraser's, Lights, Jaegers, Indians and Highlanders rush the westernmost of Gate's defences - catching the Continentals there by surprise; they are standing easy, and not even close-manning the barricades as Fraser's men sweep in. There is brief fight, before the shocked Continentals turn and run. Fraser's men have taken the woodside entrenchments at a single blow, but now have to halt to reorganise.

The Continental are running, but more due to surprise and shock than actual casualties.
The British guns open up on the Main Redoubt, but do little damage. Gates hesitates, then orders two militia regiments to the man rear of the Main Redoubt, to prevent Fraser sweeping up the slope, and two more to man the front facing Burgoyne.
Meanwhile the the Continental brigade who ran from Fraser's Lights and Indians reform, and the two regiments ahead of them (which were earlier ordered to march to the Main Redoubt) halt, and form line to face Fraser.
At the creek, Morgan's riflemen pull back - intimidated by the approach of the Grenadiers - and just in time as, with unexpected speed (good dice) these rush down the slope and splash across the stream to occupy the very position Morgan's men had recently stood.
With most of the British from the ridge now across the creek and Fraser's troops deployed to command the Schenectady road (his only viable line of retreat) Gates has a dilemma; to deal with Fraser now, or see off Burgoyne first. He hesitates.
Next move von Riedesel is activated first. His men order their ranks and shed their disorder, five companies firing into the backs of Morgan's rifles, sowing more confusion.
Gates rides off the ridge to pass orders to the troops on the lower ground facing Fraser. He can be reasonable confident that his troops in the redoubts can hold Burgoyne's gamble, so it looks like he wants to concentrate on drive Fraser back into the woods. He has four regiments of Continentals and two of Militia to hand. He could also draw off another Continental regiment from the bostal redoubt, just to make sure.
Burgoyne's guns batter the redoubt, while his redcoats reorganise themselves after crossing the creek. Burgoyne himself brings down one of the two reserve regiments from the ridge, leaving the other to protect the guns.
Despite their disruption level, and the British forces from the ridge moving swiftly at them and in reach of both flanks - not to mention Morgan's rifles' speedy withdrawal on their right - Lincoln's skirmishers down by the creek and fronting the bostal redoubt, elect to hold position and open fire on the redcoats. They cause no damage, but one has to admire their (surprising) pluck.
Having crossed the creek, Burgoyne's leading British battalions slowly move up the main ridge, flanking Lincoln's skirmishers.
At the next opportunity Morgan's rifles pull back further towards the defence line of the town, meanwhile, von Reidesel's Hessians, facing them, deploy towards the westernmost bostal (evidently he does not fancy going up the eastern arm, flanked as it is from both sides) while his British grenadier companies charge into the flank of Lincoln's skirmishers by the creek. Unsurprisingly these skedaddle up the hill; but not after some losses to the grenadiers' bayonets and being shot at, as they run, by the artillery.....
Frazers Light troops deploy, with his Rangers shooting up at the militia manning the rear slopes of the Main Redoubt, while his Highlanders slog up the slope on their flank, where they are met by an (ineffective) volley from the militia there.

The Indians meanwhile scuttle between the redoubt hill and the woods, seemingly with the intent to flank the defences. Seeing this the brigadier at the redoubt swivels his reserve regiment of Continentals to face this threat, just in case.
South of the Main Redoubt the four Continental regiments advance on Fraser's light companies. If Gates's plan here is to secure the Schenectady road this looks likely to succeed.
And so another move ends as we creep into early to mid afternoon.
Personally, at this stage, I cannot see Burgoyne's attack on the ridge succeeding without heavy loss. His only real hope, I feel, lies in Fraser so upsetting things on the flank of the Main Redoubt that the garrison here loses its nerve. I'm convinced that any attack on the entrenchments will prove costly. On the other hand, most of the Continental regiments are south of the Main Redoubt, facing Fraser, so the redcoats will mainly be up against untried militia... Maybe it's worth pushing luck a little further..? Burgoyne certainly thinks so.
Lincoln's skirmishers keep running, but as they scramble up the broken ground flanking the nearest bostal it's noticeable that some are slinking off the field, such is their level of disruption.
The British artillery again turns it's attention to the Main Redoubt, while Gates rides to help reduce the disruption among his Continental regiments threatening Fraser. The British light companies facing them open fire, to little effect.
However, on the main ridge a sudden charge by the Highlanders and Rangers is too much for the militia on the west side of the redoubt, and they turn and flee, upsetting their supports. Just to make matters worse Burgoyne himself is the next commander to be activated. In good order his regiments make their way up the main ridge.
Over near the town fort Morgan steadies his rifles and awaits developments, while Lincoln rallies his skirmishers.
The Continentals to the south of the ridge adjust position to take into the account issues on the main ridge, and one regiment fires upon Fraser's light companies, causing little damage.
Up in the Main Redoubt the commander here seems to panic, drawing back a regiment from the north-facing entrenchments to bolster the unit of Continentals facing Fraser's highlanders, but upsetting them in the process. The Continentals would like to get off a volley into Fraser's men, but the range is too great.
Next move, and Gate's on the south side of the ridge, can't see what's happening in the redoubt. By the same token, Burgoyne can't see what's occurring in the fortifications either.
The MORE good luck for the British; Fraser is the first commander to be activated. The Rangers slam into the flank of one of the militia units in the Main Redoubt while the Highlanders, Fraser at their head, charge the Continentals. The militia unit panics and routs. The Continentals also turn and run, upsetting the nearby militia units at the entrenchments. Suddenly all is going to pot in the Main Redoubt as the commander here gets cut down by the Highlanders. The bagpipes of the Highlanders and the war whoops of their supporting Indians echo along the entrenchments, further upsetting the militia.

Next, the grenadiers start moving up the slope to the bostal, then (the luck is all going the Britishers' way) Burgoyne is activated! The lead British regiments reach the breastworks; they aren't even charging - but this is enough for the militia facing them. Already shaken by the other rebel units withdrawing or routing, and the falling of the redoubt commander, these too make off, only to be struck by a salvo from the British guns....

Lincoln and Morgan brace themselves for an attack, but do nothing aggressive.
Meanwhile, Gates is determined to secure the line of retreat to Schenectady, and, after getting his men in order, pushes two regiments towards Fraser's light infantry.
That last bound was a bad one for the Americans. The Main Redoubt has all but fallen and all the units in it have been discomforted in one way or another. However, Morgan and Lincoln still hold their entrenched positions and Gates has four Continental regiments in hand south of the Main Redoubt. All is not lost - and the British KNOW that they have been VERY lucky in getting into the Main Redoubt so cheaply...
Next go the British guns open up on Lincoln's redoubt, but to no discernible effect. The broken militia flee from the Main redoubt while the regimental commanders there make their own decisions to pull back and consolidate - the overall commander being hors de combat.
The Hessians start climbing the bostal. Burgoyne is activated and another of his regiments charges into the main redoubt, driving back a small militia unit.
To the south of the Main Redoubt the Continentals exchange fire on Fraser's lights and sort themselves out into defensive lines in case any enemy swarm down from the ridge. Gates rides off, hat in hand, to the routing militia - successfully rallying one regiment.
Next move - we are now into mid afternoon - Fraser's Lights south of the Main Redoubt again come under volley fire, and scurry back to the cover of the woodside entrenchments.
Fraser is activated. He sorts out his Highlanders and moves them forward in the Main Redoubt, while his Rangers both advance and give a harassing fire to those of the redoubt garrison still showing fight. Meanwhile his Indians, like a bad movie, rush to the skyline of the Main Redoubt ridge and glower down on the Continentals below and to the south.
Over towards the town Morgan decides to hold his ground, while von Reidesel's men carry on, clambering up the up the western bostal stream-bed.
In the Main Redoubt Burgoyne's regiments either get themselves back into order or open fire - or, in once case, charge the defenders; forcing one militia regiment to break off contact and routing another. These units fall back through the other rebel units in the redoubt, causing more disorder - as well as upsetting Lincoln's skirmishers on their flank. To all intents and purposes the Main Redoubt has now fallen to the British.
While the British guns open up on his redoubt, Lincoln's skirmishers in turn open fire on the British Grenadiers, causing some shock - and that ends another move.
Next go Fraser sorts out his men, moving the Highlanders towards the woods. His Lights reform down by the woodland entrenchments. Some of his Indians and rangers open fire on their nearest Continentals, but to little effect.
The remaining rebels begin to withdraw in good order from the Main Redoubt.
By the bostal some of the Hessians reform themselves, others open fire on Lincoln's men, who also come under fire from the artillery. The British grenadier companies charge and push back Lincoln's skirmishers, while Morgan shifts HIS rifles over the bostal ridge to support Lincoln.
One of Burgoyne's regiments charges one of the militia units falling back from the redoubt and speeds it on it's way, while another flanks Lincoln' skirmishers. End of the move - and Gates doesn't get activated.....
At the beginning of the next bound Fraser's Indians and Lights fire upon the Continentals below the Main Redoubt, while his Rangers and Highlanders deploy. Another broken militia unit flees off table and the British guns fire off one of their last salvoes into Lincoln's redoubt.
But then Gates is activated.. I reckon he now has some serious choices to make...
Gates's Options
It looks to me that Gates is in a bit of a pickle.
He has six militia regiments already at breaking point or actually broken (both have already left the table), with one of his Continental regiments wavering.
He has lost the Main Redoubt to the enemy.
However, he still has four Continental Army regiments in the south which are more or less intact and in good order.
Although Lincoln and Morgan's are redoubts holding steady, and their regiments (seven militia and once CA) are relatively unblooded and secure, there is a danger they will soon be attacked by Burgoyne and von Reidesal's troops. Experience has shown that the militia will likely not stand when charged.
Even if the British are thrown back from or hold off attacking these redoubts today they will still hold the Main Redoubt, and likely cut the Schenectady road - Gates's only line of retreat - if they bring some of their heavy guns up to the main redoubt overnight.
Gates knows that, off-table, the town has been occupied and that Clinton (with fifteen regiments and more heavy guns) waits in the wings, likely to attack Arnold's four militia regiments tomorrow.
Although it looks like an attack on Lincoln's redoubt is imminent, if this falls Burgoyne may well be satisfied with the day's gains and may not risk pressing on further south. If this turns out to be the case - or if Lincoln holds - then this could allow Gates to extract him and Morgan to join with the Continental Army units, plus the militia units now retreating from the Main Redoubt. With his force concentrated (and stabilised) south of the Main Redoubt he can then decide to either:
1) Push past Fraser's Light Infantry, extract Morgan and Lincoln from their redoubts before they are assaulted and pull his force away down the Schenectady road (informing Arnold of the plan and instructing him to also withdraw towards Schenectady in the night).
Pluses: He gets his army away pretty much intact and avoids another action tomorrow - with the combined armies of Burgoyne and Clinton attacking him; leaving him a chance to fight another day.
Negatives; This is admitting defeat, plus he will be abandoning Albany and his heavy supplies in the Main Redoubt.
2) Attempt to establish a new defensive position off-table behind Arnold (who is holding the south-facing defences).
Pluses: His army is still pretty much intact and he may well give a bloody nose to the combined armies of Burgoyne and Clinton if they attack him tomorrow.
Negatives; He will be abandoning Albany and his heavy supplies in the Main Redoubt. He may become trapped and put to siege, rather than assaulted. If he loses, whether in open battle or siege, his army will likely to be lost to the Struggle.
3) Reorganise on-table and attempt to retake the Main Redoubt.
Pluses: He may regain his heavy supplies in the Main Redoubt, making a night-time retreat to Schenectady less humiliating, plus securing the Schenectady road to allow the extraction of Lincoln and Morgan (and off-table Arnold).
Negatives: He may lose heavily, Lincoln and Morgan could be cut off, and swamped - or forced to accept terms - tomorrow.
4) Reorganise on-table and attempt to retake Albany.
Pluses: His army is still pretty much intact and he may well give a bloody nose to the combined armies of Burgoyne and Clinton if they attack him tomorrow.
Negatives; He will be abandoning his heavy supplies in the Main Redoubt. He may become trapped and put to siege in Albany, rather than assaulted. If he loses, whether by storm or siege, his army will likely to be lost to the Struggle.
5) Leaving Morgan and Lincoln in position, reorganise on-table and attack Burgoyne with what forces he has at what seems the best place - possibly pushing Burgoyne back.
Pluses: He may regain his heavy supplies in the Main Redoubt. By rebuffing Burgoyne this will make a night-time retreat to Schenectady less humiliating, plus securing the Schenectady road to allow a retreat overnight.
Negatives: He may lose heavily and be knocked back with losses. If so, Lincoln and Morgan could be cut off, and swamped - or forced to accept terms – tomorrow.
None of the above are ideal, but then, he is in a bad position. I scribble a quick Ad Hoc Decision table:
Result is a nine - Option 1. Given Gates's situation I will switch player and play him, with Burgoyne "going on automatic". An aid is sent off to inform Morgan and Lincoln.
But before any action can be taken first Burgoyne, then von Reidesel are activated and throw their regiments at Lincoln's troops, Morgan's Rifles and the remaining dispirited garrison of the Main Reboubt. The militia on the slopes from the Main Redoubt and in Lincoln's redoubt will not meet the bayonets of the Hessians and Redcoats and three units break. Morgan's men retreat to their supports.
Gates has suddenly had the situation taken out of his hands. With more than half his army routed or wavering near breaking point all that can be done is to salvage what he can from the wreck and pull back towards Schenectady. Luckily Burgoyne and Reidesel's men are too exhausted to pursue. All is over bar the withdrawal.
In campaign terms this was not a disaster for the rebels. Losing Albany and the supply train was bad, but Gates got away with most of his army.
Burgoyne will claim this as a win - but in strategic terms it was not. OK, Albany was taken and Burgoyne's army suffered minimal casualties in pushing gates off his perch, but now Gates can head north towards Lafayette. Had Burgoyne waited for Clinton to be ready this could (and should) have been a decisive victory.
Conclusion:
Well, that was an exciting little game which did NOT end as I expected - I fully anticipated Burgoyne getting a bloody nose; but then I hadn't fought this kind of fight with these rules before.
The result was partly due to a LOT of luck on the British side regarding Gates's initial dispositions, good Leader Activation/good movement dice and Fraser's successful progress though the woods. Add to that mix a LOT of aggressive action test results on the part of the British junior commanders (plus the failure, on EACH occasion when tested, of the militia to hold the ground they were given when faced with a bayonet charge) and maybe this was too one-sided a fight.
The British artillery was pretty ineffective though.
Technical thoughts: I need to make some different colour-coded markers for Disruption Levels and Casualties.
I may consider making some "formation change templates".
I maybe need to research/revisit/revise the rules regarding heavy gunnery, esp. howitzers.
I need to do some more reading-up on British officer casualties.
Had I not been doing a lot of reading which challenges a lot of the myths about the AWI I would have been more concerned by the results.
As it is, the adjusting of the traditional picture of the effectiveness (or otherwise) of musketry and the taking into consideration how British troops ACTUALLY behaved and fought in this period (amongst other things the lying down/using reverse slopes when under fire during this period - a practice I had previously understood to have been adopted later, in the Napoleonic Wars, rapidity of approach, flexibility and the speedy nature of British charges) meant that the rules seemed to reflect the reality quite well.
Next post will consider some of the rules and off-table action processes I used for this game, along with some technical notes and decision table examples.
As always, any thoughts, queries, critiques and comments welcome.