- as the case might be...
Following the French decision to make some sort of showing in the face of the large enemy army approaching along the road from London (rather than scuttling back to Hastings) I have, as is my sad little wont, been looking at the geography and trying to put myself into the head of the commander of the French force at Chatham.
It's obvious that, given the scale and nature of the Game map, "Chatham" clearly means the whole Chatham/Rochester area - i.e. the Royal Dockyard at Chatham, yes, but also the city and bridge at Rochester. Strangely the map does NOT show the River Medway as a potential issue in a military context (Odd, if you know the river. Odder still, if one knows one's history.).


So, although the Government army is, in map terms, happy to attack the French, and the French happy to meet them, instead of jumping straight into a battle I'm going to go all "Yours To Reason Why" and look at the options open to Richelieu and let the dice decide.

These options, looking at the real ground, rather than just the game map, seem to be:

1) Stand and fight in the Rochester/Chatham area. I doubt if George will want to fight a contested river crossing at the bridge itself, so to get him across the river the French would have to ALLOW him over (too much of a touch of The Battle of Maldon here..?). But there are obstacles on which to rest one's flanks and limit George's options once he is over the river. [Hmmm... Brave, but if the enemy mess it up, possibly a good option?]
2) Pull east of Rochester and make for the hills to the east of the city, positioning on rising ground and awaiting the enemy. [Brave and chivalrous, but possibly asking for a defeat, given the odds and chances of outflanking.]
(Note: It seems that there were no significant landward defences of the Royal Dockyards built until the 1750s, so hunkering down there - something which occurred to me given my knowledge of the site - is not, I think, a viable option.)

3) Destroy the bridge at Rochester and the Royal Dockyards before marching to the Tunbridge Wells box.
(As with other boxes on the game map this seems named for familiarity rather than accuracy. Tunbridge Wells was more a fashionable resort, than a strategic hub.
Tunbridge/Tonbridge - the major junction, river crossing (and associated castle) might have been more apt for this box, but there we are).
[This option would involve marching through the countryside/down country roads and possibly asking for being caught and brought to battle in the difficult ground of the Weald. Hmmm.. Knowing the ground I wouldn't fancy it myself.]
4) Ditto re. the bridge and dockyards, but march back to Hastings after all [What the Council voted NOT to do. As above, with the "retracing our steps" factor.].
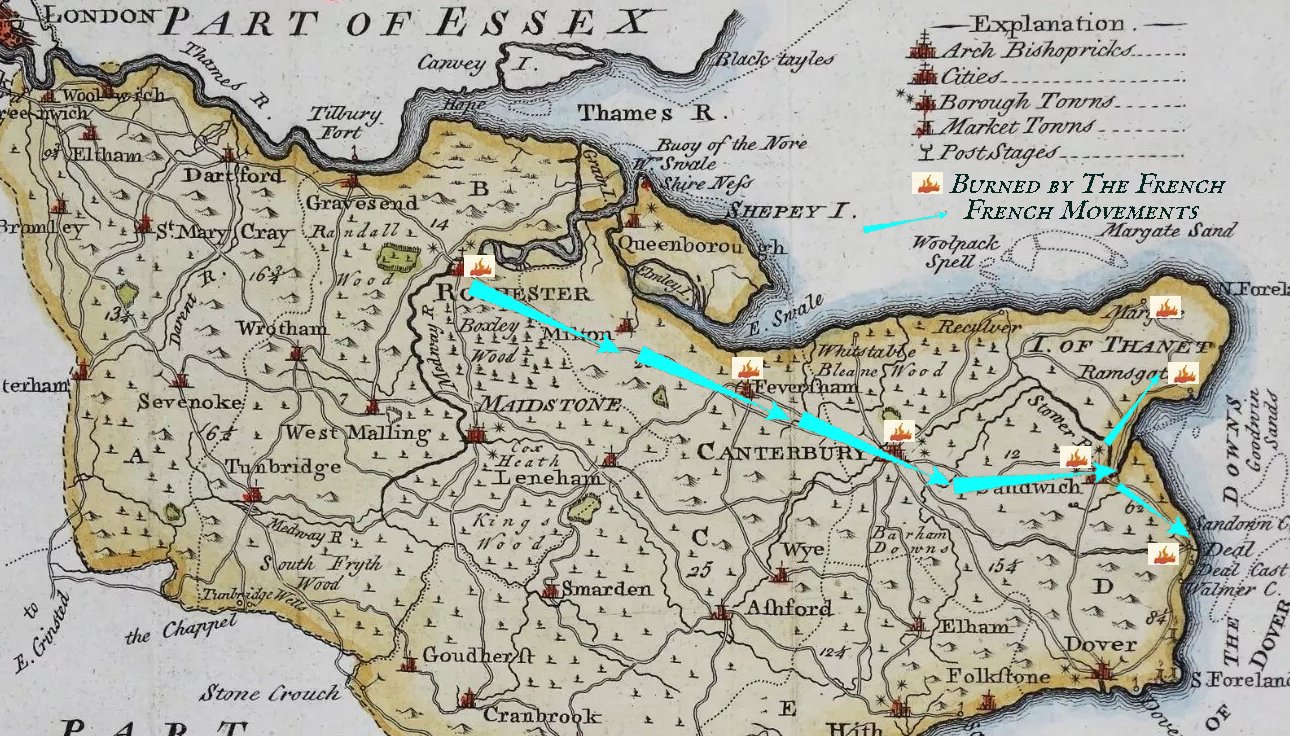
5) Ditto re. the b. and d. and march along the north Kent coast, via Canterbury, to Ramsgate, destroying any Public Buildings or other facilities at Faversham, Ramsgate, Sandwich, Margate and Deal en route (Sandwich being one of the old Cinque Ports and the others being "Limbs", so a political coup, if not a major military one).
[If making good time this could have legs for the French. The enemy would have to swing south to cross the Medway, giving time for the French to push quickly east along the clear, straight old Roman road; this route being easy to follow, well inhabited and being generally easy going, while providing a number of likely good battle sites if brought to ground. Entering Canterbury would be a coup of itself, as well as giving access to supplies.]
6) As above re. the bridge & docks, and march (again, via Canterbury) to Dover to destroy the port facilities there, and possibly take the castle (a major political coup). [Good to reasonable roads. The Canterbury factor. Dover Castle would be a HARD nut to crack - if properly garrisoned - but what a coup.]
No other obvious options come to mind at the moment. Decisions, decisions...
OK, let's assess the odds, and let the dice (3x6d) make a decision...

Option 2 - Throw of 3 or 18.
Option 3 - Throw of 5 or 16.
Option 4 - Throw of 11 or 15.
Option 5 - Throw of 6 to 11.
Option 6 - Throw of 12 to 14.
The dice say 10. Option 5. OK.... In terms of the overall campaign game lets say I have three weeks before the next map move.
So, what to do now? Skip straight to the next Game Move? Why make life easy for myself..?
So, I will revert to a simple, daily "War Diary" mode for this operation.
No Blitzkrieg here.. All movement is likely to take plaxce on road, and all will be relatively slow (on single carriageway with minimal alternative practical routes, so some units cannot move until others have moved and you are likely to have the "some are just setting off as some are arriving" situation.). I will be guided by the map, online resources for distances etc. - as well as details and locations.

Day One:
Government army leaves London. Stops at Shooters Hill.
Day Two:
French blow up bridge. Detachments continue with destruction at dockyards while main force moves east along the Canterbury road until Sittingbourne.
Day Three:
Royal army reaches Gads Hill. Rumours of destruction of bridge at Rochester and burning of the dockyard are confirmed.
French army detachments burn docks and town hall at Faversham while heavy wagons and main force marches to Harbeldown.

Government army foot assembles at Borstal. Cavalry sent to reconnoitre Rochester.
Day Six: Government army foot enters Rochester. King inspects damage. Wagons etc. catch up main force.
Day Seven:
French army enters Sandwich. One brigade and cavalry dispatched to Isle of Thanet to carry out damage there. Fishing vessels commandeered and dispatches sent to France regarding current situation. Dockyard and town hall burned.
Day Eight:
Government army enters Faversham. King inspects damage. Army waits for any delayed wagons etc. to catch up.

Battle of Ramsgate - minor skirmish where the French "Brigade of Destruction" meet Ramsgate Garrison*.
Main French force rests. Council of War to decide next move. Inconclusive.
[I'm assuming there isn't a whole regiment at Ramsgate, but, again, the map box represents the whole Ramsgate/Sandwich/Deal castle/Sandown castle/Walmer castle complex, with men parcelled out in penny-packets. This seems reasonable. In terms of the Board Game rules this would be an "overun" anyway. Alas, I have no larger scale figures for this period, so a 1/72 skirmish game is out of the question.]
Day Eight:
Government army enters Faversham. King inspects damage. Army waits for any delayed wagons etc. to catch up.


Day Nine:
Government army enters Canterbury. King inspects damage. Service in cathedral. Reports come in regarding French activity in Sandwich/Thanet area. Council of War. Options discussed include pushing for Dover, splitting force to deal with French destruction and retake Sandwich or concentrate on catching French army.
The French march to Deal. They have only battalion guns (OK, taking naval guns from Chatham and putting them on wagons would have slowed them down, but...) so can only make token bombardment of the castles at Sandown, Deal and Walmer. Are rejoined by the brigade sent to Thanet.

Day Ten:Government army dispatches flying column on forced march to Dover under Albermarle. Arrives at nightfall and enters the castle. The King, the Hessians, two regiments of foot, the wagons and the heavy weapons remain at Canterbury..

Scouts bring news of Government forces at Dover and Canterbury. French Council of War. Moving to Dover seems pointless without heavy guns. The options appear to be to march to attack the King at Canterbury, to sit tight at Deal, to fall back to Sandwich or to move to Thanet and wait for reinforcements. The Council decides to do the latter.

So, no Battle Report for Chatham after all.... Sorry...
Next move on the Game Map could see action in Scotland or the Borders. There is a possible second wave of French coming. King George could decide to crush those pesky Frenchies cluttering up Kent. Who knows...?

So, no Battle Report for Chatham after all.... Sorry...
Next move on the Game Map could see action in Scotland or the Borders. There is a possible second wave of French coming. King George could decide to crush those pesky Frenchies cluttering up Kent. Who knows...?


No comments:
Post a Comment