Showing posts with label AWI. Show all posts

Sunday, 29 September 2024

All Ashore Who's Going Ashore; Part Two

The Action:

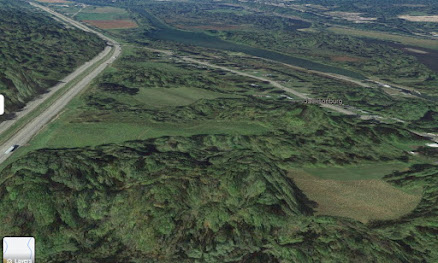
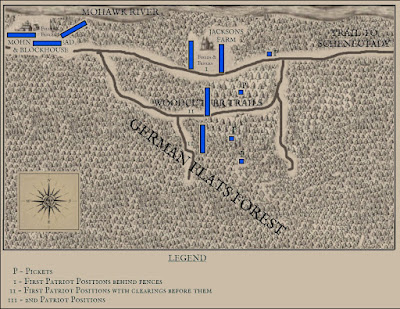
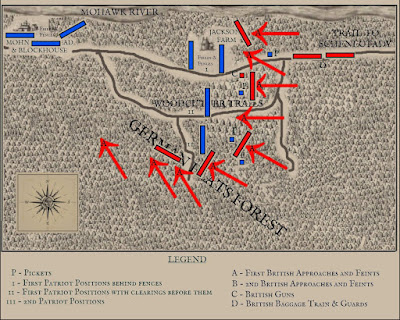
The boats proceed up the creek for without incident, reaching the bend and disembarking well before dawn. The boats are hidden with brushwood and the men prepare to wait out the following day. This passes without incident. At 02:30 the men get ready. It is reckoned it will take at least an hour for everyone to get into position, so at 03:00 they set off. All guns are to remain unloaded.
 
[Scale: as this is a 1:1 game - with each figure representing one man, one gun = one gun etc. the ground scale and move length are appropriately scaled. Each move represents approx. a minute of real time. It should take approx. four to five moves to row the laden boats upstream to the bend. Normal brisk walking move for men will be 100 yards a minute, so 25cm on the table. However, the men are in bush, acting stealthily, for most/some of the time, say 80 yards (20cm) for a normal move, 40 yards (10cm) for sneaking.

Oh, and if you read the last post before the 25th Sept. I have tweaked the incident/events procedures a tad
.]


Oh, and if you read the last post before the 25th Sept. I have tweaked the incident/events procedures a tad
.]


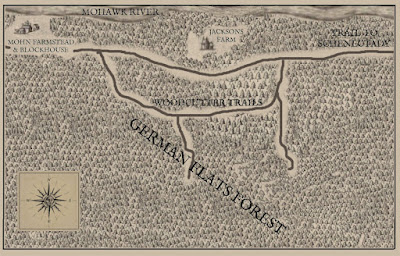
The group moves off and reaches the first track junction without incident. Time is lost confirming orders* and checking watches (again), then the party splits up. 

[*Out comes the stopwatch for this. I literally talk to myself; a hangover from group games where time spent in game-specific talking/activity (i.e. not just banter/skylarking) such as giving and writing orders could mean losing "time" for actual moves on the table. You might be surprised how much time this can eat-up.]


The group heading for the river sneaks away, reaches the river bank without incident, and awaits the time for the assault


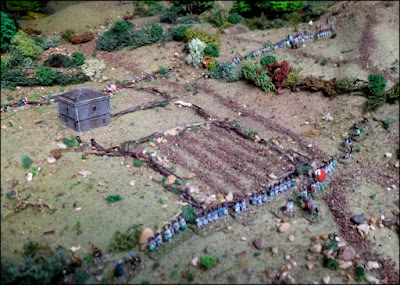
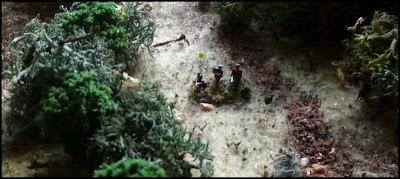
The main group approaches the enemy picket. Someone is sent forward to scout; a couple of rebels are standing sentry. 


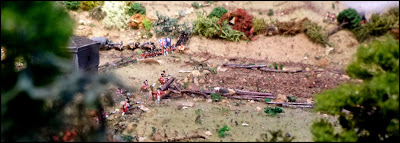
Leaving the Marines, A small party of seamen sneaks up successfully, and pounces on the picket. One sentry drops his gun and puts his hands up. The other hesitates, and is subdued. Three more guys are rudely awakened and pulled out of the tent; none of them make a fight of it. The prisoners are taken down the slope, and a guard placed over them. So far so good.


[The above involved a series of basic 6D tests for the sneaking, and the alertness/reaction of each guard.
If the prisoners are later left behind under guard this means another detached group which will have to be tested for each move. Likely the lesser of two evils, but a nuisance.
]

Meanwhile, back at the boat party by the creek, the night is uneventful, well, almost.. They accidentally scare up some ducks - but luckily there doesn't appear to be anyone around to notice. 

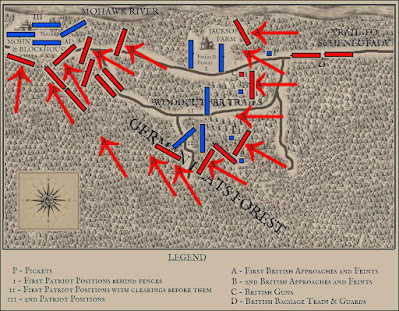
The main party now splits as planned, seamen, the prisoners, and the marines will wait at the picket location. The rest will sneak around to the north of the fort.


At 03:45 everything seems to be going well. All groups have moved to their Starting Positions without issue.

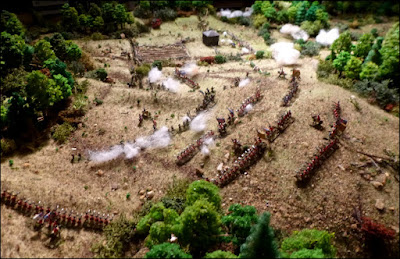
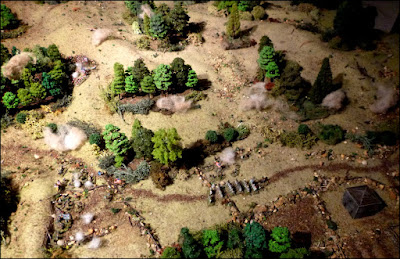
But come 04:0hrs things start unravelling at the north end. As the group under O'Tool starts off from the woods, one man trips on a tree root, injuring himself and making a racket [Noise marker.]. Then, just as the sailors quietly approach the fort walls, a pistol goes off accidentally - one of the men has loaded his piece despite orders!


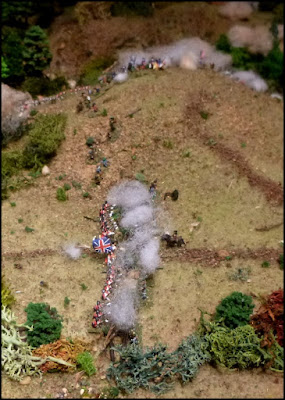
With surprise gone, all that can be done is to attack with vigour. The sailors storm up the slope, where they are confronted with several now alert sentries, who shoot, bringing down a scatter of crewmen but not enough to stem the tide. The sailors overwhelm the
nearest guards, cutting them down. 


Meanwhile, at the south end of the fort, and before the shot from the north, a scout sneaks up to see if he can spot any sentries at the south-east corner of the fort. He can see two.


Lt. Reed orders they be silently dealt with. Picked crewmen lead, swarming over the embankment. One sentry, surprised, puts up no fight, and is felled - but the other, more alert - fires his musket before being cut down. This would have spelled disaster - but
parallels the debacle at the north.


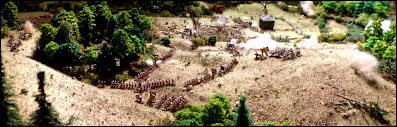
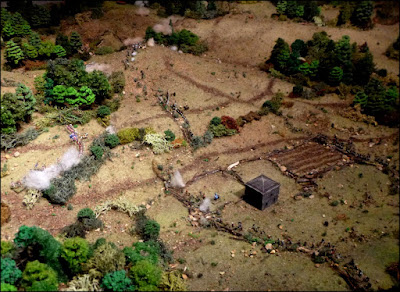
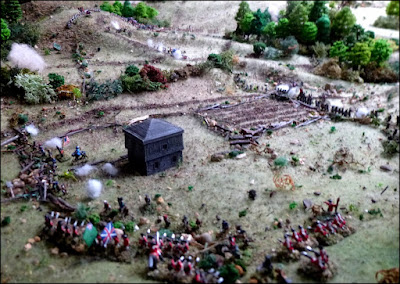
At this Lt. Reed leads his whole group over the walls. He spots the tent lines - and at once orders his crew to cut guy-ropes and knock down the tents, stabbing at any occupants under the fallen canvas, and to make it clear to anyone under the fallen tents that if any emerge they WILL be killed.


At the same time he orders Sgt. Moon of the marine detachment to form up his men, get their muskets loaded, and shoot at any of the garrison emerging from the tents or nearby buildings. 


About half a dozen disorientated enemy troops come out from the still-standing tent, but are
brought down by fire from the marines, or hacked or speared by the cutlasses and pikes of the crewmen.


Outside the fort, at the Picket, Midshipman Burton hears the shooting, and says he wishes to take his men forward to support the action; any attempt at secrecy having clearly blown to the winds. Lt. Harris of the marines, however, defers - preferring to wait. Burton ignores this, and leads his crewmen towards the fight at a run.

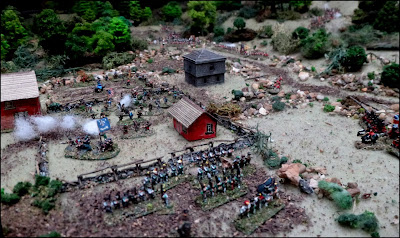
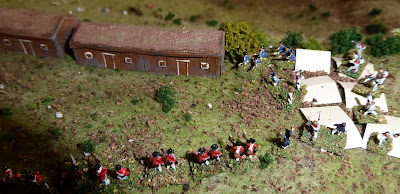
Back at the fort O'Tool's command swarms round the northernmost building, from whence tumble a scatter of rudely-awakened enemy 
artillerymen. A couple show fight, and fall, but the rest raise their hands.

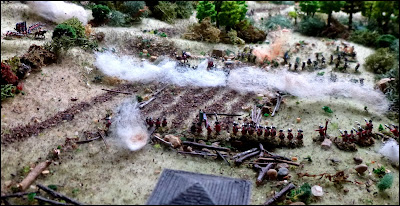
More gunners emerge from the buildings towards the fort's southern end - to be confronted by Sgt. Moon's line of levelled muskets and the blood-flecked weaponry of Reed's sailors. One artilleryman runs towards the cannon facing the river, where he is joined by a game sentry, but the rest either hesitate or simply surrender. However, there are others in the building. These need to be convinced not to fight come out and fight .Reed orders a volley.


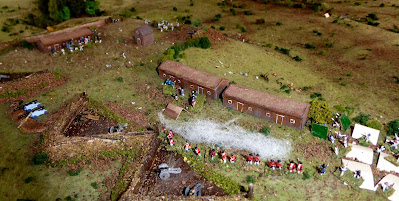
He then shouts to those in the buildings that if there is any shooting from within the barracks the cannon will be turned on them - and sends some of the sailors to turn around one of the guns. This seems to take the fight out of the men within.

[Multiple tests going on above for the garrison: all the "rooms" within the barrack buildings testing separably.]

Midshipman Burton's men push into the fort unopposed, but the operation is almost over. 


All that remains is the spiking of the guns and the detonation of the magazine. Seven of the garrison have died in the action, but the prisoners, including their wounded and any survivors from the tents, are disarmed, ushered out of the fort and sent down to the riverbank. Lt. O'Tool has no interest in them; he just wants them out of the way before blowing up the magazine.

After spiking the guns the Recklesses gather their own wounded (ten men), place their two dead in one of the buildings before setting it afire, and move swiftly off as the magazine goes up.


Apart from bumping into some civilians, whom they put with the prisoners from the picket, the Landing Party meet no opposition on their way back to their boats. The civilians and prisoners are left in the woods, disarmed and without boots, and the boats move swiftly downstream to join The Reckless. A successful operation. 

Conclusion: 

That was fun - and it was nice to get the Landing Party (Langton's) out to play.

Because of the fast-moving game timescale different elements of the game in different parts of the fort were fought in "move clumps" of two to three moved each. Obviously I had to make sure event sequences and time-scales met up, but I'm used to this.

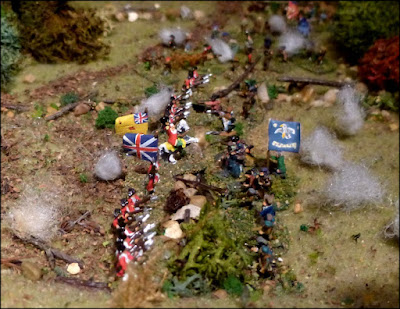
Clearly, the actual assault on the fort could have been played with larger scale figures (had I had them, though maybe not on a 1:1 basis), but the joy of 6mm (to me) is that the equally important approach can also be played out.  


Thursday, 19 September 2024

All Ashore Who's Going Ashore Part One, the Prep....

Or, "Not The Navy Lark..".


Whether inspired by a recent multiperiod event at Hever Castle, where we did Smugglers, Sailors & Revenue men (I tend to come away with more cuts n' bruises from these than from our medieval fights, due to no protective gear in 18th/19thC.  I hear that apparently the viking group which attends this event - all shields, maille, helms & protective gloves - think that we are mad..) or a recent decision to re-read Alexander Kent's the Bolitho saga (which I think I first started reading in 1970s Iran) I decided this week to do a little AWI Landing Party action....   

So....

The Story:

Fort G
ibaigazo, held by the rebels and with its collection of heavy guns, commands access up the Big Snake River. The captain of the British Frigate HMS Reckless has orders to neutralise the threat to allow passage of an important supply shipment to proceed upriver. Clearly to attempt to do so using the frigate itself would be suicide and the cliffs and bluffs prevent landings below the fort itself. Thus, seven boats of ships crew and the frigate's marines are to proceed up Wee Small Creek (from point A on the map, attack the fort from the landward side, spike or otherwise destroy the guns therein, and make their way back safely.


There is no intelligence as to the exact size of the garrison. Friendly local sources indicate it is small, though large enough to man all the guns present. The element of surprise would therefore seem to be vital.  

The Plan:

The boats will proceed upriver, during the night of the 12th, to the bend where they will be hidden in the patch of woodland there. They will rest up here during the day. Come nightfall the force will move along the tack which leads from the river westwards. On reaching the north-south track the force will proceed north to the next junction, whereupon it will split.

A third of the crew and half the marines under 2nd Lt. Reed will move along the track towards the Big Snakey. At four o' clock in the morning they will infiltrate the fort using the spurs of the high-ground, deal with any sentries, and begin spiking the guns.

The rest of the men will wait at the junction while a small group reconnoitres, and deals with, any picket at the small entrenchment on the rise east of the fort. The force will then move to to the next junction, where, again, it will split.

Half the crewmen and the rest of the marines will stay at the redoubt with Lt. Harris of the marines and Midshipman Burton 
and await any noise from the fort. If there an alarm or shooting is heard they will rush the fort entrance; making as much noise as possible.

The remainder of the crew, under 1st Lt. O'Tool will move north along the track, past the spur leading to the fort entrance, and on to the woodland to the north of the fort. At four o' clock in the morning they too will infiltrate the fort from the north; neutralize any
 sentries, and begin spiking the guns at that end.


The objectives are:

1) To spike the guns. Once this has been done a colour will be raised to indicate the fact to the Reckless.

2) To blow up the magazine.

The force will then return to the boats and head downstream to the confluence with the Big Snakey, to rendezvous with the Reckless after she has further bombarded the now impotent fortifications.

NO weapons are to be loaded until ordered. This puts Friendly Units at an initial disadvantage if attacked, but prevents accidental discharge. 

                                                           *
The plan is complex and will require stealth and good timing. Officers will check their watches at the woodland before setting out to aid with coordination. Keeping to the tracks is risky, but necessary to prevent parties from getting lost in the scrub in the dark.

In addition to the risks of getting lost once off the tracks (dice tests) there may be enemy patrols and random civilians (hunters/travellers etc.) about. On the plus side there may also be Loyalists in the area, willing to guide, or even join, the force. 


Scenario Specific rules:

1) Night-time Move Tests: Each night-time move a 20D will be thrown for each independently operating unit. Units test even if stationary, but only four tests an hour. On a throw of 20 the Event Table must be checked. This Move Test throw is modified as follows (cumulative):

Unit is stationary -3
Unit is in woodland -2
Unit 
is moving and has friendly locals with it -1
Unit is moving and has friendly local Scout/s with it -2
Unit is "Sneaking" -4
Unit is stationary and taking cover +2
Unit is moving at full speed +1
Unit is Scurrying +3
Unit is moving on track +1
Unit is within 3" of track +1
Unit has prisoners - +1
Plus 1 for each Wildlife Token in play (see Event Table).
Plus 8 if any friendly unit fires or has fired in last 10 moves.
Plus 4 if any friendly scout or single enemy sentry fires 
or has fired in last 5 moves.
Plus 5 if any enemy unit has fired during this scenario.
Plus 12 if any gun has fired during the scenario.
Plus 15 if boats have been discovered by hostiles 
and this fact has been reported to the Fort.

However, an unmodified 20 result always requires a Test for an Event and an unmodified 1 an "Accident Test" (see below) .  

2) Day-time Move Tests: Each daytime move a 12D will be thrown for each independently operating unit. Units test even if stationary. On a throw of 12 the Event Table must be checked. This Move Test throw is modified as follows (cumulative):

Unit is stationary -1
Unit is in woodland -2
Unit is moving and has friendly locals with it -1
Unit is moving and has friendly local Scout/s with it -1
Unit is "Sneaking" -2
Unit is stationary and taking cover +2
Unit is moving at full speed +2
Unit is Scurrying +5
Unit is moving on track +3
Unit is within 3" of track +2
Unit has prisoners - +1
Plus 2 for each Wildlife Token in play (see Event Table).
Plus 5 if any friendly unit fires or has fired in last 10 moves.
Plus 2 if any friendly scout or single enemy sentry fires 
or has fired in last 5 moves.
Plus 5 if any enemy unit has fired during this scenario.
Plus 12 if any gun has fired during the scenario.
Plus 15 if boats have been seen/discovered by hostiles and this fact has been reported to the Fort.

However, an unmodified 20 result always requires a Test for an Event and an unmodified 1 an "Accident Test"(see below) .  


4) Accident Test:

Throw 1x6D.
On a result of 1 someone dropped a loaded firearm and it goes off. Test for friendly casualty as normal shooting. This occurs EVEN if an "unloaded" order has been given (someone disobeyed). 
Result of 2-4; someone has disturbed Wildlife - gain a Wildlife Marker.
Result of 5; someone has tripped. Dice for injury as shooting. Injured party moves at half speed.
Result of 6; someone has tripped. Dice for injury as shooting. Injured party moves at half speed. Also, the person who fell has shouted. Place wildlife marker (represents human noise but who need different markers?)

5) Movement:

Friendly units have three movement modes "Sneaking", Normal and "Scurry".

6) Accidental Firing:

Each Friendly Force must be designated loaded or unloaded. If loaded a 1x6D test must be made for each Event Test.

On a result of 1 someone shoots. Test for all adjacent stands of three.
On a result of 1-3 they also shoot. Continue this process for every shooting stand. Add 2 to each subsequent Event Test for every stand which has fired.
IF the Event Test results in any human presence test for casualties on that presence. If an enemy patrol/sentry they MUST return fire (i.e. they cannot just run off in the first round). Any Ambush is deemed triggered prematurely and gets NO Ambush bonus.  

7) Event Table:

Should be self explanatory. 


Right, all ready to go.... Watch this space for the fight...


Tuesday, 1 March 2022

1776 and All That (part seven/the last)

They think It's All over.....

After the action at Jackson's Farm we move to the last map move in the 1776 Saratoga Scenario - and the randomised leader activation makes things tricky for me...

Grey assaults Philadelphia, which falls. This alone probably loses me the scenario - but Washington, up in the hills, simply just doesn't have the manpower to contest things, so there's nothing I can do. 

In the north Burgoyne splits his troops at Albany; leaving a garrison there and himself heading up towards Ticonderoga (hoping to thwart Lafayette's move along the St. Lawrence? Who knows..?).

Warner, lacking the troops (or bottle?) to tackle Brant, moves to reinforce Fort Oswego.

Despite the "friction" encountered at Jackson's Farm Clinton (unluckily for me, dice-activated before Gates on the map) has swept up the Mohawk Valley in pursuit of Gates. I decide to break down the move down with simple dice tests (with a penalty for Clinton) to see how far Gates gets before being caught up.

Luckily Gates makes it past Fort Stanwix before the British get near. This is key. As Clinton approaches Stanwix he then has a choice - attack the fort, and risk losing contact with Gates, or pressing on. He elects to attack the fort and takes it in two assaults.

Meanwhile Gates continues his march unmolested and joins Warner at Ft. Oswego. 

With the fall of Stanwix the British have now definitely won the scenario.

Lafayette is too slow making his way up the St. Lawrence to take Montreal or Quebec.

Washington, in the hills north of Reading, is impotent, due to lack of men.

Stark could have run minor interference in New England, but hasn't enough men to make a difference or to force a battle and is being pressed by Howe and another detached force. He withdraws into the White Mountains.

At move end, while the Americans hold one of their objectives - Ft. Oswego - the British have taken Ticonderoga, Albany, West Point, Ft. Stanwix and Philadelphia, so have piled up the Victory Points.

On the other hand, looking beyond the scenario, the Continental forces have avoided costly losses, so still have two viable armies in the field. Personally I think THIS should count in the VP tally, but I don't make the rules. Were this part of a longer campaign this successful avoidance of destruction would be counted a good thing....

However, HAD there been a further move or two Lafayette could have pressed further into Canada, but he would likely have had to face Burgoyne and the Canadian garrison troops (now released from their static role by his incursion). A defeat here for either side could have been disastrous.

Up by Lake Ontario Gates could possibly have been forced to battle by the combined forces of Brandt & Clinton. Or he might have slipped away (again) and headed south to join Washington - or even (more unlikely) north to follow Lafayette. Who knows..?


Looking at how the game panned out The (dice-controlled) British were FAR more active than historically.

The march on Philadelphia was perhaps predictable, as was Burgoyne's progress towards Albany. Howe' unexpected move into New England stopped Stark being a nuisance, but it was Clinton's march on West Point then, critically, on to Albany that was the clincher.

Had Clinton not pushed beyond West Point - and had instead sat there, or, say, had reinforced Howe' push into New England, or even pulled back to New York -  Gates, when facing Burgoyne's (rash?) attack at Albany, would not have been worrying about the threat to his rear, and thus would have had the aggressive and capable Arnold, plus his regiments, at his side in the redoubts above the town. Had Arnold been there, to perhaps blunt Fraser's flanking move, the Battle at Albany COULD have been a Saratoga....  

Conclusion:

THAT was fun.... 1776 was already one of my favourite board games, always repays replaying, and has proved to be perfect as a "scenario generator". Had I wanted to I could have fought a number of fort assaults and a city assault, as well as the two field battles. The great thing with tying a battle into a campaign being that by there was a reason for each fight AND a clear intention/objective on the part of the combatants. Using a board game makes campaign "creation" far, far less work..

I will note down down the forces Gates/Clinton/Brandt & Warner would have had next move at Ft. Oswego, and also the respective forces available to Lafayette and Burgoyne in Canada - thus giving me two ready-made battles to fight out later, should I so wish.

That was a try-out WELL worth repeating.

As always, I welcome any queries or feedback. Next, a different write-up of a different battle I fought the other week, working with the "Pony Wars" rule set. Watch this space.


Friday, 25 February 2022

1776 And All That (part six)

The Battle of Jackson's Farm;

Right, a quick bit of thinking and messing about with the table and I'm good to go.

As this will be a likely be a short fight (I reckon) I've created a random layout (below) rather than get bogged down in maps etc. (note the river and other bank in the photo are "cosmetic photo-shopping". I should be so lucky as to have that big a space..)

Basically the north edge of the table will represent the vegetation edging the Mohawk River, the rest of the table the re-entrants and general "messiness" of the hills etc. in the rough vicinity of present Jacksonburg (pic) before the main, modern routes were carved through them. 

One problem - as one can see from the pic below - it's ALL bloody woods !!" (I'm assuming the big empty fields, like the roads literally carved out of the landscape, are all new....).


Being UK-based, and never having been to New York State, and really having previously only looked closely at maps (rather than Google Earth) of this area before this campaign I am slightly staggered by just how much dense-looking woodland there still is - and I was born & bred in the most wooded County in UK... The daft thing is: I should know this already... I've seen the movies, and the documentaries and read the books. There are LOTS of trees in the eastern states. I knew that.. But....

So... Back to the table. There ought to be more tree cover. It SHOULD look something like THIS:


However, moving guys about on a tree-covered table is difficult (once upon a day I'd have fought a battle like this in board game style) so that the physical on-table wooded areas are actually deemed Heavily Wooded Thickets while all other areas, except enclosed fields and "rocky clearings", are deemed to be "ordinary" woodland (which from the Web looks much like the woodland we have round this part of the world).

Thus, I reckon Special Rules are called for ...

Woodland Movement: All movement unless in fields, Thickets or on tracks is assumed to be taking place in woodland.

Woodland restricts line of sight to 50m*.

All infantry units must be in open or extended order to operate in woodland without penalty. Units in close order move at two thirds speed and suffer 1 disruption point per move if moving.

Mounted aids proceed at half speed.

All units in woodland count as being in soft cover UNLESS within 10m of shooters.

All non-light troops/skirmishers suffer 1 Disruption Point while moving in Woodland.

*Blind shooting by volley may take pace at normal ranges but uses twice the ammunition. Non-volley shooting out of LoS is not permitted. 

Some "rocky areas" in the woodland are deemed "clearings" (marked out on the table by small twigs and rocks) so count as normal open ground/fields.


Thickets: Only skirmish/light units or units in open order may enter thickets. No horse can enter thickets.

All units move at half speed. Line of sight is reduced to 10m*. All units in Thickets count as being in soft cover within 10m and hard cover beyond that.

All light troops/skirmishers suffer 1 Disruption Point and all non-light troops suffer 2 Disruption Points while in a Thicket. 

(*Blind shooting into thickets by volley may take pace at normal ranges but uses twice the ammunition and all results are halved after all other factors have been taken into consideration. Non-volley shooting out of LoS is not permitted.).


Victory Conditions: Clinton needs to rout or destroy the defenders or get at least 6 elements of his main force off the West table edge and his heavy train to the midway point of the table in 24 moves to claim victory.

The Colonial force needs to prevent this.

The Game (Summary): 

I set out two regiments of my guys among the fences at Jackson's Farm in two lines. The other units are extended in a line south to a hill a little more than halfway across the table. I do not have enough chaps to muster any more of a reserve than the second line at Jackson's.


I spend the first few moves pushing forwards detached companies as strong pickets to reveal/provoke/draw on the Enemy Blinds (advance units) in the woods.

Slowly I become aware of movement ahead, and facing both my flanks. There is firing at the far right on my line, then reports of suspicious movement on my actual right flank. Over the next few moves it is clear that there is a significant force moving through the woods towards - and more worrying, beyond - my flank.

Enemy units open fire on my troops on my right flank and in the centre. 


Just as I'm getting worried about my right flank a firefight develops to my front - where three manhandled enemy light field pieces appear, and open fire on my guys at Jackson's Farm. 


As I ride over to see what's happening on my right more enemy appear. Hessians and redcoats are in the woods, and my men start falling back.  There is suspicious movement around, and soon to the rear, of my right flank. 


At Jackson's Farm a regular regiment supported by light troops appear in the woods by the river. There is a short firefight, but then an enemy assault sends my guys reeling. 


Meanwhile my centre unit falls back and my right is seriously unhappy. I decide it's time to fall back to Mohn's Farm and form a second position there.

All the time the enemy keep up the pressure. There are a couple of successes (a British regiment is checked and badly mauled at Jackson's farm by my second line and another mauled in the central woods) but my men are getting jumpy.


The big problem is the feeling that we are being outflanked. I want to get my guys back to Mohn's Farm, and the walls and fields commanding the road, so that this issue isn't relevant, but the enemy advance is relentless (if slow in the woods). 


I head back to the road, but a swiftly advancing enemy unit charges out the woods, breaks the unit I am with - and my general is captured.

The enemy are now pressing on towards Mohn's Farm themselves - and whenever the Redcoats get the chance they are aggressive; throwing bayonet charges at my flustered troops.


Just west of Jackson's Farm, the supports of the broken unit, already demoralised by the artillery fire and having their mates flee through them, and seeing another unit break and their general captured - plus being cut off from the road to Mohn's Farm by more enemy emerging swiftly from the woods to its rear and flank - butt-end their guns and surrender.

It really is time to fall back to Mohn's Farm, but there is now no central command to coordinate things, so each regimental commander makes his own decision. 


It's a bitty process, but my remaining units begin to rally at Mohn's Farm. However, with enemy Blinds pressing forwards, and more more enemy now emerging from the woodland to command the road westwards, things are going to pieces.


But time is nearly up - although their baggage train has been slowly advancing along the road and has now passed Jackson's Farm - there is little chance the British will exit six units off the map edge in time. 

And so, outnumbered by two to one, and with no central command, my men, regiment by regiment, decide to withdraw rather than stand against the overwhelming numbers. It is probably the best thing to do.

Endgame - but my boys at least have the satisfaction of knowing that the enemy advance has been slowed by their actions......

Conclusion: Phew... That was tense.

Throughout, the Blinds (represented in the table by "dust" clouds.. Yes, I know it's woodland, but I couldn't be bothered to make a load of birch seed bird flocks) clustering round my Right Flank were a real worry (Clinton doing his signature outflanking), and by the end I was seriously outnumbered.

Had I fought another move I would either have had to skedaddle, at the risk of being charged as I did so, or lose two regiments in pointless fighting around Mohn's Farm (losses Gates could well do without). It would have delayed the British further, but they had already used their last move.

The British achieved half their Victory Conditions (Clinton got his Baggage Train more than half way across the board), but failed to get the required six units off the west table edge (though two more moves would likely have done this for them; maybe three if my lads had been wasted in a fight at the farm...). 

Enemy losses were light. Mine far, far heavier than I would have liked; a regiment surrendered (not to mention the general) and my gross losses in actual casualties or missing totalled 540 men (more than a fifth of my force) though a majority of these will either be wounded, "temporary deserters" or lads hiding-up in the woods, and intending to make their way to Fort Drayton by the backways.

I'll do the calculations for the campaign later. 

I guess it was kind of a draw. Most of my guys lived to fight another day (as did Gates's force) but I lost a lot. Even if Clinton didn't catch Gates the fight was a "British Victory" on paper in that they held the field and suffered less. So call it sort of even but the British winning on points. 

The above was a precis of the battle. I did a (long) near move-by-move write up as I went along (and, as sometimes happens, took far to many random photos). If anyone is interested on more of a blow-by-blow I can post that (just make a comment). 

As always, thoughts, queries & comments invited.

The Game Blind Processes: 

For this game, to see if Enemy Blinds appear I throw a 1x12D each move, adding 1 to the dice throw (cumulatively) for each move AFTER the first complete move.

On a (modified) score of 12 an Enemy Blind is created/has been spotted.

To find the location of this Blind I dice 1x6D for EACH Picket, then for the centre of each space of four inches more than four inches away from a picket - including the ends of a picket line.

Note that at the end of each Move a marker is moved 6 inches along the long board edge. Only friendly units east of this marker need make this test.

I do the same for any forward (first line) units without pickets to their front/sides.

The highest scoring picket/unit has encountered/become aware of something and a Blind will be placed.

In the case of different units drawing the highest score then all highest drawing units have seen something and Blinds are placed accordingly.

Blinds appear 4 inches distance from the spotting unit; to their front, or flank if a flank test. Enemy Blinds cannot be placed directly in the middle of Thickets. Neither, initially, will they be placed behind friendly units, but that may be possible if dictated by card draw.

In any Blind Location tests where a friendly unit is already within four inches of an existing Blind such a unit adds one to it's test throw for each such Blind already so placed.

I also make a single test per move for eastern end of the Main Road to Schenectady.]

Next move I push a rifle company to investigate the Blind. They get within 50 yards of the Blind and... 

There are two Blind Movement Tokens in the tub mix, but Enemy Blinds only actually test once per move even if the second tokens is later drawn.

The test is a simple throw of a 1x6D.

On a result of 1-3. Blind remains stationary.

On a 3-4 Blind moved forwards four inches with a direction test made based on IMP.

On a 5-6 Blind moves four inches plus 1xAveD in inches towards nearest Patriot force/unit.

Once a friendly unit moves to within clear LoS of a Blind a test on a standard card deck is made as follows (right click, open and expand).

Other Thoughts: 

Below are some ideas that came to me during the game, for me to ponder over at some time....

Panic: Thinking here about F&I war variant..? More research needed.

Units which are in themselves within 100 yards of hidden Enemy Blinds or which have come under fire while in Woodland or in or within 25 yards of Thickets may be subject to Panic Firing.

Test 2x6D per move per appropriate unit.

On a result of 2 or 12 Theatre-Trained Regular infantry will fall to panic firing.

Veteran Militia riflemen or Theatre-Trained troops on a throw of 2.

On a result of 7-8 all others will fall to panic firing.

A unit which fails a Panic Firing Test will halt, suffer 1 Disruption Point per move, remain stationary and fire in a direction (dictated by 2x6D dice throw - see below) using double ammunition until rallied.

On a result of 2 to 3 half the unit deploys to refuse its left flank, receives an additional Disruption Point and shoots half it's strength to that flank and half to it's front. Neighbouring friendly units in range may take casualties.

On a result of 11 to 12 half the unit deploys to refuse its right flank, receives an additional Disruption Point and shoots half it's strength to that flank and half to it's front. Neighbouring friendly units in range may take casualties.

On a result of 3-10 unite fires to it's full front. Neighbouring friendly units in range may take proportionate casualties.

Any unit in woodland or thicket taking casualties from unseen shooters (including from friendly fire) will take twice the number of Disruption Points (but not casualties) inflicted on it that move. 


Baggage/Artillery Train: Thinking about baggage...

A heavy baggage train can only move at full speed on tracks. It operates at half speed in fields. The train cannot climb steep slopes. It cannot enter thickets. It cannot enter very rocky ground.

If operating off-track (other than in fields; so thus in woodland) it moves at one quarter speed and MUST be preceded/accompanied by a full regiment; which is assumed to be manhandling wagons, cutting and laying timber to allow it to progress at all etc. etc.

This regiment becomes, effectively, part of the train. It cannot fire or attack or move away from the train while so committed. It cannot separate itself from the train without spending a whole move doing so. If it separates itself from the train the train cannot move - not even to retrace its steps. While part of the train, and until subsequently rallied if it detaches itself, it is already considered Disrupted to level two (note; this disruption level does not affect movement of the train). 

Heavy to medium artillery cannot deploy in Woodland. Light guns can, but must be manhandled and not use limbers.

Further Thoughts on Scouts and Spotting: 

Thoughts about Blind reaction tests using a table like this....? Hmm... Of is that a complication I don't need. The system above worked fine....

I thought about using Blinds for friendly units (only be placed if a friendly unit "seen" by a hostile unit subsequently moves out of LoS of hostile units). Why..?  Because their presence could affect AI decisions. Maybe a thought for another day...

As with the rest of the above; thoughts etc. welcomed.


Or three... Or four......

VERY little to report.... Due to a busy reenactment season another filler post I'm afraid, just to show I'm still here...... Our ann...