Showing posts with label Jacobites. Show all posts

Tuesday, 13 August 2024

Takin' The High Road....

 Meanwhile, in Scotland...

With the French dealt with, the Government can concentrate on the Scottish Question. Cumberland has a large mobile army up by the Borders. There are two Jacobite armies operating in the Lowlands. Government Scot units are in the far north east.

The next map moves see Charlie outside Edinburgh; but with Cumberland approaching the Jacobites are wary of assaulting the castle (Councils of War). Instead they move towards Wigtown to join Murray.


While Inverness - the last Jacobite stronghold in Scotland - falls to Government Highland troops, Cumberland moves to block the Jacobite options; these being:

1) To seek battle.

2) To break for the Highlands.

3) To break for the Lowlands. 

While the Jacobites dither, Cumberland moves to Lanark, effectively boxing the Jacobites into Galloway/South Ayre. At another Council of War the Jacobites waver, then vote to seek the enemy - the alternative is to risk being caught on the march. They move on Lanark, and the Government army.


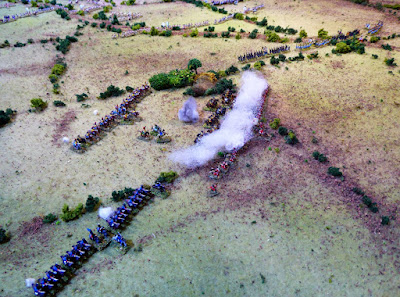
The Battle of Lanark.

The Government army is largely made up of experienced professionals. They are likely to stand on the defensive, but have good guns and cavalry. Any fear of the Highland Charge has been eroded by the Highlanders' lack of success on previous fields.

The Jabobites have a larger army, good guns, but fewer horse, and there are some sound professional Irish regiments, French detachments and a Swedish regiment with the force.  However, many Highland regiments are at half-strength or less, having suffered badly in previous fights, and the rest of the clansmen are largely inexperienced and unblooded. 

This promises to be a hard fight - for both sides. 

What with house emergencies (shower leak, garage door collapse, washing machine breakdown), the heat, family wrangling and a reeactment (Battle of Evesham - where I got a load of new bruises on my shield arm, and hit by three arrows..) I didn't have time to set up a table, so reverted to my old, old system of settling tactical matters with a boardgame. Same solo principles as a table game, using the game tokens from "1745", with a few extras from SPI's Wellington's Victory. Worked very well, and was MUCH quicker.


After a quick barrage I threw my Highlanders at the enemy right, while my slower allies marched on my left.

The enemy first line were mainly in line formation, static and placed on "Overwatch" - not a lot I could do about that - while their guns held fire until they could be guaranteed to do damage to my columns.

My Highlanders crashed in and, despite bad casualties en route, hit the enemy front line. My Centre made little headway, but my Right caused many enemy casualties. My Left, however, was slow (the Irish & Swedish), and didn't manage
 to engage. 


Also on my Left, the enemy volleys of regiments in line tore apart some of my Highland units and the hand-to-hand did not go our way, sending some of my guys reeling. Not good.


The Irish formed Line, while I tried to reorganise my Centre and right. My Right has a fight with some of the enemy horse; meanwhile, the enemy tried to reorganise their lines. 


Both sides took a breather in the Centre. On my Left there was a firefight between the Irish and Swedes and the enemy Right, including their Highland companies in the woodland.  My men were being whittled away. Then the enemy line on their Left advanced, while their cavalry on their right moved around the woods, threatening my Left flank.  


Again, there was some hard fighting. The enemy Right horse swept away my Swedes (who had already taken casualties from the Highland companies) while their Left horse drove back some on my guys facing them. Prince Charles come forward with the cavalry reserve. 


I threw my men forward in one last charge. 


But the enemy horse on their Right was now scattering my men there, and my own Right had disintegrated. Charlie made off in the face of the Government dragoons. The rest was, as far as the enemy were concerned, just mopping-up. The Irish, surrounded, surrendered. My retreating Highlanders were cut down by the enemy horse. Charlie got away with the cavalry reserve. Game over.


The Prince fled to Stranraer, where, next map move, he would be picked up by friendly ships, and taken back the France. The Rebellion was over..... 

Well, THAT escalated quickly.....

Conclusion

Well, that was an interesting and fun experiment.

The combination of using a board game and tabletop fighting worked really well (again, as with the "1776" game the other year), though this board game had a LOT more chrome and (sometimes fiddly) detail. For those without the time to set up their own "campaign rules" and draw up their own maps this method is a good way into campaigning, I reckon. 

The "Council of War" process worked well again, helping cement a narrative as well as adding some "unknown factors". 

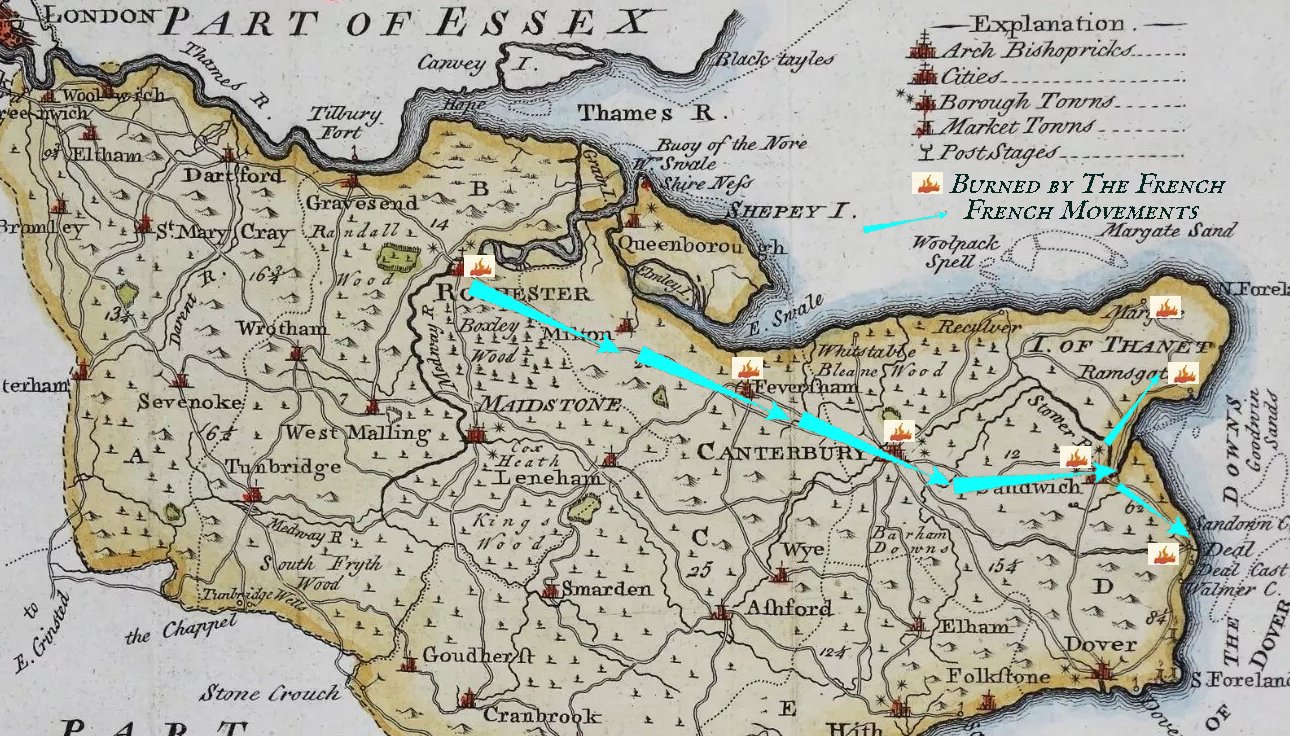
The "French In Kent" interlude, stepping away from the board game, was interesting and fun - made easy with the amazing resources on the Web (old maps and images, topographic sites, distance calculators, Google Earth etc. etc.). We really are spoiled in that regard these days.

Is the game "unwinnable" for the Jacobites (as claimed by some)? Perhaps...
I had a high "French Intervention Level" from reasonably early in the game, the French actually committed big-time, and I still lost (but maybe I'm just a lousy general).

I think the game may only be winnable on points - but that may be a reflection of the reality. Historically there was little or no support for the Jacobites south of the Border (a real pain in the game), and north of the Border the Scots themselves were divided (ditto).

The "What If" scenario - whereby the Jacobites simply secured Scotland and negotiated some kind of independence under the Stuarts  - is fantasy in my book (my arguments being;

A) That's NOT what the Stuarts were after (they wanted the whole UK shooting match) - even if the French did.

B) Once peace on the Continent "broke out" the full weight of the Hanoverian military machine would come back to England, recruit/regroup and swing north; and with Scotland still likely divided (the Lowland bourgeoisie needing the trade freedoms and markets which came with the UK, the Clans divided by local feuds, the "English Gold" factor, the religious divide etc.) I don't see a scrap of paper standing in the way of an invasion.

But there we are..)

A well-worthwhile exercise. What next...?

As always, all queries etc. welcomed and answered....


Monday, 22 July 2024

To Battle (at last)..

The Battle of Deal.

As my French approach the Government Army it is clear that they have been alerted, have "Stood To" before their camp, and are deployed for battle. Not that I was planning a surprise or a night attack (shudder), but it is clear that I am outnumbered, as scouts suggested.

The Government Army Forms Up

My guys ("mine", as I am "fighting" the French side) are still in column of route along the road from Deal. I begin to deploy.

My cavalry will be in wings on either side of the army, my main line will be deployed between, in two lines, with guns in support; though these are still limbered and on the road. 

The French March Onto the Field

While I am sorting this out the enemy moves their firing line forward and, behind these leading units, shift all of their cavalry to their right.

It is now clear that although I out-gun them, and have more horse, they outnumber me in foot, both in numbers and number of units. My regiments are generally larger, so, individually, can take more punishment than the enemy's, but any damage will be concentrated, rather than spread between different units. On the plus side I have three "General" figures with my army, compared to their two. This gives me SOME advantage, but only Earl Marshall on my right is above average. 

I need to break the enemy quickly because, although at this stage Albermarle will be many miles to my rear, and so will not be a concern for some hours, the threat of him getting between me and the coast is very real if I am held. 

[Technical Note: for a change I decide to use a randomised YuGo/IGo method and a PIP system with localised/lower-level ad hoc decision throws for C&C. Moving/shooting etc. will be my adaptation of Andy Callan's Loose Files and American Scramble for the Jacobite Rebellion, plus some tweaks. The British Commander is of a higher quality than Richelieu. I will find this works against me in Initiative Rolls and PIPs... However, HIS junior is below average, so....]

While I am getting my centre and the guns in order I see Earl Marshall, commander of my right cavalry wing, push forwards to flank the enemy line, then throw his three regiments against a Government British regiment acting as a kind of flank guard. OK... A bit premature - I would have liked to have prepared the ground with my guns - but maybe it will work...

The First French Cavalry Charge

On the other hand, not.. The enemy troops here are professional Line; they wait until the last minute to unleash their firepower and my leading cavalry regiment is badly mauled, then [Thanks to a Movement Dice issue.] barely reaches the enemy line, with minimal Impetus. There is a brief tussle as they hit the facing bayonets, take more casualties, then break. Their supports, shocked, are pulled back by Earl Marshall ("Threes About") to reform* rather than losing them. So much for my right hook...

[*Thanks to subsequent bad PIP dice the cavalry will take several moves to reform. As Regulars the units here will automatically recover one Shock Point per move in which they do nothing else, without the need for me to spend PIPS. But that takes time.]

The far left of the enemy firing line starts shooting at my own as it gets into position, but in the centre things at my end are largely a matter of sorting lines and getting my guns into position and shooting. No problem, except speed (or lack of it) thus far here. 

Initial Dispositions

[As usual, if pic is too small to read, right click & open in new tab to enlarge]


But then the enemy having massed his horse on his right, and after some lucky movement results, throws them at my left wing cavalry under Henry - who FAILS TO REACT!! My men are hit while stationary (!!!). NOT what cavalry are for...

British Cavalry Move....

...And Strike

Result: one regiment gripped in a melee (blocking/preventing my nearest foot unit from shooting into the enemy horse) and another broken. One enemy cavalry regiment pursues my broken lads round the flank of my second line foot, shadowed by the enemy's uncommitted regiment. Oh, dear...!!

Phase One

My next move is reduced to damage limitation (trying to block the enemy horse from tearing through a gap in my second line and stopping the end regiment of my second line from being hit in the flank by "refusing" several companies.). My guns start to play on the enemy firing line.


The trick with the foot Firing Lines is to use the "first volley" bonus wisely - i.e. let the enemy get close before loosing with full strength, rather than peppering from a distance and losing that first volley advantage. My plan then is to hit and disrupt them with my guns before moving to close musket range; but my guns aren't hitting much, coping with the enemy horse rampaging around my flank is using up precious time [PIPs] and
 the enemy won't seemingly be drawn into doing anything stupid like marching straight into close range (unsurprisingly).


I try shooting at the enemy cavalry on my Left with guns and foot, and cause some disruption, but things aren't looking too clever. Thus far I have lost two cavalry regiments routed and my Left is under threat. I need to plug gaps, but haven't the spare regiments to do it. Not at all good.

[If it looks as if I'm a rubbish general - something I won't dispute - this is what I like from a game. In my experience most things in real life involving other people include large elements of "crisis management". My tabletop battles are like that - and NOT a form of chess.. Mind you, I HAVE been getting very bad dice throughout. Even my usually-reliable guns seem to be having a bad day.. But hey, ho.. C'est la guerre...]


While I am trying to keep my guns shooting and my lines secure the enemy takes the risk of moving their lead firing line nearer to mine, and there is an exchange of fire.*

[*At close quarters shooting of this nature is simultaneous, with the non-active side "borrowing" a PIP from their next Activation Phase. There will be occasions where moving or not moving, and a form of "Overwatch", carry advantages, but in a straight Line v Line firefight I like things simultaneous.]

My guys come off worse in this and the next round of shooting; taking a LOT of Disruption, then casualties. The enemy - four smaller regiments to my two large ones - are able to absorb the Disruption better, and one of my regiments runs - not at all good - and I have to pull back the main firing line. I move my right wing cavalry forward to threaten the enemy Left, and try to minimise Morale losses; all the time trying to keep my guns shooting.  

Things are looking tricky in my centre. I draw back two foot regiments and try to move my remaining cavalry unit on this side up to protect my guns. 

Over on my right my cavalry make another charge, but the enemy have realised our intentions and formed a firm line to face them.

The Second French Cavalry Charge

One of my charging cavalry regiments is halted, and after a tussle, routed. The other one forces its way though the enemy regiment facing them, but caused little actual damage. Once through, at the end of their charge move, they pull up, out of musket range, to reorder themselves.

But on my Left.. Oh, dear... The enemy cavalry charge at my left rear, hitting my cavalry there in the flank, sending them running, before getting among the limbers and wagons of my artillery park.


My Irish piquets acting as an artillery guard, loose off a volley, but to little effect. Some of my artillerymen run to seek refuge among my regiments in the centre. I try to form a protective perimeter, in the front centre, with my foot.

Phase Two
Next move the enemy reserve turns to meet  my isolated cavalry unit to their rear.  Meanwhile, to my rear, the enemy horse engages those of my artillery crews still at the artillery park and the Irish. These, shocked and outnumbered, surrender.

There is a brief hiatus...

I now have the single cavalry regiment, isolated at the rear of the enemy army and a "polygon" of foot regiments in the centre. My guns have been taken. Most of my cavalry and one foot regiment routed. To one side of my "polygon" are the enemy cavalry, still at almost full strength. On the other are side the enemy foot; steady and, again, barely damaged. My options, with Albermarle possibly making his way to the battlefield from my rear, seem to be a "glorious last stand", a "glorious death or glory charge", a fighting retreat (Though to where? Sandwich?) -  or to call for a parley.... It is decided to call for a parley....

Endgame

Casualties:

The Government troops got off very lightly, a score or so infantry dead/mortally wounded and about double that seriously wounded. The cavalry suffered worse (40 dead and about twice as many injured), but considering the damage they did this was cheap; had the French guns been turned on them properly this could have been a LOT worse.

The French foot suffered: 180 dead, 140 seriously wounded and approx. 100 light wounds, with a colonel among the dead.  Likewise their horse:160 dead, 370 with serious wounds and 300 lightly wounded.  

Aftermath: 

After a brief Parley a cease-fire is agreed. The wounded are attended to by both sides.

All troops remain in their respective positions until the arrival of Albermarle mid afternoon.

That evening the King returns to Canterbury, before starting to London the following day, while Albermarle, Richelieu and their staff meet in the inn at Finglesham to agree on a Convention. 

Overnight the two armies sleep on their arms on the field, while the senior officers repair to the inns at Finglesham, Eastry and Ham.

The Battle of Deal - and the French Adventure in England - is over.

                                               *

Articles of Convention Between His Grace Emmanuel Armand de Vignerot du Plessis, Duke of Aiguillon and Lieutenant General The Right Honourable William Anne Keppel, Earl of Albemarle   20th June 1746. 

I. The troops under His Grace the Duke of Aiguillon, to form up in their current positions and march, with the honours of war, to the village of Betteshanger, there to pile arms at the word of command from their own officers.

II. A free passage to be granted, under escort, to the army under His Grace the Duke of Aiguillon to the Port of Dover, on condition of not serving again against the Armed Forces of Great Britain or Her Allies, whether in the British Isles, upon the Continent of Europe or otherwise Overseas for the duration of this present War. All such troops to be conveyed to vessels of the Royal Navy of France for removal from these isles, without let or hindrance from the Royal Navy of Great Britain.

III. No armed vessel of the Royal Navy of France involved in the above enterprise is to sail or otherwise close to within Three Statute Miles of the Dominions of George the Second, by the Grace of God, King of Great Britain, France and Ireland, Defender of the Faith, Duke of Brunswick-Lüneburg, Archtreasurer and Prince-Elector of the Holy Roman Empire, during the course of any conveyancing or troops covered by this Convention. Unarmed Neutral or Private vessels commissioned by the French Authorities for the purposes of the above will be permitted within this Three Mile Limit with the Permission, and at the Discretion, of Authorised Officers of  His Majesty's Armed Forces. Any breach of the above may be deemed to invalidate this Convention.

IV. The army under His Grace the Duke of Aiguillon, to march at the earliest opportunity to the Port of Dover, by the easiest, most expeditious, and convenient route; and to be quartered in, near, or as convenient as possible to said Port, that embarkation of the troops may not be delayed, when transports arrive to receive them.

V. The troops under the command of  His Grace the Duke of Aiguillon to be supplied on their march, and during their being in quarters, with provisions, by Lieutenant General The Right Honourable William Anne Keppel, Earl of Albemarle's orders, at the same rate of rations as the troops of his own army; and if possible the officers' horses are to be supplied with forage at the usual rates.

VI. All officers under the command of  His Grace the Duke of Aiguillon to retain their carriages and horses, and no baggage to be molested or searched; His Grace the Duke of Aiguillon giving his honour that there are no public stores secreted therein. Should any carriages be wanted during the march for the transportation of officers' baggage, they are if possible, to be supplied by the country at the usual rates.

VII. Upon the march, and during the time the army currently under the command of His Grace the Duke of Aiguillon shall remain in quarters in the vicinity of the Port of Dover, the officers are not, as far as circumstances will admit, to be separated from their men. The officers are to be quartered according to rank, and are not to be hindered from assembling their men for roll call, and other necessary purposes of regularity.

VIII. All corps whatever of His Grace the Duke of Aiguillon, whether composed of artificers, drivers, independent companies, and followers of the army, of whatever country, saving only Subjects of His Majesty King George IInd taken in arms upon the field, shall be included in the fullest sense and utmost extent of the above articles, and comprehended in every respect as French subjects.

IX. Passports to be immediately granted for two officers, not exceeding the rank of captains, who shall be appointed by His Grace the Duke of Aiguillon, to carry despatches to France and to the nearest appropriate vessels of the Royal Navy of France. These officers are to set out immediately after receiving their despatches, and are to travel the shortest route and in the most expeditious manner.

X. During the stay of the troops commanded by His Grace the Duke of Aiguillonin the vicinity of the Port of Dover, the officers are to be admitted on parole, and are to be allowed to wear their side arms.

XII. These articles are to be mutually signed and exchanged to-morrow morning at 9 o'clock, and the troops under His Grace the Duke of Aiguillon are to march as herein agreed at three o'clock in the afternoon.

[signed] Lieutenant Général  His Grace Emmanuel Armand de Vignerot du Plessis, Duke of Aiguillon

[signed] Lieutenant General The Right Honourable William Anne Keppel, Earl of Albemarle

20th June 1746. 


Next Map Move the only active Jacobite Forces will be in the North. The French defeat in Kent won't really release many Government troops in time to affect the situation in Scotland, but Cumberland and Cope have matters in hand up there anyway. Or not, as the case may be...

As usual, any queries etc. welcome...


Thursday, 18 July 2024

Battle of Sandwich instead..? Or Deal.. Or....

Another month of Manoeuvre - and some fighting (?).

With matters in Kent undecided, we move into June. Prince
Charlie romps southwards through the Highlands and Cope moves down to the Borders while Murray nips across to Carlisle.

Cumberland shifts northwards with part of the Midlands army, leaving a couple of Brigades "just in case".

The French fleet again sallies forth, brushes aside the now seriously depleted Royal Navy (wooden ships don't just grow on trees you know) in a short action, and moves to land (correctly) at Thanet some reinforcements for Richelieu.
     
The French hold a Council of War at Deal (usual routine, but it only takes two rounds to decide: they will seek battle at the earliest opportunity. 

The Government plans for Kent are also aggressive. The options for George are marching to Dover to join Albermarle (with the chance the French may zip north from Deal to Sandwich, then on to Canterbury or Thanet), march to Deal, and meet Albermarle there (with the risk of being intercepted by the French) or to march to Sandwich and catch the French in a pincer, with Albermarle coming up from Dover, in the hope of hitting Richelieu in the Deal-Sandwich area (risk of defeat in detail for one friendly force or the other).

Deal is about two days' standard march (with guns & wagons, and in column, and assembling at march end) from Canterbury (about 16 miles), but only about three hours or so from Dover. Coordination may be tricky, unless the units at Dover force-march to get there in a day.

The French, who will likely be pretty quickly informed of the movement of the troops from Canterbury by scouts (the French have more cavalry units with them, so can out-scout the British locally) have several choices:

One:
Sit fast at Deal, then hit Albermarle as he emerges from Dover - but with the risk of finding George bearing down from the north or north west if Albermarle simply slips back into Dover Castle. Risky...

Two:
March south from Deal to prevent Albermarle from linking with George, as above, but pushing a small holding force north to hold the walls of Sandwich (and maybe distract any arrivals from Canterbury) and sending mounted vedettes to monitor the Canterbury-Sandwich and Canterbury-Deal roads. Here the risks are of Albermarle refusing battle as above.  

Three:
March to attack George. This would seem wisest, given that it is thought that that is the smaller enemy force. However, if Albermarle gives chase unmolested he will be only about three to four hours behind the French.

Four: March north from Deal towards Sandwich, as if heading for undefended Canterbury if G. is taking the Deal road, or to meet an evacuation fleet; hopefully tempting Albermarle out, but then stopping HIM en-route.

The topographical map shows that on the road from Deal, south of Sandwich, north east of Ham, there is a low, shallow elevation, like a very low ridge (topped by an
occasionally wooded track called Felderland Lane for lateral movement). A force around here could block an advance from either Dover or Deal.

A small stream runs along a wet, partially-wooded, slight valley to its front, separating the low "ridge" from the rise on which Ham sits. Seems as good a place at any to await any force from the Deal direction.

In addition, jutting southwards from very low this rise is an equally low "spur" which carries the Deal road. A force here could block that road, with one flank on the bend of the shallow wooded valley and another on the wetland or the village of Worth*. 

(In literature, Worth was the "birthplace" of Horatio Hornblower. In legend, Henry the Fifth allegedly landed here from the Agincourt Campaign and had a tryst with a local Ale-wife; hence the name of one of the village pubs "The Crispin Inn".) 


However, on Streetview the rise marked on the topographical is barely noticeable - the land here is generally pretty flat; so will likely to have more of an effect on drainage than provide difficulty to troops. Hmmm....
 

Still, getting an enemy marching from Deal to deploy in the wetter ground, bombarding them, then attacking could work.

IF, however, the enemy come up the Dover road a move along the "higher" ground and the Felderland Lane should be easy enough; given that the option of redeploying on Foxborough Hill would cover the Dover approach.

Hmmm... All well and good, but this leaves the French vulnerably close to George if Albermarle won't play ball and attack - and George makes good speed - so putting the onus on the French to make the running and attack Albermarle.

Council of War (again):

At the French Council of War the options are thrashed out. As information comes in suggesting that George, marching from Canterbury, has halted near Eastry, presumably to coordinate with Albermarle on the morrow a decision is made.
It is decided to try the old "sneak out" ploy of leaving the tents up and campfires burning with a scratch crew, to make it look as if the camp is occupied, to hopefully stop Albermarle's scouts from spotting what is going on, while pushing to head off George as far up the Canterbury road as possible. A night march IS hazardous, but will hopefully give the French a few hours to confront and maul George before Albermarle starts chasing.

To a large extent the French force has done its job; seriously embarrassing the sitting Government and the Hanoverian dynasty. If it can win a battle against the king himself before sailing home this will be all to the better.. Does any of this really help Charlie? Maybe by keeping Government forces in the south, but as stated before, the French are playing their own game.. 


The Field: 

The land where George's army is camping, astride the road on shallow rise east of Eastry with nearby water, seems pretty flat farmland, with slight dips to small watercourses. Like the Felderland site above, there is little in the way of sharp or extreme changes in elevation. George has been alerted to the enemy approach and the men are Standing To.

I spent about 20 minutes making up a table where, apart from the woodland, the features are
primarily set-dressing. The main feature is the road and the the two minor settlements (Betteshanger and Finglesham) with some token "semi-boggy ground and token spinneys.


[Technical note: my camera has been playing up - see pic above - as has the "adding images" on Blogger, the process having seemingly changed this week (for the worse, as per usual with updates). It took half an hour and two browser changes to get the last two pics added. I hope this isn't an omen...]

Tuesday, 9 July 2024

The Battle of Chatham... Or not-

 - as the case might be...

Following the French decision to make some sort of showing in the face of the large enemy army approaching along the road from London (rather than scuttling back to Hastings) I have, as is my sad little wont, been looking at the geography and trying to put myself into the head of the commander of the French force at Chatham.

It's obvious that, given the scale and nature of the Game map, "Chatham" clearly means the whole Chatham/Rochester area  - i.e. the Royal Dockyard at Chatham, yes, but also the city and bridge at Rochester. Strangely the map does NOT show the River Medway as a potential issue in a military context (Odd, if you know the river. Odder still, if one knows one's history.).


Now, the Medway IS a significant obstacle (apparently more so by the 1700s than in Roman times). It was a navigable river (vessels up to 40 tons till the 1740s to Maidstone, navigable to Tonbridge) and there were (and still are) a limited number of crossing points downstream of Maidstone; these being (fluctuating?) ancient fords at Snodland & Wouldham, Aylesford (the clue is in the name - though there was a bridge there, seemingly built in the 14thC) and the important bridge at Rochester.


It therefore strikes me that not only would destroying the bridge at Rochester buy time for an army on the east bank, 
opening up options to the the French, but that doing so AND burning the Royal Dockyards at Chatham, would be both a blow to British power (whoever triumphs in the revolt - any British king is a potential enemy king) and a major propaganda coup. 

So, although the Government army is, in map terms, happy to attack the French, and the French happy to meet them, instead of jumping straight into a battle I'm going to go all "Yours To Reason Why" and look at the options open to Richelieu and let the dice decide


These options, looking at the real ground, rather than just the game map, seem to be:

1) Stand and fight in the Rochester/Chatham area. I doubt if George will want to fight a contested river crossing at the bridge itself, so to get him across the river the French would have to ALLOW him over (too much of a touch of The Battle of Maldon here..?). But there are obstacles on which to rest one's flanks and limit George's options once he is over the river. [Hmmm..Brave, but if the enemy mess it up, possibly a good option?]

2) Pull east of Rochester and make for the hills to the east of the city, positioning on rising ground and awaiting the enemy. [Brave and chivalrous, but possibly asking for a defeat, given the odds and chances of outflanking.]

(Note: It seems that there were no significant landward defences of the Royal Dockyards built until the 1750s, so hunkering down there - something which occurred to me given my knowledge of the site - is not, I think, a viable option.)

3) Destroy the bridge at Rochester and the Royal Dockyards before marching to the Tunbridge Wells box.

(As with other boxes on the game map this seems named for familiarity rather than accuracy. Tunbridge Wells was more a fashionable resort, than a strategic hub.

Tunbridge/Tonbridge  - the major junction, river crossing (and associated castle) might have been more apt for this box, but there we are).

[This option would involve marching through the
countryside/down country roads and possibly asking for being caught and brought to battle in the difficult ground of the Weald. Hmmm.. Knowing the ground I wouldn't fancy it myself.]

4) Ditto re. the bridge and dockyards, but march back to Hastings after all [What the Council voted NOT to do. As above, with the "retracing our steps" factor.].

5) Ditto re. the b. and d. and march along the north Kent coast, via Canterbury, to Ramsgate, destroying any Public Buildings or other facilities at Faversham, Ramsgate, Sandwich, Margate and Deal en route 
(Sandwich being one of the old Cinque Ports and the others being "Limbs", so a political coup, if not a major military one).

[
If making good time this could have legs for the French. The enemy would have to swing south to cross the Medway, giving time for the French to push quickly east along the clear, straight old Roman road; this route being easy to follow, well inhabited and being generally easy going, while providing a number of likely good battle sites if brought to ground. Entering Canterbury would be a coup of itself, as well as giving access to supplies.]


6) As above re. the bridge & docks, and march (again, via Canterbury) to Dover to destroy the port facilities there, and possibly take the castle (a major political coup). [Good to reasonable roads. The Canterbury factor. Dover Castle would be a HARD nut to crack - if properly garrisoned - but what a coup.]

No other obvious options come to mind at the moment. Decisions, decisions...

OK, let's assess the odds, and let the dice (3x6d) make a decision... 


Option 1 - Throw of 4 or 17.

Option 2 - Throw of 3 or 18.

Option 3 - Throw of 5 or 16.

Option 4 - Throw of 11 or 15.

Option 5 - Throw of 6 to 11.

Option 6 -  Throw of 12 to 14.

The dice say 10. Option 5.  OK.... In terms of the overall campaign game lets say I have three weeks before the next map move.

So, what to do now? Skip straight to the next Game Move? Why make life easy for myself..? 

So, I will revert to a simple, daily "War Diary" mode for this operation.

No Blitzkrieg here.. All movement is likely to take plaxce on road, and all will be 
relatively slow (on single carriageway with minimal alternative practical routes, so some units cannot move until others have moved and you are likely to have the "some are just setting off as some are arriving" situation.). I will be guided by the map, online resources for distances etc. - as well as details and locations.


Day One:
Government army leaves London. Stops at Shooters Hill.

French forces collect powder etc. from Royal Dockyard and stockpile at Rochester bridge. Begin burning of the dockyard.

Day Two:
Government army reaches vicinity Ebbsfleet near Gravesend.

French blow up bridge. Detachments continue with destruction at dockyards while main force moves east along the Canterbury road until Sittingbourne.

Day Three:
Royal army reaches Gads Hill. Rumours of destruction of bridge at Rochester and burning of the dockyard are confirmed.

French army reaches Faversham.

Day Four:

Government army marches for Snodland ford. Foot and horse to attempt crossing here. Wagons and guns to proceed to Aylesford.

French army detachments burn docks and town hall at Faversham while heavy wagons and main force marches to Harbeldown.

Day Five:
Government army foot assembles at Borstal. Cavalry sent to reconnoitre Rochester.

French army enters Canterbury. Guildhall burned. Army rests to allow stragglers and detachments to catch up.

Day Six: Government army foot enters Rochester. King inspects damage. Wagons etc. catch up main force.

French army reaches Wingham.

Day Seven:
Government army foot & horse reach Sittingbourne. Wagons etc. follow.

French army enters Sandwich. One brigade and cavalry dispatched to Isle of Thanet to carry out damage there. Fishing vessels commandeered and dispatches sent to France regarding current situation. Dockyard and town hall burned.

Day Eight:
Government army enters Faversham. King inspects damage. Army waits for any delayed wagons etc. to catch up.
 

Battle of Ramsgate - minor skirmish where the French "Brigade of Destruction" meet Ramsgate Garrison*.

Main French force rests. Council of War to decide next move. Inconclusive.

[I'm assuming there isn't a whole regiment at Ramsgate, but, again, the map box represents the whole Ramsgate/Sandwich/Deal castle/Sandown castle/Walmer castle complex, with men parcelled out in penny-packets. This seems reasonable. In terms of the Board Game rules this would be an "overun" anyway. Alas, I have no larger scale figures for this period, so a 1/72 skirmish game is out of the question.]


Day Nine:
Government army enters Canterbury. King inspects damage. Service in cathedral. Reports come in regarding French activity in Sandwich/Thanet area. Council of War. Options discussed include pushing for Dover, splitting force to deal with French destruction and retake Sandwich or concentrate on catching French army.

The French march to Deal. They have only battalion guns (OK, taking naval guns from Chatham and putting them on wagons would have slowed them down, but...) so can only make token bombardment of the castles at Sandown, Deal and Walmer. Are rejoined by the brigade sent to Thanet.


Day Ten:
Government army dispatches flying column on forced march to Dover under Albermarle. Arrives at nightfall and enters the castle. The King, the Hessians, two regiments of foot, the wagons and the heavy weapons remain at Canterbury..

Scouts bring news of Government forces at Dover and CanterburyFrench Council of War. Moving to Dover seems pointless without heavy guns. The options appear to be to march to attack the King at Canterbury, to sit tight at Deal, to fall back to Sandwich or to move to Thanet and wait for reinforcements. The Council decides to do the latter.


So, no Battle Report for Chatham after all.... Sorry...

Next move on the Game Map could see action in Scotland or the Borders. There is a possible second wave of French coming. King George could decide to crush those pesky Frenchies cluttering up Kent. Who knows...? 


Or three... Or four......

VERY little to report.... Due to a busy reenactment season another filler post I'm afraid, just to show I'm still here...... Our ann...