Anyhoo, I decided to have a slimmed down try-out, tweaking the "Albany" table set up from the last table game (and before I altered it for the second campaign battle).

Technical Notes:
Basically I tried out the PW threat generation/action/reaction system, rather than the full rules (I have move/shoot/C&C rules). After the bulk of the enemy arrived I also cut down the number of card draws; making them dice throw per move/detachment dependant, as per my usual "Event" processes.
I didn't complicate matters with too many settlements, the fort, miners etc. and limited reinforcements for the cavalry, so the Card Pack was adjusted accordingly. I also used SP style Token Activation for leaders/units, rather than IgoUgo and my House Combat & C&C rules rather than the somewhat complex (?) percentage chart system in the game.
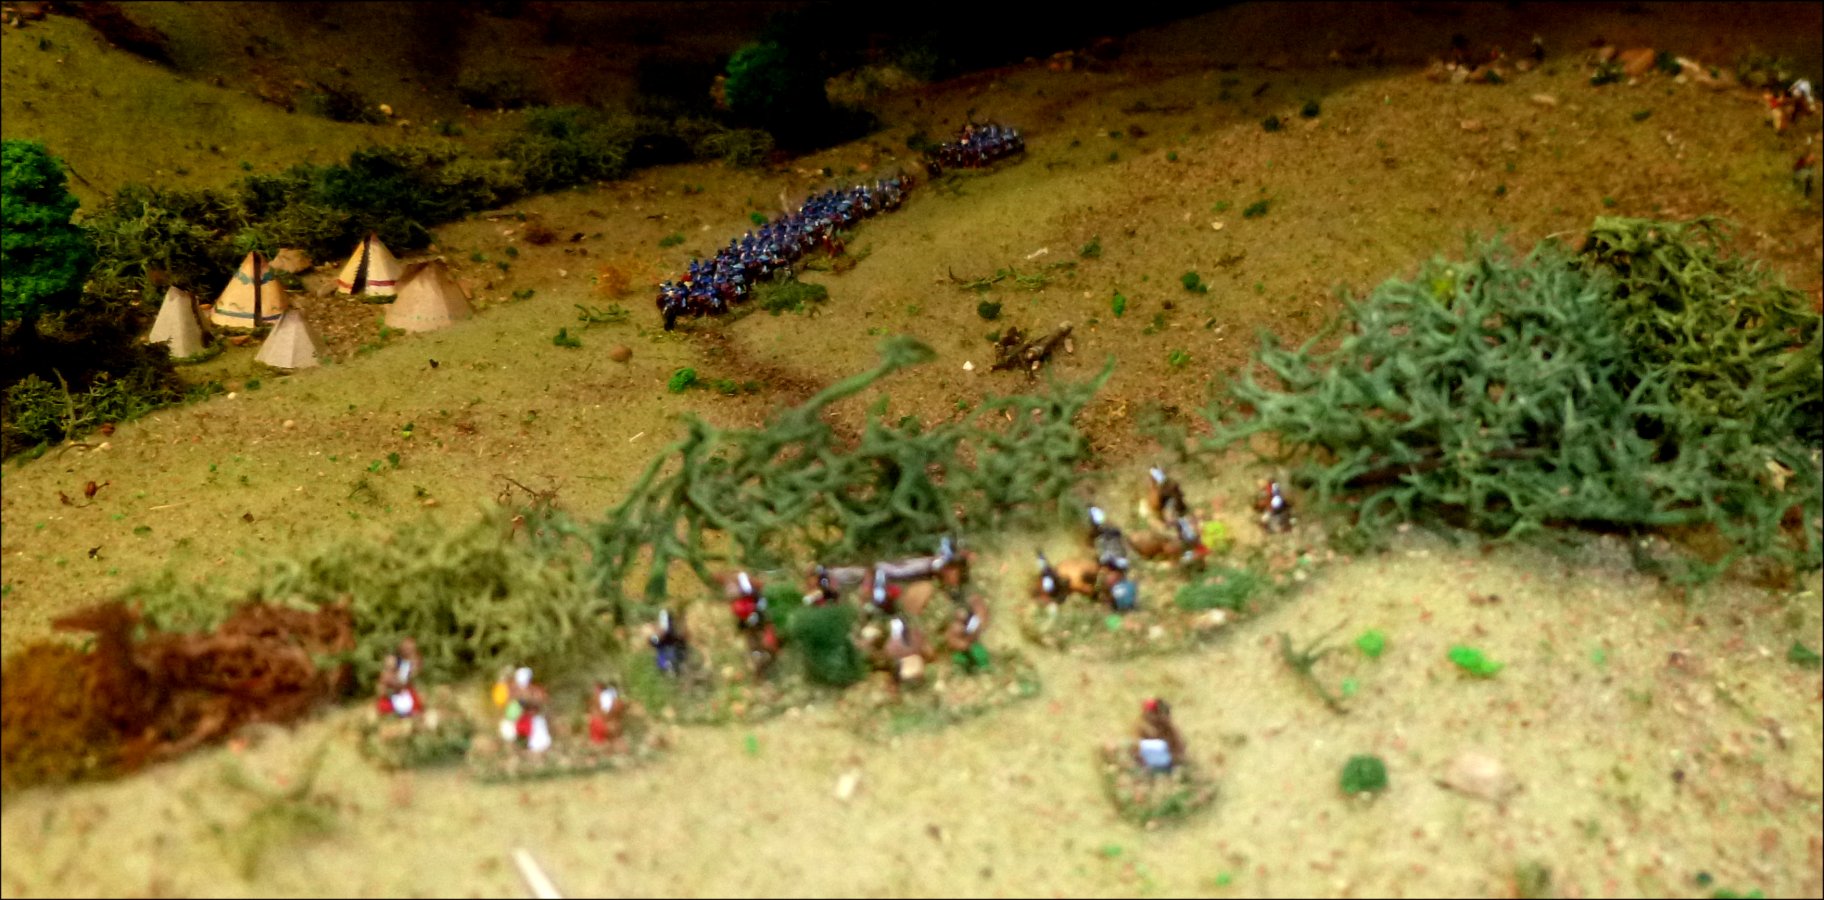
As I did this in 6mm I used two companies (troops) of cavalry at a 1:1 ratio (one of the joys of 6mm) at, say, 40 men per company.
I can run to about 230 hostiles (horse and foot - but don't look too close at the horse...) on the table at the same time.

The Backstory:
Captain Beech and Lt. Aspen (of E and F Troops) have been ordered to the Brown Beaver Agency after a request from the local Agent. A number of families from the resident tribe have gone awol from the Reservation. This is a concern since a not-insignificant number of bravos (in fact several score) have been going missing over the last few weeks - possibly influenced by a renegade warrior named Two Trees (a situation which the Agent had not seen fit to inform the Authorities until now).
The Captain has been ordered to seek out the wandering families, who are believed to be in the vicinity of the Little Beaver headwaters, and return them to the Reservation. He has been given several friendly Brown Beaver scouts as guides and interpreters.
Information from passing trappers have indicated that there are tipis camped in Hemlock Valley, near the Balsam farmstead and where the stage road from Cypress Springs crosses Little Beaver Creek. This is where the troops will head first.

The terrain is hilly and somewhat broken, with outcrops of rock, clusters of impenetrable thorny scrub and patches of woodland, particularly by Little Beaver Creek. In the north west corner there is the edge of the Trembling Forest - which could prove a haven for hostiles or fleeing families.
[Technical Note: There are no "Passes" or Buttes as used in the "Pony "Wars" rules. Instead of "Passes" I will use "Ambush Points". These are basically any spots on the table - cover, pockets of ground, "choke points", narrow valleys etc. - where hostiles might hide in waiting. Local forces will emerge from the table sides (as per the Rules/dice throw) or the native villages or from ambush.]

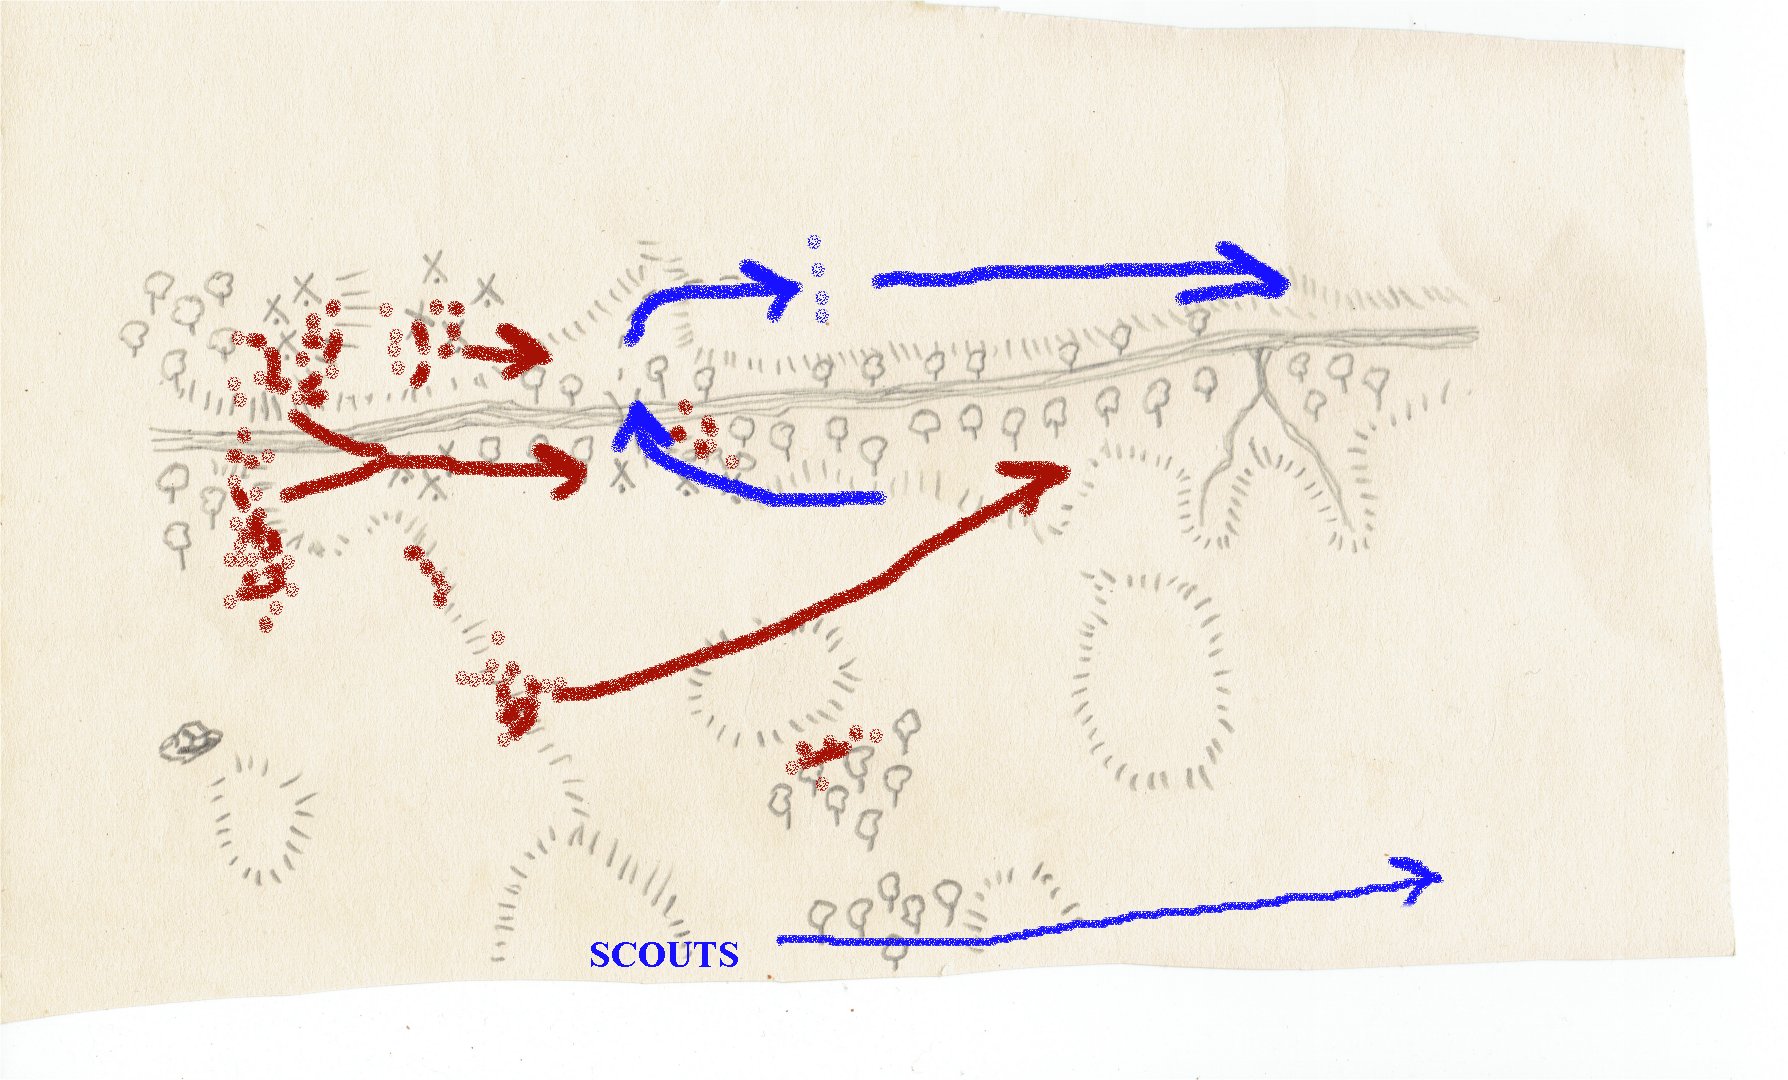
The Plan and Game:
OK.. So the plan is that both Troops will move until they spot the village. A Plan will then be formulated.
Three uneventful moves into the game and good progress is being made. Scouts report they can see tipis in the distance, and the force gathers on a high point we will call "Rocky Hill". To their front, along the creek and nestling beneath the tree-covered foothills of Trembling Forest, they can see the native camp. We halt the command on Rocky Hill to consider our options.
We won't want the hostile civilians to make off into the forest, so the plan is that the C.O. and Troop E will proceed out of sight of the villages to the Balsam Farm, accompanied by a detachment and First Sergeant Elm from F troop. The rest of F Troop will hold, hull down, at Rocky Hill.
On arrival at the farm the F Troop detachment will escort the settlers there to safety. Meanwhile, E Troop will move on the village due north, to cut off the escape route to the forest.
As soon as E Troop makes its move (signalled by bugle call and gunshots) the remainder of F troop holding at Rocky Hill will charge the east end of the village. This combined assault should be enough to cow the natives there. These will be then be gathered together and escorted east alongside the creek, up onto the Stage Road and off the table. Simple.....

Meanwhile, scouts to the south east of the main force spot a group of twenty or so braves galloping north/east between them and the farm. Two scouts take cover, while one gallops to inform the main force..
E troop and the detachment move off - avoiding the high ground so as not to be seen. However, on reaching a narrow spot in a valley between some woods and a long hill, lets call it "Boulder Hill", they come under fire from the trees. The cavalry take hits, and rush away from the shooters, climbing up to Boulder hill. Here E Troop dismounts and forms a skirmish line among the rocks, but the detachment from F Troop, having lost men, including First Sergeant, Elm, and become disorganised climbing the hill, panic; riding off towards Rocky Hill.

From Boulder Hill E Troop exchanges fire with the natives in the woods. Lt. Aspen dismounts one of his sections on Rocky Hill. These give supporting fire from the flank.
However, the group of braves seen earlier by the scouts react to the sound of the shooting and race to the ridge-line overlooking Boulder Hill. From here these warriors open fire on the Flank of E Troop. Captain Beech pulls two sections back at an angle to face this new threat and there is an exchange of fire with the natives on the ridge.


Within two further moves the Indians in the wood become discouraged and pull away to lick their wounds.
[Meanwhile a card draw starts "The Drums". This is not good, as it allows an off-table build-up of potential enemy reinforcements.]

The panicked unit from F Troop rejoins their Lieutenant and rallies on Rocky Hill. Aspen organises his command, but takes no aggressive action; preferring to maintain a firing line in case of more hostiles emerging and await further orders.
At Boulder Hill things aren't going well. Although the shooters in the wood have pulled back the mounted hostiles on the ridge get lucky; several troopers of E Troop fall - including Captain Beech himself, killed outright. This and the sudden build-up of shock, prompts a rush for the horses, and the next thing I know E troop has totally panicked, and rushed off towards Rocky Hill. Not at all good.

As the fleeing E Troop pull alongside Rocky Hill, their First Sergeant, Oak, quickly joined by Lt. Aspen, manages to halt their flight and regain some sense of order.
The mounted hostiles on the ridge are content to cheer, as they watch the cavalry run off. Then, seeing Aspen making no move, they race across to Boulder Hill and occupy it (no doubt dealing with any wounded troopers left by E Troop's flight). They stay here for several minutes. From their point of view it is "Job Done".
However, all of this takes time - and over by the tipis practically all of the women and children have run to the safety of the forest. THAT objective has sailed; leaving only the settlers at Balsam Farm to be "rescued"....
Up on Rocky Hill Lt. Aspen gathers together the remains of E Troop and his own. He still musters over 70 troopers, plus scouts. With no movement among the tipis it would look as if those birds have flown. He comes to a decision, and will proceed to Balsam Farmstead. However, as he watches the hostiles on Boulder Hill, he formulates a Plan...
First Sgt. Oak of E troop will lead two sections of men down towards the river, as if to move on the village. Hopefully that will draw the hostiles down from Boulder Hill, allowing Aspen to charge them, and trap them against Oak's men and the river - or at least to scatter them.
However, as soon as he has given his orders, smoke signals can be seen coming from the trembling Woods. As if in response to this, the mounted hostiles on Boulder Hill fall back to the ridge, where they are joined by the riflemen from the woods. Hmm..... All very suspicious, but Oak continues down to the river.
On Aspen's next activation he sends scouts down to inform Sgt. Oak of the latest developments and a change of plan. Aspen will bring the whole command down towards the river, join Sgt. Oak, then proceed along the river flats before heading up to the farmstead.

While Aspen's men make their way along the river flats, the mounted hostiles on the ridge return to Boulder Hill on Aspen's flank - unaware of the scouts climbing up the opposite side - while the hostiles on foot run to the scrub on the river end of the ridge to Aspen's front.
[Technical Notes: While this is going on, with the Drums Beating, the hostile reinforcement cards are building up. When (or if) these activate Aspen's command could be in serious trouble.]

Next turn the hostiles on Boulder Hill spot the scouts - who see them at the same time. The scouts react, and try to turn and run. The hostiles also react - and charge - easily overrunning the scouts [Some hurried dice tests], who are cut down in their saddles as they try to flee. However, this brings the hostiles on the hill in view of Aspen's men.
As if prompted by all the noise from Boulder Hill the hostile riflemen on the ridge open up at Aspen's column. This is probably a mistake, as at this distance they are unlikely to cause much damage. The sudden volley causes a stir among the troopers, but no casualties. Aspen moves, but then the riflemen get another chance to shoot. A trooper falls, and the men of Oak's section start to get worried.
Next move; the Drums stop... Oh, oh..... Suddenly the eaves of Trembling Forest echo with war-whoops, as about 125 hostiles rush from the trees, the majority of them mounted. But can Aspen see them..? Some quick eyeing-in at table level. He can see SOME - but will have no idea of how many there might actually be.
[Quick decision table, since I have more knowledge than Aspen and I don't like playing All-Seeing Eye....
Ok.. He can see and hear an unknown, possibly large (they are noisy) body of hostiles coming out of the trees to his front right. He has been shot at from cover on high ground to his left flank and taken casualties. He has hostiles to his left rear who have killed the scouts there. Earlier on his commanding officer was killed, some of the men of the leading troop broke, he has lost his own First Sergeant. All pretty bad.
However, I never did a "Personality Test" for Aspen (I was "playing" the now deceased Cpt. Beech), so I'd better do that....
Using an SP type process he turns out to be a good-looking young buck, of average build, from a good military family, went to military college, is mild-mannered and polite - even chivalrous - with no known vices. He has a good seat and is accomplished in the hunting field and with weaponry. He has been in action twice already and is reasonably secure in himself. He is above average in courage, being neither rash nor cautious. As a result of all this he is popular with his men and they are reasonably confident around him.
Ok.. This suggests he will be able to assess the situation calmly and sensibly, come up with a reasonable number of actions and give calm, precise orders which will be obeyed.
I start the stopwatch..... It takes about a minute and forty five seconds to sum up the situation, make a quick Ad Hoc Decision table based on his personality and the options open to him, and for him to make that decision, call over his sergeant and pass the orders.. So a full move.]
On the other hand, once above the bluffs he is confident that he can form a fighting line and scatter any attacking enemy force (of whatever size) foolish enough to attack him, with firepower; then allowing him to proceed to the farmstead - if still standing (which he will be able to see from the bluffs).

He moves his force down to the creek to join Sgt. Oaks. but as they reach the flats gunfire erupts from high ground.
Meanwhile the mounted hostiles in the vicinity of Boulder Hill move along his flank, eventually turning towards the creek, as if to cut him off from heading east.

The two cavalry scouts, on the south edge of the board and who have (wisely) been laying low all this time, take the opportunity race eastwards.
Aspen's men reach the woods by the ford and cross the creek.


Next move the whole hostile force, all war parties, home in on Aspen's command and, as they mount the narrow track up the ridge above the bluffs, the rear of his column (the remains of E Troop) is struck by warriors of the Boulder Hill band and another trooper falls.


Things are hotting up. The column comes under fire from hostiles on foot by the creek, causing panic among Aspen's men, then more hostiles arrive at the bottom of the track to the Bluff Ridge; but this only causes confusion among the braves, as both groups struggle to close and count coup among the apparently fleeing troopers. However, despite this, three more cavalrymen fall to the spears and tomahawks of the braves.
Suddenly a stroke of luck for Aspen [three CP tokens and good dice]. At the brow of the Bluff Ridge he rallies his Troop, is able to dismount most of his command and form a firing line. E Troop is still panicked and in disorder, as it rushes up the trail, but things could be worse.

As we go into the next move, again, Aspen is lucky [first token to be drawn]. Inspired by his encouragement his men fire with a good, orderly volley towards the hostiles. It only causes a little disruption at this range, but seems to do the trick; sending a message to the hostiles that the troopers are organised and waiting on the high ground. The main force of hostiles halt on the slopes south of the creek. None of the hostiles on the north bank want to make a suicide charge up the narrow trail to the ridge, and their mounted elements begin to fall back to the main group.
Aspen, given breathing space, considers withdrawing slowly, by sections, along the ridge. He is unlikely to be followed; so far as the hostiles are concerned they have got their women and children off to safety and successfully seen off the cavalry. They have nothing more to prove and nothing to gain by losing men to a retreating enemy.
However, there is still the settlement. In theory Aspen's sixty-odd remaining troopers should be a match for the hundred and eighty or so hostiles visible, but with any element of surprise gone and his men - especially E Troop - jittery he is in a bit of a quandary. He COULD pull back along the ridge, pass down the larger coulee to the east, cross the creek and try to reach the farmstead - risking more ambushes and an attack from the hostiles - or simply return to the fort.....
Aspen decides on one last throw of the dice. Leaving two sections and E Troop's bugler on the bluffs, with orders to move about to demonstrate their presence and respond to firing - but to skedaddle if the hostiles move forward - he will take the rest of the force east to the coulee, cross the stream and make his way along the low-lying land out of sight of the enemy, until level with Rocky Hill. He will then form line in the dead ground and rush the enemy flank, building to a charge on approaching.

His force does this without incident. Meanwhile the hostiles are content to exchange desultory fire with the section on the bluffs.

Aspen's main body move along the top of the bluffs without incident. They negotiate the coolee and cross the creek, reaching the dead ground beyond unseen. So far so good.


As soon as Aspen's force is in position he gets them in order, then trots them forward, up out of the dead ground, in two lines..
His (bugle blowing) line of horsemen appears "out of the ground" on the flank of the hostiles, and they panic - perhaps assuming that this is a new force ("Here comes the cavalry!!").


However, next move the hostiles Activate first, and move further off at high speed. There is no opportunity for Aspen to charge to contact.
The main body of hostiles moves to the edges of Trembling Forest, and halts.
For Aspen the idea of charging into the trees - with his horses needing a period of slower action if they are not to become blown - is not an option. Instead, Aspen turns his command and moves off into the dead ground and valley between the ridge and Boulder Hill towards the farmstead. Among the trees the hostiles hesitate. They don't like the look of things.

The hostiles have no cause to lose men harassing Aspen, having secured their vulnerable women and children and already have counted coup against both E troop and the men they caught crossing the creek and at the foot of the trail to the bluffs and, to their mind, seen them off. They decide not to needlessly risk any more lives against this "new group" of Long Knives...
It seems to me that things have reached a conclusion, narrative-wise. Aspen can leave the table with the settlers - which he does. Roll credits...

That was a fast moving piece of fun. The rules and systems worked, though I thought the "pick a card every move" process - fitting to a demo or co-op game where you want constant stimulus to keep folk interested - was a bit "overkill", and moderated this (with a dice test to draw a card) once more than 160 hostiles were on the board.
Also, I was working 6mm, not 15-28mm, on a 4.5 foot x 7 ft table. With 6mm you can do wide-sweeping movements which suit the genre (plus go for a 1:1 ratio) but this will mean more moves, and thus more card drawing.
I can see this as a great idea for a near-RPG or inter-unit (say, between forts or troops) campaign for a group/club, as well as working for solo.
Were this part of a campaign this would count as a "lose" for the cavalry - and a mixed result for Aspen personally.

The cavalry got a punch on the nose, losing an officer, a senior NCO and several men, failed to secure the tribe's civilians, failed to cause any significant loss (from the cavalry "body count" point of view) to the hostile warriors and withdrew (albeit in the face of superior numbers).
Aspen himself SHOULD have come out of this well; he took command after his superior fell, rallied his men, developed a plan on the hoof and carried this out - securing his men and the settlers.
However, he is the sole surviving officer in a cock-up, plus totally neglected to address the issue of the bodies of Beech and his troopers; which were left to be treated in traditional manner by the tribe, and which will need to be recovered - at risk - by a burial detail.
Were this part of a campaign, his future career (and promotion) would depend greatly on how his immediate superior feels about him personally - and the political considerations higher up. If they want a scapegoat he will be in the frame.
However, given his family background and connections (plus his "bankability" as a personality) he might come out of it well, and even step into Beech's boots; especially if the Army wants to sell the "Beaver Creek Incident" as a success ("Junior Officer Steps Up And Saves The Day" etc.) rather than a damp squib....
But those bodies could very well come back to haunt him, and affect the morale of his next command. Kipling (as so often) comes to mind: "The papers 'id it 'andsome, but you know the Army knows.."

As always, comments/snipes etc. welcome.


