Showing posts with label Decision Making. Show all posts

Monday, 29 August 2022

This Ain't Zululand: Part Four

A Delayed Post:

I'm a bit behind with posts & write-ups thanks to the Reenactment Season (Evesham, Bosworth etc. and associated injuries), heat-induced lethargy, a bout of Covid which I'm still shaking off (dagnabbit) and family-issue wrangling, but here we go. Thoughts on a replay of the previous TAZ fights, but from the Other Side of The Hill.... 

Playing At Home.

Same set up and scenario as the first battle, this time playing as the Great King's general. My job is to stop the British achieving their objective while not losing too many men.

The reason for this (apart from the fun) is to play around with a situation where it is MY guys who are hidden, to see how I can manage a "secret plan" of my own with limited data AND how to manage the enemy's reaction to what they find. There may be some seat-of-the-pants flying but should be fun.

Decisions, decisions:

My first decision will be how to deploy my forces.

It doesn't take a military genius to see that the British will be most vulnerable if their convoy straggles (test throws will be as before, and as we have seen before, so this cannot be guaranteed) or when they are crossing the Drift (or drifts). Having men to hand to take advantage in these situations would be good, but placing them so makes their discovery by enemy scouts more likely.

Scattering my regiments will allow wider coverage. However, this leaves them open to defeat in detail and increases the chances of independent action on the part of my sub-commanders. Placing troops off-table keeps them safe, but makes them difficult to summon - and again risks independent action on their part. Also, do I expose certain troops to view (and thus fire) in the hope this affects enemy decisions ? Hmmm....

Once the British enter the field (via the track) they will be making their own decisions as to what to do. This will be hidden from me since while my general can guess at their route, how they actually approach and how (i.e. in column of march, deployed for battle or in mobile square) will only be "known to me" if I chose to place the general in Line of Sight of the column (i.e. close to the action) or when a report (Messenger) mentions this (see below: "Incoming Data").

The enemy "decision" will certainly affect the success of any moves on my part. Their decision may also affect how any of my sub-commanders react.

One thing I will need to decide is where to place my general. Ideally he should be able to see both the enemy and his own army. He should also be in a position to signal to his men so as to exert some kind of control over the action. However......

Given that on the two previous occasions the "Home Side" achieved their objective with just the AI as player (albeit at a cost) I feel that I should handicap myself. My general will therefore start the game in the kraal (let's say he is having "second breakfast"; one of the privileges of rank) and will not move from there until there is the sound of heavy gunfire (say at least a whole British company) within 36 inches of the kraal or a message arrives (see below) indicating that the enemy are here in force.

Incoming Data: 

Unless the enemy is in clear sight I won't know what they are doing unless informed by messenger. Unlike the enemy horse in the previous games I do not have separate Scout Units. Instead my units must spot the enemy, then send messengers to my general. These messengers are not professional soldiers (these are the junior ranks of the units - perhaps rookies or even herd boys). The process will work like this.

On an enemy force approaching within sight and within twenty four inches of a friendly unit or scout a test is made per friendly move on the table below to see if a messenger is despatched:

We then assess how long, in theory, a messenger will take to reach the General and test once that time is expended to see if the message has been delayed.
 

Once the message has arrived we test again on the table below to ascertain how good the data sent actually is.


Summoning /Activating Troops:

On-table troops will be activated in the normal way  - i.e. their commanders will react to messages, pre-arranged signals, react to ad hoc decision tests with regards changing situations and standing orders etc. etc. However, off-table troops must either have specific instructions as when to enter (written before play) or must be summoned by signal or messenger. They will NOT enter the table without orders. 

Messengers sent by the general will be subject to the usual problems/factors of messengers, with a standard "Delay test". Messages must be written out and must be interpreted based on the actual words - not the intentions of the writer.

Signals, if used, must have a pre-set meaning (written down at the start of the game, "e.g. On signal march to location of smoke", "On signal; march to Black Calf Kopje",  "On signal; march to Black Calf Kopje, attacking any enemy seen en route"etc.). Their implementation may be subject to a "Delay Test". Once on the field they will be subject to normal sub-commander reaction tests.

Pre-set instructions must be specific (e.g. "If many guns are heard march to them", "March to Black Cow Kopje when the sun is highest", "March to any Kopje from which I signal with smoke", "March to the Drift" etc.)  with a supplemental instruction if desired (e.g. "If many guns are heard march to them. Attack any enemy seen."  etc.).


Summary:  

Yet another "How Can I Introduce FoW into my Games experiment. OK, a lot of tables there, but I want to see how I can manage (or mismanage) on limited data. Playthrough next....


Sunday, 2 January 2022

1776 And All That....

 A "Cheat" Campaign.

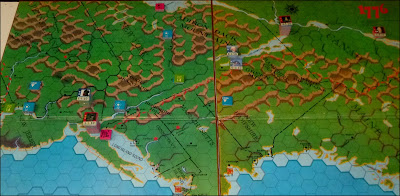
One of the easier methods of playing a campaign I've adopted over the years is to use an "oven ready" board game to generate the battles.

This means less work to set up the campaign parameters and systems for supply/politics etc. (assuming I know the game rules), no map work, scaling or other niggles. One just sets out the game and away we go; basically scenario generation the easy way.

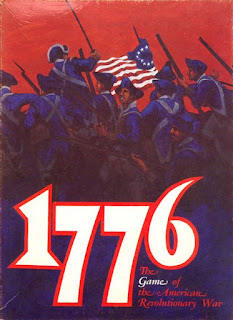
Avalon hill's "1776" is one of my fave board games, is reasonably easily adapted for Solo and provides a lot of fun as a board game. As a "scenario generator" for the table it is one of the best, I reckon and has a place in my heart as being one of my earliest board game purchases.

It also has the advantage of having a number of ready-made small, short game scenarios which allows you to play without embarking on a marathon "whole war" exercise. Hence.....


The Saratoga Campaign:   

Using 3rd edition rules (cadged from the Web - since getting a copy THIS side of the water would break the bank) and home-printed Leader counters I set up as the Scenario Instructions. 

I will play the Colonials on the map (as Geo. Washington). I write initial orders each move for the various commanders of the independent commands scattered across the map. HOWEVER, people being people, there is always a change these officers will not obey my orders promptly or may even go off piste. The chances for this will be based on ad hoc Decision Tests, dependant upon their personalities and, where appropriate, affected by enemy action. 

The British will have an over all strategy based on their Victory conditions, but the actions of their individual commands will, like mine, be based on personality-tweaked Decision Tables. British forces above a certain size and a certain distance from my forces may also generate "Decoy Tokens". These will also act on ad hoc Decision Tables.

Also, I will abandon the IgoUgo system and activate all independent commands (inc. Washington and Decoys) by Token Draw.

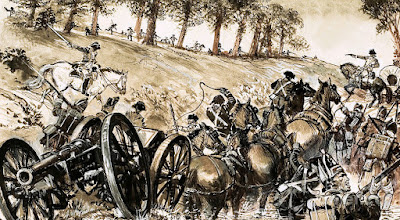
Table battles will generate themselves, however I do not intend to fight sieges/assaults on forts on the table as 1) I want this to be a quick "experiment" and 2) thanks to the amazing Mr. Google one has no real excuse (beyond laziness or time or cost) not to model the actual forts reasonably accurately (once one could have blamed use of a "generic fort" on "the library never had a book showing it". The incredible resource that is the Interweb shoots THAT get-out down in flames).  

OK, so off we go.

First Move: 

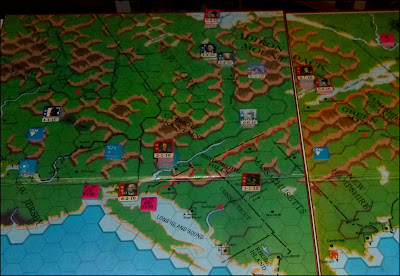
Washington is activated (Yay!) and scuttles back into Pennsyvania to avoid any sudden moves by the large British force at New York. He dispatches Lafayette to gather heavy artillery from West Point before the British seize it.

British General Howe, at New York, decides to send three Decoys out, one by sea along the coast towards Princeton, one towards New Haven and one up the Hudson towards West Point (aka Fort Clinton).

Meanwhile Wayne shifts up the Delaware Valley to try to put the Catskills between him and the British and threaten the British garrison at Ft. Oswego.

General Burgoyne moves down from Canada towards Fort Ticonderoga. 

There is no action. 

Move Two:

Reinforcements are placed as the scenario rules.

Faced by Burgoyne's superior force Shuyler, at Ticonderoga, panics, abandons the fort and pulls out his troops and guns: moving towards Fort Stanwix. Warner, across the lake at at Mt. Independence likewise abandons his post and pulls back into the Green Mountains.

Burgoyne occupies Ticonderoga.

Wayne continues towards Fort Oswego. 

Howe advances into Connecticut to secure British supply lines.

Henry Clinton disembarks at West Point/Ft. Clinton.

Move Three:

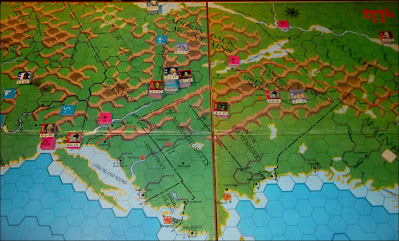
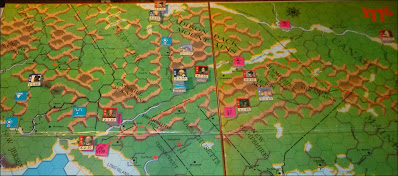
Howe pushes into Massachusetts.

Burgoyne moves towards Albany, leaving a garrison at Ticonderoga.

While Wayne and Lafayette continue the advance on Oswego.

Warner moves behind Burgoyne and up towards Fort Stanwix.

Henry Clinton attacks and takes West Point/Fort Clinton. 

Move Four:


Howe pushes into New Hampshire to secure British supply lines, now threatened by the appearance of Stark.

Lafayette's force approaches Fort Oswego.  At Oswego Brandt wants to ambush the Colonials as they approach. The fort commander is against this and refuses to allow his garrison to take part in the adventure. Brandt and his force leave the fort by bateau and canoe. Lafayette attacks the fort and takes it, but suffers losses.

British troops under Grey land on the New Jersey coast to threaten Princeton. 

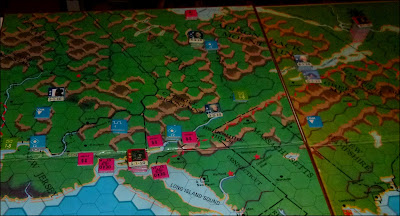
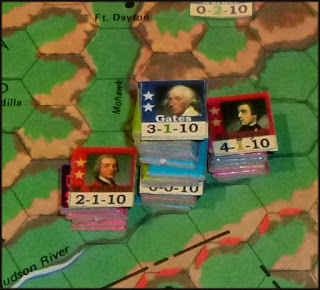
Gates, at Albany is reinforced. He now has a force here of approx. 6,000 men and sufficient supplies to put up a good fight. He decided to stay put in the vicinity of Albany. However, he has neglected to entrench.

Meanwhile both Burgoyne (12 regiments plus Indians and a battery of heavy guns) and Clinton (15 regiments and a battery of heavy guns) move towards Albany with the intention to attack Gates. Both forces enter the Albany hex.


"Fight On The table" Table Decision Time:

1) Gates's Decision:

With Gates at Albany, and the two British armies under Clinton and Burgoyne headed to the town, we now have a possible Field Battle looming.

Now, the 1776 Game Moves are "a month" long. This would seem to be plenty of time for Gates to decide on what he wants to do before the arrival of the British. Would he elect to stay put, or push off to avoid what could turn out to be a pincer movement, or what? We will allow Gates to decide.

However, although the map moves are a month long the hexes on the map only represent about 18.5 miles across. As mentioned above; Gates had, in theory, good time to decide what to do IF approached by the British forces. BUT both British forces arrived in the Albany hex after the halfway stage of their moves and after using different amounts of that move; Burgoyne after three fifths of his move and Clinton five fifths.

This allows Gates time to attack Burgoyne BEFORE Clinton even reaches the hex, but would he..?

Working on the (Traditional? Unfair?) reading of Gate's character I'm going for a 3x6D test: 

3: Leaving a small force to hold Albany, Gates steals away with the remainder of his army northwards towards Ft. Stanwix (and Lafayette's force) to avoid "the trap". 

4-6: Gates calls a Council of War* and abides by their decision (Arnold and Morgan will press for an attack on Burgoyne).

7-8: Leaving a holding force in Albany town to distract Clinton, Gates moves to the north of Albany and approaches Burgoyne. Whether he attacks or holds to simply block will be decided once he is close to the enemy (fought as an "Encounter" battle). 

9-11: Gates digs-in in the vicinity of Albany to provide a defence against attack from both directions

12-13: Leaving a holding force in Albany town to distract Burgoyne, Gates moves south to Normans Creek hold there to await Clinton's attack or to attack Clinton (to be decided once he is close to the enemy. Fight as a Face to Face battle). This, however, may leave time for Burgoyne to attack him from behind. 

14-15: Gates calls a Council of War and ignores their decision*; remaining in situ at Albany without digging-in. He will await attack.

16-17: Leaving a small force to hold Albany, Gates moves his whole force to attack one of the British armies (dice for which, fight as an "Encounter" battle).

18: Gates despatches Arnold with a small force to swing past Burgoyne and move to retake Ticonderoga while taking his main force across the Hudson and towards New York. 


(*Councils of War: I would use the method described on my Post "Technical Interlude: Council... What Council....?" but with the various Leaders with Gates acting as "Councillors" with starting cards based on their known characters.

IF Gates chooses to ignore the Council decision then Leaders who have voted strongly against him may very well decide to engage in independent action - i.e. disobey orders on a dice test. If Gates goes along with the Council decision, but certain Leaders who had proved very much against the consensus remain "unconvinced" they MAY consider disobeying orders on a dice test.)

I make the dice check: an Eleven. Gates will garrison Albany and attempt to dig-in nearby to withstand an attack from any quarter before any British forces press home. If the British are prompt he will only have time to put together scratch defences (Arnold goes SPARE !!).


2) British Decisions:

A very basic dice test (not to mention their orders) has already decided that both British forces will press on to Albany. However, whether either force will press home an attack on Gates's force (if it is still in situ) is unknown; as is how prompt they will be and whether they can/will coordinate with each other in any way.

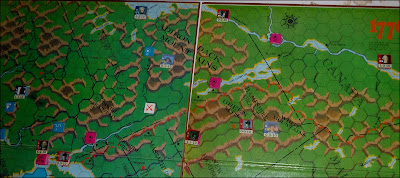
Burgoyne has advanced via Forts Miller and Hardy (not on the 1776 game map) on the west side of the Hudson. He has already stolen a march on Gates, and crossed the Mohawk River (??? Commandeering the ferries and local canoes? Portaging his bridge of boats ALL the way from the Hudson up the Mohawk to pass the falls? Sky-hooks? Goodness knows.. Looks ruddy difficult to me - but that's one of the anomalies of board game movement. Mind you, I have no idea how Gates's/Schuyler's army crossed it either in real life, so there we go... Let's say Burgoyne got his bridge of boats to come down the Hudson and crossed the Mohawk at the confluence with the Hudson while Gates was asleep....).


He still has time to attack Gates (12 days) before Clinton. However, discretion (dice test) overcoming his gambler's instincts he elects to spend 6 days digging-in, so that he has a bolt-hole if repulsed by Gates/thrown back after an unsuccessful attack on on Albany, resting his army, seeking supplies locally and trying to make contact with Clinton (simple dice test per day for this; fail on each occasion).

After this six days are up Burgoyne hesitates (has he lost his nerve?) and spends two more days trying ascertain Clinton's whereabouts and intentions. On the third day (28th) he moves to engage Gates, whatever the risk.

Clinton is likewise on the west side of the Hudson. When within 18 miles of Albany he halts, resting his men and seeking news of Burgoyne for two days.

While Burgoyne is moving towards Gates' army Clinton's scouts make contact with him. Clinton wishes to further rest his men and secure supplies, as well as reconnoitring the ground beyond Norman's Kill/Gates's position. He will not attack until the 29th.

On hearing this Burgoyne halts, his men camping rough while his indians and scouts reconnoitre Gate's position. He WILL attack on the 29th, whether Clinton supports or not.

[Note: All of the above "decisions"  were simple dice tests with modifiers based on Personality and circumstances.]

We have a battle.....  All we need to know is what the field will be like....

4) My Decision - How To Set Out The Table: 

OK.. Gates has decided to stay put somewhere in the hex. Burgoyne has elected to attack him, wherever he is.

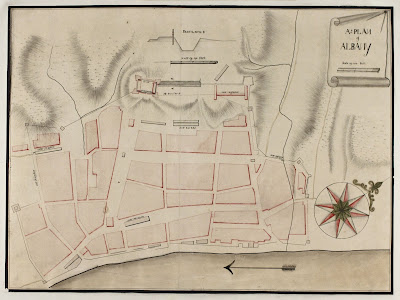
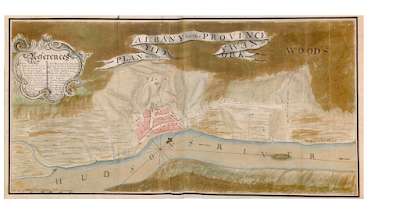
Looking at old maps (I LOVE the Interweb) Albany itself has a fort (described by contemporaries as dilapidated and apparently mainly used as a prison) and stockade but appears to be dominated by patches of higher ground outside the enceinte.


Basically it looks like the adage "If you want to defend this place I wouldn't do it from here" seems VERY apt.

Digging-in at the town itself seems a daft thing to do - especially as both British forces are accompanied by heavy artillery. However, entrenching on the heights above the town might be considered - denying the town to the enemy and keeping supply lines open up the Hudson (in theory...) if the British lay siege. This seems an option.

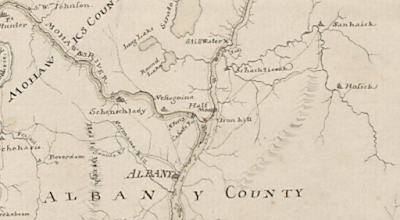
The Mohawk River has already been crossed by Burgoyne (to enter the hex - goodness knows how; see above).

However, in reality this river is a serious obstacle and Gates might consider moving towards the Mohawk and using that to protect his flank/rear before settling into a defensive posture. The angle between the Mohawk and the Hudson, by the Falls, looks secure - but I'm going to assume that that is Burgoyne's bridgehead (aka deathtrap?). Of course Gates could rest a flank on the Hudson between Burgoyne and Albany. 


Between Clinton and Albany is the river Normans Creek (aka Normans Kill - not on the game map and close enough to Albany got Clinton not to have reached it yet). From StreetView and Google maps is not a creek you want to have to fight across. Gates might very well consider using this obstacle.

On the other hand, the terrain around Albany seems wooded with a number of slopes, hills and other places suitable for defence.

Hmmm...... Do I decide for Gates, or make another test? I guess that depends on whether I am going to "Fight the Battle" as one of the British forces or as Gates (basically I'd chose the one with the hardest job, just to make life interesting).

I COULD have gone to an annotated map and worked the moves day-by day, but we already know what the British are going to get up to....

So..... I toss a dice for Gates.

1-2) He will dig-in on the gentle ridge that seems to run from Albany town eastwards, resting a flank on the town's fort.

3) He will dig-in on the banks of Normans Creek, commanding the main crossing.

4-5) He will dig-in on the larger north-south ridge between Burgoyne (at the Mohawk/Hudson confluence) and Albany.

6) He will march to the Mohawk in the vicinity of the ferries at Schenectady and dig-in, using the river to guard his flank and giving him the option of pulling back upriver towards Ft. Stanwix and Lafayette if defeated.


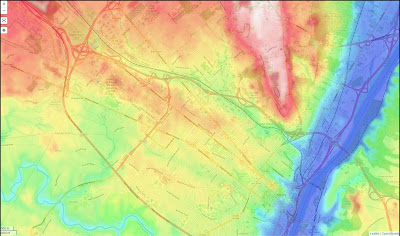
I dice. He opts for No. 1.

I will set up a table with a wooded ridge with the fort/Albany at one end. Gates will be somewhere on it. I will play Burgoyne. He has fewer troops. He will have no idea of Gates's exact dispositions. There is no guarantee Clinton will help, even on the second day....

Watch this space for the fight....


Sunday, 21 October 2018

Tuning the Tables...

An Interim Post....

In between projects post Battle o' Hastings (We lost. Again...). Apart from nursing a few bruises later (see B. o' Hastings) and with nothing new to write up (just more painting of 15mm Blue Moon bods - oh dear...) I thought I'd tidy up a couple of my posts from the Solo FB group (from last year) re. my use of tables for Tactical Decisions.


In the pic below are some very simple example tables for the "AI" army I occasionally adopt for large battles, using a standard playing card deck, plus an example of a typical "Blinds Reveal" table (I use "Blinds" a lot - I love imponderables).

Usually Activation of "MY" forces will be by SP type tokens or cards. Enemy (AI) grand strategy or random activities will be dictated - on a draw of THEIR Army (or, sometimes, Division) token/s, then a draw from a standard playing card pack - by the appropriate Table. I will usually draw up such tables based on the scenario and backstory - or as dictated by the campaign where appropriate..


Although, in theory, my own sub-commanders will obey orders (yeah. Right..) there is scope of initiative for those reacting to circumstances or out of my Control Radius. An example of one of these tables is given below.


The above assumes I have an Enemy/Blinds on the table. The table below shows the kind of thing I use for when the enemy aren't on the table to start with. This table assumes use of firearms, but could be adapted for any missile-using AI enemy (e.g. bow-armed outlaws etc.).


For standard large battles my usual M.O. is that:


1) have a set of "General Orders" for the "AI army " based on the scenario/situation (e.g "Defensive Stance", "Aggressive Stance" or "Unknown Stance"). I then draw up a "General Table" (like Table 1 above) to add uncertainty on my part (e.g. see my "replaying" of the Battle of Watling Street post).


2) However, once battle has joined there will be situations where IMP provides an opportunity to the AI - e.g. a flanking opportunity. In such cases I do a quick, scribbled ad hoc table to see if the local commander sees and has the initiative to take advantage Again, in my Battle of Watling Street post, this happened - my left flank was doing reasonably well and pushing back the Roman right.  However, in following up that local success the flank of one of my units was exposed to a possible opportunistic attack from enemy cavalry. I scribbled a "proportionate table" to allow for the Roman cavalry unit c.o. to check if he would see - and be prepared to use his initiative and exploit - this opportunity. As it happened he did, charged my hitherto successful unit, broke it - and, as the reaction spread - broke my whole army... Brilliant - even if it did mess up the experiment...)


Below is a quick example of my tables "In Action".  Yes - heresy - these are 5mm figs, and I'm using SP cards rather than tokens for visibility purposes.

EXAMPLE:

OK: I have drawn up tables for this game based on the "Scenario Story" (a border clash between two rival Greek colonies out in the far and murky Celtic West) and the "Stance" of both parties. In this case both parties are aggressive.

The "Greek" tables below are for the AI (my enemy).


I have some friendly (presumably because I am paying them) Celts from the hinterland as allies. These will generally do as I ask, but since they are not actually "my guys" they have a table too.


The board and armies are set up. Turn sequence is as follows:

1) The "Table Phase"; I have a normal pack of playing cards (the "Table Deck") to activate the tables. Each move I throw a dice. On a throw of "6" on a 6d I draw one card from this pack and apply the result, moving the units/leaders affected as if this were a "normal game move" and they had been activated in Phase 2. I then discard this card.

Note that in this scenario, after two moves I add one point to the dice throw, increasing the chance of table activation. After the fourth move I add an additional point to this throw. Thereafter it will only take a throw of 4 to activate the Table Deck.

Once I have checked for/activated the table I then move on to Phase 2: the Leader Activation Phase.

2) Leader Activation Phase: Leader activation will be via the Sharp Practice cards (pictured) me having already written out which unit commander has which card leader number. There are some additional "Command" card in use to speed things along.

Once activated Leaders/units will move as "normal game rules" (in this case my House Rules) as per army stance.

The game then proceeds.

Move one - and no tables get activated this turn. Normal Activation as per the SP cards commence. Enemy are aggressive so as their units activate they will advance. The AI advances his skirmishers and
follows up with his phalanx and right flank cavalry.

I don't get a look-in.

At end move skirmishers exchange fire...


Move Two and the Table Pack dice throw activates the AI Pack.

A Jack o' Diamonds "Advance Right Wing to Flank Enemy and/or Deploy Reserve is drawn. The AI advances his right wing (cavalry) and I do a quick "does he add his reserve?" throw (1-3 No. 4-6 Yes). His right cav. & cav. reserve move round to threaten my flank...

Meanwhile the enemy's phalanx moves through his skirmish line and forms up.

MY Activation Cards allow me to adjust my left backwards to meet this threat AND to set my Allies moving.


Again the Table Pack activates (dice)and the enemy moves his phalanx (this is all one formation - formed of 4 units forward). My allies get charged, and recoil....

At end move all I can do is shoot my skirmishers...


Next go again the Table Pack gets activated - and the Enemy left gets a flanking order. However, there are walls and vineyards in the way, do to do this the enemy left cav. must take a detour....

Meanwhile their right cavalry (threatening my left flank) get no cards at all.

Thanks to Activation my CiC now gets the chance to inspire and swing my allies round and into the enemy phalanx left flank/rear, scattering his skirmishers in the process His leftmost hoplites break - and with one of my phalanx units charging his centre (lucky Activation card and plucky unit commander!!!) there is a chain reaction, with his whole phalanx panicking, prompting a route....  PHEW!!! NOT the result I expected at all, but none the less welcome for that......


Things could have gone very differently. My Allies could have misbehaved, the Activation Cards could have been totally different,  but as it was it was a short, sharp, fun game..

Well, I hope that was of some use as a basic demo. of the Table Activation & use. These aspects can be applied to any move/shoot/fight rules (I was using my basic SP/Featherstone House Rules)....

Any queries please ask as usual...

Next time:  another Musketeer exercise in Data Gathering (watch this space) then on with more 1/72 painting (1stC Jewish insurgents) ....


Wednesday, 30 May 2018

Technical Interlude: "Council... What Council....?"

Occasionally there will be mention in my posts, usually during campaigns, of a decision made by a "Council of Officers", "Council of War", "The Elders of the Tribe", "The Band" etc. etc. These comments will relate to instances where I need a group decision for "my side" or the enemy regarding policy, strategy, grand tactical action and so forth (i.e when it's not just a case of the relevant commanders obeying orders or me saying "You lot go there"). There are several ways I mimic this...

Sometimes I will be lazy, list the options (occasionally just in my head) and simply chuck a dice.

Other times I will draw up a table of options, allocate "dice result" numbers to these, based on my assessment of the likelihood or advisability of certain decisions - THEN simply chuck some dice (example below using five x 6D).

Or do a similar thing using my old Tell Me" dial....


However, for the scenario being played out at the moment I am using method described in the following examples using a pack of standard playing cards. I have found this method quite satisfying, particularly for long-term, grand-scale campaigns where politics, as well as military decisions, are part of the mix....

First I decide on the issue the make up of the council (the number of members), and the issue the council members are to discuss - in a "Yes/No" form. I then assess if anything is know about the council members (i.e have they an opinion known in advance, do they have a voting history/character/agenda?).

If it is pretty clear what their opinion on the matter will be then cards are drawn from the pack until one turns in the "colour of their opinion". This represents both the individual's "vote" and their ability to marshal their arguments.

Basically the higher value the card, the stronger the feelings of the person involved and the better his/her arguments so that. for example, someone drawing an eight of hearts (red) is deemed to have "out-argued" and convinced over to his side someone with (say) a two of clubs (black). Where the opposing cards add up to the same value as a character's card the character affected will abstain.

Where relevant a character might be granted a random additional card of that colour to further back his arguments (for example; when I have used this method to see if a defeated tribe will fight on against the Romans any Chief Druid in the Council is highly likely to be highly motivated to argue for fighting on. He will get an additional appropriate card in his personal draw).

Example 1: An isolated force has a newly-appointed commander (who has inherited command due to the C.O. being hors de combat) following an unanticipated battle in which a high number of friendly casualties were taken). He is unsure of what is expected of him under these new circumstances and so, while awaiting orders from a higher authority, he calls for a meeting with his senior officers in order to glean their opinions before making a decision.

In this case the question is "Should we conform to the orders issued to the force before the recent battle, and proceed as if nothing has happened, or retrench here ans await further instructions?"

On this occasion Black cards will mean a "Stay put & await orders" vote. Red cards will mean a "Yes to following orders" (in this case pressing on into possibly hostile territory with a reduced force) vote.

In the example we are following there is the new C.O. and his council of officers (eight of them). At this stage of the campaign none of them are "characters" and their opinions are unknown. They therefore have no Starting Cards. I draw a random card from the shuffled deck for each officer.


We see that opinion is divided.
The C.O. is pretty cautious about proceeding (Black 8), given the changed circumstances.

One of the junior Tribunes (Black King) and one of the Senior Centurions (Black Queen) are very much urging caution - and marshalling sound arguments as to why pressing ahead would be an unwise choice.

The other officers are split. Some have no real opinion, other than being vaguely uncertain (Black 2 ), others are arguing for different sides, but with little passion or solid argument (4-7s).
One of the Milliary Prefects however is pretty gung-ho (Red Jack) and putting forward a good case for following the orders laid down for them. The result is as follows:

"After a lively debate, and despite good points on both sides, it is decided that caution is the best policy. They will await orders from higher command".

How do I decide/know this?

I move and place the cards in  order of seniority OR "strength of feeling" if there are no extremes in ranking. Thus, in the pic the Black King trumps the Red Jack  - i.e. the Tribune out-argues the Prefect, who concedes.

The Black Queen (with its value of 12) outnumbers and so "out persuades" the Red. 6. The Black 7 ditto the Red 5, and the Black 5 beats the Red 4 (i.e. the officers arguing for caution defeat the arguments of those in favour of a "forward" policy).

With the Black 9 backing the C.O.'s position anyway, when it comes to a vote the Black cards have won the argument, and the Council unanimously votes for caution, the C.O. confirms the decision of the Council (he had his doubts anyway)..

Meanwhile I make a note of those individuals who have drawn Picture Cards - these will form "character notes" for future discussions (i.e the gung-ho Prefect will now always draw a red card, the noticeably cautious Tribune & Centurion always black).

                        
Example 2:

A Tribal Army has just suffered a serious defeat, so bad that it seems appropriate the tribe considers its options. The choices on the agenda are "Do we continue the fight?" or "Do we sue for terms".

We have a Council of Elders and Chiefs made up of six elders, a senior druid, the current High Chief /Warband leader and the chiefs of two allied contingents (I normally have one "elder"/chief per division/unit but this will vary depending on the scenario).

It is already known, as part of the background to this event, that Druid is strongly for fighting on, as is the Chief of the Albi contingent (as long as the fight in on someone else's ground he is all for it..) so they each get a starting card from the red suits (drawn at random) to represent this.

The High Chief, wounded in the fight and shocked by their defeat and the casualty rate, two Elders (whose units broke in the previous battle) and the Chieftain of the allied Catoni (whose chaps lost heavily) are not so keen, so they get get random starter cards from the black suits (see the left had Starter Positions on the pic below) .

Then we shuffle the pack and draw for the debate - laying cards for all the participants who do not already have cards. The Druid - because of his inter-tribal spiritual influence and powers of persuasion - will get an extra card randomly drawn from the red suits.

The result is as follows:

We then assess the "debate".

Cards are laid down in order of seniority. Once a card has been laid it cannot be moved again.

We see that all the High Chief can do is persuade Elder 6 to abstain.
The Druid however can use his red Jack to trump the black 10 of Elder 1 (winning him over) and his red 9 the black 7 of Elder 3.
The Chief of the Albi uses his red 7 to counter the black 5 of Elder 5 and the Chief of the Catoni his black king to beat down the red 9 of Elder 2.

This just leaves Elder 5 to play (the only card neither played nor covered by another card). He can trump the High Kin's black 2, talking Elder 6 back to the "war party" AND "see" the High King's 2 with the "unused" pips, causing him to abstain.

We therefore see below the red (for war), black (for peace) and abstaining (blue) final positions....


The party wishing to continue the fight wins the debate - the High Chief giving in to the pressure from his council. Note, however, that the Chief of the Catoni has NOT been persuaded at all and has very strong feelings (untrumped Black king). As an independent chief he will withdraw his forces from the forthcoming battle.....

I have used this method in large and small campaigns - and even mid-battle - when a serious decision needs to be made and find it quick to use and achieving pleasing results; with untrumped high cards  leading to all sorts of actions by junior commanders which upset matters for both the AI AND the live solo player....


Or three... Or four......

VERY little to report.... Due to a busy reenactment season another filler post I'm afraid, just to show I'm still here...... Our ann...