Some Celtic Shenanigans...
Before re-jigging the table completely, a little Celtic Playtime...
A couple of years ago I downloaded the (free) "Valiant Britons" rules by Jim Wallman (link http://jimwallman.org.uk/wargame/valiant%20britons.pdf ).
These are rules more akin to a simple RPG (or some of the campaign rules in TFLs' Dux Brit.) based on Tribal Chieftainship and one-upmanship; that is they are more about gaining Kudos vis a vis rival chiefs than simple war - though that is the final test.
However, as per usual I was looking at the rules to see if they could be tweaked and cannibalised - in this case to add a bit more colour, chrome and personality to my solo Celtic Campaigns.
So, without further ado:
Backstory:
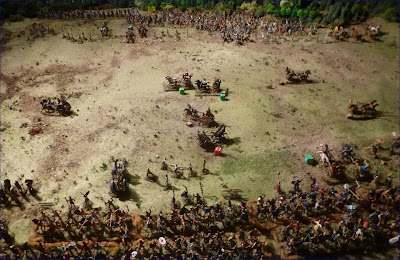
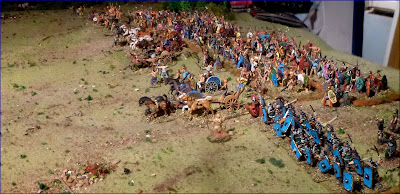
The Uphincurhardui have arranged to meet a rival tribe the Damdenemi in the Vale of Apples in a fight for the possession of the valley, and its two important Druidical sites. Neither side is out to wipe out the enemy - just establish dominance; so this is an almost ritualised meeting. In theory...
Normally the Uphincurhardui would expect to have the advantage of numbers, but this time the Damdenemi have brought along some German Mercenaries to boost their side.
I'll "fight" the Us. The AI will play the Ds.; ordering is lads about based on Dice-led Decisions and IMP. I will set out both sides (positions diced for. My guys in red, the enemy in green). There is a thin skirmish line in front of each army, but these are really just decorative/there to run interference to over-bold chariot chiefs. They will have no effect on actual combat.

Prep. Rules & General Stuff:
In theory all chiefs should already have Valiant Britons Kudos Levels. I will decide the Starting Kudos levels for my chiefs with a dice throw.
I will use the Valiant Britons rules re. chieftain "showing-off to gain more Kudos" rules before the violent action starts.
Basically, in this preliminary phase each chief can attempt to carry out certain acts (chariot tricks, approaching and taunting the enemy etc. etc.). Success gains him/her Kudos (If used as part of a campaign - as the original rule set intends - this, and success in battle, also has long term benefits).
More Kudos Points can then give him more influence in the coming battle; basically by impressing his own side by his antics he will get more "Psycho Points" (aka Command Points/PIPS) at a ratio of 1PP per 5 Kudos.
For most battles i would have Activation procedures for my Chiefs. However, for this exercise I am using alternate "I Go U Go" turns, with all chiefs potentially Activated. However, see below....
I have solo-ised (as usual) and added some other random factors below as per my usual messing about....
Command points and Orders:
At the beginning of each move The High Chief for each side makes a throw for any additional Command Points/PPs/PIPS available to him for that move over and above his Normal rating - Minus 1CP/PP/PIP (hereafter CPs) per Wound he has received, per Challenge he has refused or Retreat/Recoil he has made.
He can then move/act/give orders to any Warbands within his Command Radius at a cost of 1CP per move/act or command passed to a Chief/Unit within 10" of his position or 2CP per command over 10" away. He can also apply spare CPs to inspire troops in combat - with extra bonuses if he joins in too....
HOWEVER, this is a tribal force. If the Warband concerned is over eight inches from his actual figure a further test is required ("Will the Warband Chief Obey?"). This is a simple Dx6 test. 1-2 Order Ignored. 2-5 Order Complied with.
Any Warband Chief outside the High Chief's command radius tests individually each move to determine individual initiative/attitude (1x6D).
Independent Chief test (1x6D): Result of1-2: He holds position - UNLESS flanked or has falling back/routing friendlies on flank, in which case he and his command withdraws. He may turn to meet any incoming threat.
Result of 3-4: He may adjust position to meet any threat (forward or back, whichever gives an advantage). If a 4 he may advance towards any enemy withdrawing within 2ft of his position. Ad Hoc decision test based on IMP.
Result of 5: He may advance towards any enemy within 2ft of his position. Ad Hoc decision test based on IMP where ness.
Result of 6: He may advance towards any enemy within 2ft of his position or charge any within charge move. Ad Hoc decision test based on IMP where ness.
Challenges: Any Chiefs (friendly or enemy) who approach within 6" of another enemy chief's command must make a 1x6D "Challenge Test" to engage in (or continue) individual combat.
Result of 1-2: He takes position behind his own command and shouts, but does nothing Bold.
Result of 3-4: He takes position to the flank of his own command and struts.
Result of 5: He takes position to the front of his own command and taunts.
Result of 6: He issues a challenge to single combat to the enemy commander.
If a challenge has been issued to a Chief he must test (ax6D) for his own resolve.
Result of 1-5: He refuses the challenge. His command must withdraw 2" next move.
Result of 4-6: He engages in single combat with the enemy commander.
Both of the above Tests are modified by:
-1 per existing Wound (of any type)
-1 each time his command has been pushed back in the last 8 moves
+1 each time in the last 8 moves his command has pushed back an enemy unit
+2 each enemy unit his command has routed previously
+ 1 per Wound he has inflicted on an enemy Chief this move
+1 if he has refused a challenge before
+2 if he is within 10" of his High Chief
+3 if the enemy Chief has collapsed
Individual, Chief on Chief Combat:Really basic. Each Chief throws a 1x6 dice and looks at the score, modifying if there are any Special Factors and with minus 1 per existing wound (of any type). There are up to three rounds of combat per move.
Result: Draw or difference of 1: Combat continues.
Result: Difference of 2: Loser steps back 1". Winner tests to continue combat as Challenge Procedure as above but adds 1 to his test throw. If he continues combat then fight again. If not they both just snarl at each other till next move.
Result: Difference of 3: Loser steps back 1" and receives a Combat Wound. Winner tests to continue combat as Challenge Procedure as above but adds 2 to his test throw. If he continues combat then fight again. If not they both just snarl at each other till next move.
While Chiefs are fighting their commands stand and watch.
Each Chief can take 2 Combat Wounds. A third kills him. A Chief who collapses can be killed IF the Winner follows up the Combat.
(Note Combat Wounds are not the same as "crash wounds". It takes 5 Wounds of all types/any combination to Collapse a Chief and 6 to kill. Thus a Chief can take two Combat Wounds on top of two Crash Wound and still fight. Another Combat Wound and he dies. Another Crash Wound and he collapses.)
If a Chief kills another Chief he may take a Head. If he subsequently manages to get this head to one of the Altars at the side of the field he may obtain a Druidical Blessing.
Special Factors:
High Chiefs and German Chiefs* add 1 to their Challenge Test and Combat throw.
Chiefs who have taken a Head add 1 to each Test and Combat throw.
Druidical Blessing adds another plus 1 to each Test and Combat throw. If an ordinary Chief kills a High Chief or a German Chief these benefits are doubled.
All benefits (and negatives for Wounds) are cumulative.
(*High Chiefs and German Chiefs: as well as being wily survivors and canny fighters these Chiefs exude an element of charisma and are regarded with a degree of superstitious awe. This is enough to unsettle all but the boldest of warriors. They also have top of the range gear.....).
Unit Combat:In Valiant Britons the combat is simple. I didn't fancy my usual Dice-Fest and head-counting, so I also went Simple..
When two or more opposing bodies meet in combat there a Fight. There is NO head count. Instead both sides throw a dice for each of the the units making direct, base to base contact and count ranks. The result for each side is then modified (cumulatively) with:
+1 Testing Unit is Fanatic Crazee Guys
+1 Testing Unit are Scary Foreigners
-1 Testing Unit is being attacked on flank or rear
-1 per occasion Testing Unit has been pushed back this Fight
+ 1 per two friendly supporting ranks in excess of the first two ranks (both sides)
+ 1 per PP being applied by a nearby Chieftain (both sides)
+1 if Testing Unit is higher Social Class than enemy unit being fought
+1 if Testing Unit is mailed, helmeted and shielded
-1 if Testing Unit Chief is skulking at the rear or has just refused a Challenge
+1 if Testing Unit Chief has just won a Challenge Fight and pushed back rival
+2 if Testing Unit Chief has just won a Challenge Fight and wounded rival
+3 if Testing Unit Chief has just won a Challenge Fight and killed rival/rival has collapsed
+1 if Testing Unit up-slope of enemy
Combat Results:
If the scores are equal or the difference is less than 3 and this is the first or second round in this combat the fight continues into next move.
If the scores are equal or the difference is less than 3 and this is the third round in this combat BOTH parties withdraw 1".
If the one side scores more than 3 higher than the other that side wins. The other side must withdraw at least 6" but can withdraw 8" if desired by the LOSER.
Pursuit:When a loser withdraws the winner can chose to pursue if it throws a 5 or 6 on a 1x6D test.
If it pursues it causes casualties. Throw two dice per full rank in the leading unit. This is the number of potential casualties. Throw another die per individual possible casualty. On a throw of 4-6 the potential casualty has indeed been hit. Each potential casualty then makes a Saving Throw to see if he has "Fallen".
Figure has Maille, Shield and Helm: 4-6 saves.
Figure has Helm & shield: 5-6 saves.
All other 6 saves.
IF the number of fallen exceeds 3 and IF the losing Chief has been adding his PPs to the fight he is deemed to have been leading from the front and may have been hit. Throw a 1x6D. If the result is less than the number of fallen the losing Chief has been killed.
Unit Types:
In this game Unit Types are (in descending hierarchical order):
1) Chief's Companions.
2) Knightly Class 1 (helm, maille, shield, sword-bearing/sword & spear bearing)
3) Warrior Class 2 (helm, shield, sword-bearing/sword & spear bearing)
4) Mercenaries and Fanatic Crazee Guys (shield, sword/spear, nude)
5) Warrior Class 3 (shield, sword, clothed/half-clothed)
6) Warrior Class 4 (shield, spear, clothed/half-clothed)
7) Warrior Class 5 (shield/no shield, half-clothed, improvised weapons)
8) Skirmishers
So much for the rules. Now for the game played....
The Game:For the first couple of moves the enemy just sit there... So do we.... No doubt there is a lot of shouting going on, but no action on either side...
I try to prompt something - and inspire my lads to action - I decide to do something reckless; riding my chariot straight at the enemy, get into their missile range, then swiftly away - as kind of "counting coup" to gain Kudos..
But disaster...! The chariot rolls and I fall.... Not only this but I come under fire from the enemy skirmish line, am wounded, then wounded again as I re mount the chariot... I ride back - red-faced in more ways than one... As I am the first to try this particular trick I don't lose any actual Kudos, but it looks as if it wasn't for want of trying.
Next move I use one of my PPs to move a warrior unit up to the battle line.
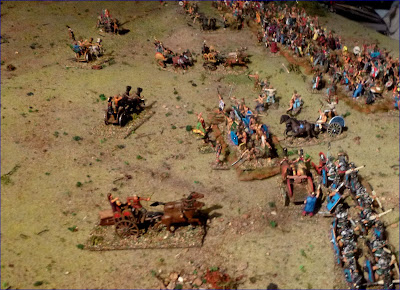
But my action in playing the fool has prompted something; both my own and the enemy's sub-commanders bring up their chariots to join the game.. It's "Showing Off Time"...
For a couple of moves chariots with some of the sub-chieftains of both sides (Dice tests) go racing round the field while the chaps try stunts (again, dice decided based on the rules tables; a simple solo-isation) - some more successfully than others.
The High Chiefs of both armies stay out of this, but by the third move three chiefs (one of mine and two of the enemy) have gained enough cheers and Kudos to inspire their boys forward. The battle begins...On my right there is a clash, with both armies' "Crazy Guys" advancing; the enemy's Crazys hitting my second helm/sword group, while my own skyclad bods have nobody to fight.. Yet....
On my left a large body of poorly-protected lesser warrior spears charge my helmeted, sword-bearing warriors, pushing them back.The enemy Crazys over on my right are suddenly reinforced by a unit of lighter swordsmen, and my guys are slowly forced back.
My line has still not formed - but with some shouting (CP/PP expenditure) I stiffen my lads' resolve.Meanwhile a whole bunch of enemy spears also races across on my left to charhe my swordsmen there.
Things aren't looking too good for my side. My Centre Right sword guys hold, but my far Right Crazy guys still have nobody to fight (they do not go into the flank of the enemy Crazys because of an uncommitted enemy warrior unit to their front which would likely take advantage).
My swords are slowly pushed back by the reinforced enemy Crazys.
Then, suddenly, the enemy general wakes up, and leads their mercenary group forward. At the same time their swords over on my right engage my Crazys...
The enemy mercenaries push forward, and drive back my centre left. Things are looking dicey...
My left is driven back slightly - the Damdenemi spears may be low class, but there are a lot of them and they are in deep formation...
Over on my right the combat is inconclusive. My swords are being pushed back, but then both groups separate, snarling at each other.
But then there is a change - my chieftain in charge of my right-hand swords issues a challenge. It is accepted by the chief of the enemy Crazys. There is a brief bout of swordplay as the lines watch...

Meanwhile, using the slope to their advantage, my centre charges the mercenaries.
My chief loses his single combat over on the right. My swords withdraw, chastened, but the enemy are failing to press home here, giving me a breather; but I'm not confident.
The mercenaries attack up the slope - but are held back!
The nemy spears on my left have also come to a standstill.
I move some of my reserve up to plug my centre, then take the unit that has seen off the mercenaries and, leading from the front, charge into the flank of the enemy spears on my left. They are discomforted, and slowly withdraw.
In my centre my massed troops are upsetting the mercenaries. They falter - their commander losing resolve - and pull back. My men do not pursue, but then the enemy here pull back further.
On my right centre there are some more individual combats between chiefs, then one of my warrior bands is driven back in disarray, taking casualties, then breaks as it's Chief panics. But my Crazy Guys engage a group of enemy swords and push them back; evening-up the score..
I stabilise my line, shifting units about, but in the space of two moves everything has altered. The enemy commander seems to lose his bottle - he has hung about at the back for much of the game - and although his reserves move forward, his front has stalled.
Suddenly the unit on his far left/my right break; charged by my Crazy Guys..
My reserve, in the centre, presses forward - and the mercenaries give up, and head homewards. This is NOT expected. The enemy reserve moves forward, but, seeing this, halts, then likewise turns to head off, and over on my left the enemy spears withdraw, wavering but snarling.
Although the enemy's Crazy Bods and one of their sword units hold their centre, the rest of the Damdenemi army is pulling back..
The day is ours !!! Though nobody is more surprised than I.......
Conclusion:That was great fun - and I'm going to have another play or two. No heads taken, but it was fun, fast and furious - all over in a couple of hours (unusual for one of my games).
I think the Valiant Britons is would be a fun set of rules and an interesting concept for a group of club to mess about with (that seems to be its intention), but the rules could also easily be played as a board game. Extra "chrome" in the form of pre-made characters/character cards could add colour if live opponents were lacking or for use in a solo campaign.
I solo-ised the Kudos-grabbing Stunts tables by the addition of simple dice tests to decide what stunts would be attempted by individual Chiefs (except for my figure. I had a choice there) and this worked.
The single combats felt right for the "flavour", and worked.
The simple combat mechanics likewise worked.
All in all, this had a nice feeling of being a ritualistic process - like a lot of so called "primitive warfare", rather than a knock-em down fight; which felt about right for this kind of low-level tribal clash....
I maybe need to think about applying some of my other "Tribal Army" conventions, but all in all I was happy with the feel of things. As I say, the Valiant Britons rule set is out there for free - and I had a lot of fun with them..
I have a set of the "Tribal" rules by Mana Press which I mean to try sometime, so, as always: watch this space - and any comments, thoughts or queries welcome.