The Battle of Jackson's Farm;
Right, a quick bit of thinking and messing about with the table and I'm good to go.
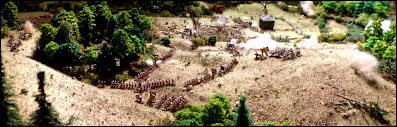
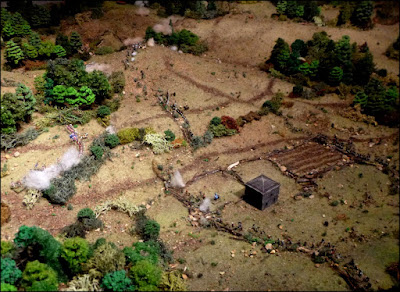
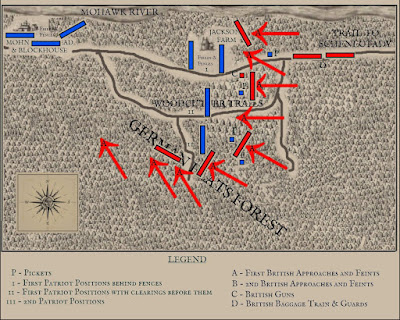
As this will be a likely be a short fight (I reckon) I've created a random layout (below) rather than get bogged down in maps etc. (note the river and other bank in the photo are "cosmetic photo-shopping". I should be so lucky as to have that big a space..)
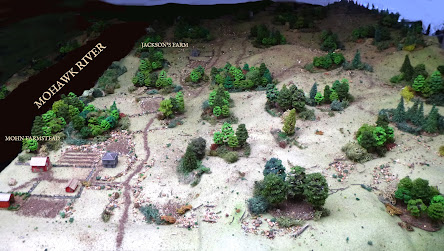
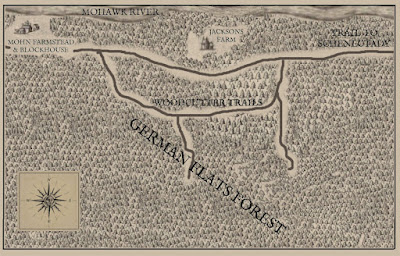
Basically the north edge of the table will represent the vegetation edging the Mohawk River, the rest of the table the re-entrants and general "messiness" of the hills etc. in the rough vicinity of present Jacksonburg (pic) before the main, modern routes were carved through them.
One problem - as one can see from the pic below - it's ALL bloody woods !!" (I'm assuming the big empty fields, like the roads literally carved out of the landscape, are all new....).
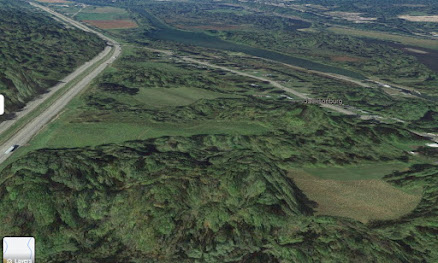
Being UK-based, and never having been to New York State, and really having previously only looked closely at maps (rather than Google Earth) of this area before this campaign I am slightly staggered by just how much dense-looking woodland there still is - and I was born & bred in the most wooded County in UK... The daft thing is: I should know this already... I've seen the movies, and the documentaries and read the books. There are LOTS of trees in the eastern states. I knew that.. But....
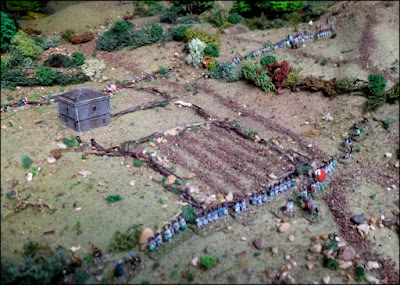
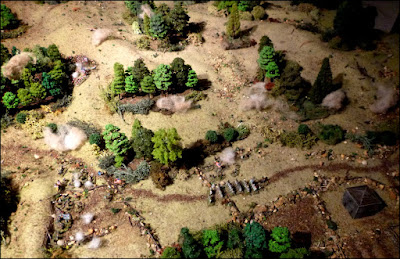
So... Back to the table. There ought to be more tree cover. It SHOULD look something like THIS:
However, moving guys about on a tree-covered table is difficult (once upon a day I'd have fought a battle like this in board game style) so that the physical on-table wooded areas are actually deemed Heavily Wooded Thickets while all other areas, except enclosed fields and "rocky clearings", are deemed to be "ordinary" woodland (which from the Web looks much like the woodland we have round this part of the world).
Thus, I reckon Special Rules are called for ...
Woodland Movement: All movement unless in fields, Thickets or on tracks is assumed to be taking place in woodland.
Woodland restricts line of sight to 50m*.
All infantry units must be in open or extended order to operate in woodland without penalty. Units in close order move at two thirds speed and suffer 1 disruption point per move if moving.
Mounted aids proceed at half speed.
All units in woodland count as being in soft cover UNLESS within 10m of shooters.
All non-light troops/skirmishers suffer 1 Disruption Point while moving in Woodland.
*Blind shooting by volley may take pace at normal ranges but uses twice the ammunition. Non-volley shooting out of LoS is not permitted.
Some "rocky areas" in the woodland are deemed "clearings" (marked out on the table by small twigs and rocks) so count as normal open ground/fields.
All units move at half speed. Line of sight is reduced to 10m*. All units in Thickets count as being in soft cover within 10m and hard cover beyond that.
All light troops/skirmishers suffer 1 Disruption Point and all non-light troops suffer 2 Disruption Points while in a Thicket.
(*Blind shooting into thickets by volley may take pace at normal ranges but uses twice the ammunition and all results are halved after all other factors have been taken into consideration. Non-volley shooting out of LoS is not permitted.).
The Colonial force needs to prevent this.
The Game (Summary):
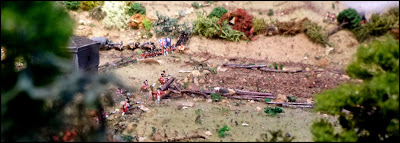
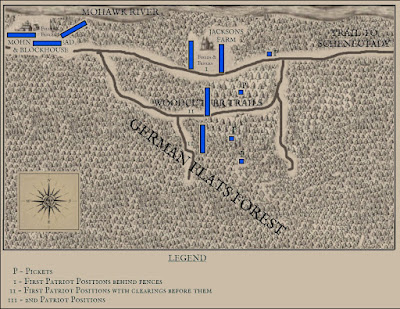
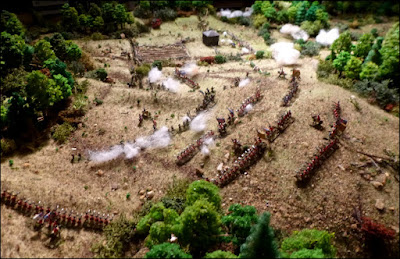
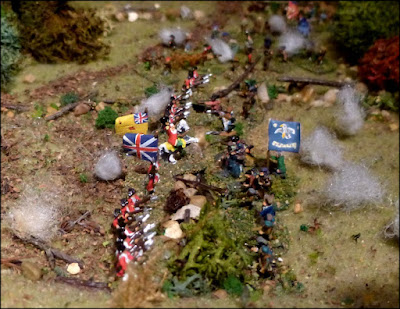
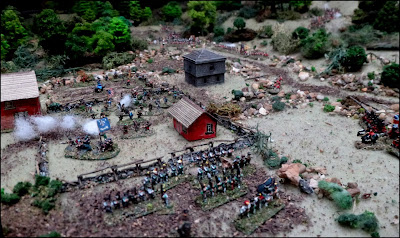
I set out two regiments of my guys among the fences at Jackson's Farm in two lines. The other units are extended in a line south to a hill a little more than halfway across the table. I do not have enough chaps to muster any more of a reserve than the second line at Jackson's.
Enemy units open fire on my troops on my right flank and in the centre.
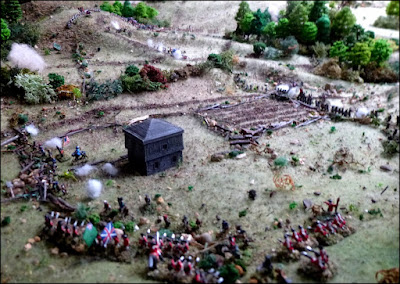
Just as I'm getting worried about my right flank a firefight develops to my front - where three manhandled enemy light field pieces appear, and open fire on my guys at Jackson's Farm.
At Jackson's Farm a regular regiment supported by light troops appear in the woods by the river. There is a short firefight, but then an enemy assault sends my guys reeling.
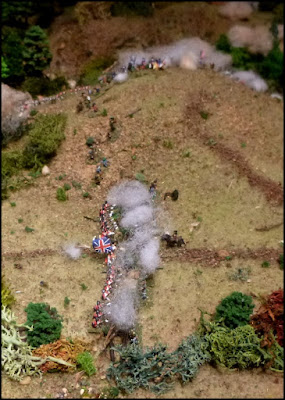
All the time the enemy keep up the pressure. There are a couple of successes (a British regiment is checked and badly mauled at Jackson's farm by my second line and another mauled in the central woods) but my men are getting jumpy.
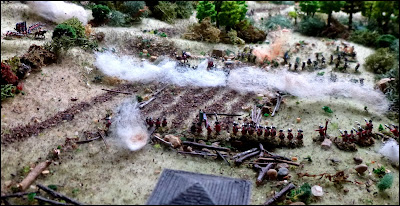

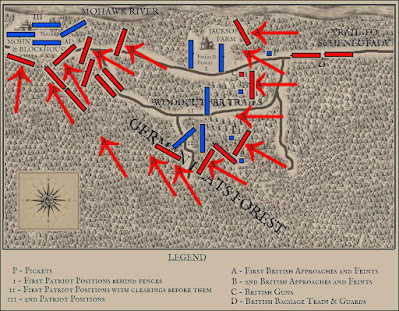
The enemy are now pressing on towards Mohn's Farm themselves - and whenever the Redcoats get the chance they are aggressive; throwing bayonet charges at my flustered troops.
It really is time to fall back to Mohn's Farm, but there is now no central command to coordinate things, so each regimental commander makes his own decision.
It's a bitty process, but my remaining units begin to rally at Mohn's Farm. However, with enemy Blinds pressing forwards, and more more enemy now emerging from the woodland to command the road westwards, things are going to pieces.
But time is nearly up - although their baggage train has been slowly advancing along the road and has now passed Jackson's Farm - there is little chance the British will exit six units off the map edge in time.
And so, outnumbered by two to one, and with no central command, my men, regiment by regiment, decide to withdraw rather than stand against the overwhelming numbers. It is probably the best thing to do.
Endgame - but my boys at least have the satisfaction of knowing that the enemy advance has been slowed by their actions......
Throughout, the Blinds (represented in the table by "dust" clouds.. Yes, I know it's woodland, but I couldn't be bothered to make a load of birch seed bird flocks) clustering round my Right Flank were a real worry (Clinton doing his signature outflanking), and by the end I was seriously outnumbered.
Had I fought another move I would either have had to skedaddle, at the risk of being charged as I did so, or lose two regiments in pointless fighting around Mohn's Farm (losses Gates could well do without). It would have delayed the British further, but they had already used their last move.
The British achieved half their Victory Conditions (Clinton got his Baggage Train more than half way across the board), but failed to get the required six units off the west table edge (though two more moves would likely have done this for them; maybe three if my lads had been wasted in a fight at the farm...).
Enemy losses were light. Mine far, far heavier than I would have liked; a regiment surrendered (not to mention the general) and my gross losses in actual casualties or missing totalled 540 men (more than a fifth of my force) though a majority of these will either be wounded, "temporary deserters" or lads hiding-up in the woods, and intending to make their way to Fort Drayton by the backways.
I'll do the calculations for the campaign later.
I guess it was kind of a draw. Most of my guys lived to fight another day (as did Gates's force) but I lost a lot. Even if Clinton didn't catch Gates the fight was a "British Victory" on paper in that they held the field and suffered less. So call it sort of even but the British winning on points.
The above was a precis of the battle. I did a (long) near move-by-move write up as I went along (and, as sometimes happens, took far to many random photos). If anyone is interested on more of a blow-by-blow I can post that (just make a comment).
As always, thoughts, queries & comments invited.
The Game Blind Processes:
For this game, to see if Enemy Blinds appear I throw a 1x12D each move, adding 1 to the dice throw (cumulatively) for each move AFTER the first complete move.
On a (modified) score of 12 an Enemy Blind is created/has been spotted.
To find the location of this Blind I dice 1x6D for EACH Picket, then for the centre of each space of four inches more than four inches away from a picket - including the ends of a picket line.
Note that at the end of each Move a marker is moved 6 inches along the long board edge. Only friendly units east of this marker need make this test.
I do the same for any forward (first line) units without pickets to their front/sides.
The highest scoring picket/unit has encountered/become aware of something and a Blind will be placed.
In the case of different units drawing the highest score then all highest drawing units have seen something and Blinds are placed accordingly.
Blinds appear 4 inches distance from the spotting unit; to their front, or flank if a flank test. Enemy Blinds cannot be placed directly in the middle of Thickets. Neither, initially, will they be placed behind friendly units, but that may be possible if dictated by card draw.
In any Blind Location tests where a friendly unit is already within four inches of an existing Blind such a unit adds one to it's test throw for each such Blind already so placed.
I also make a single test per move for eastern end of the Main Road to Schenectady.]
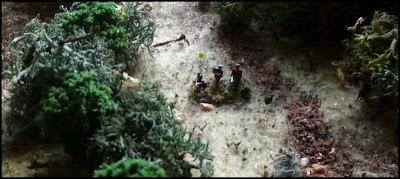
Next move I push a rifle company to investigate the Blind. They get within 50 yards of the Blind and...
There are two Blind Movement Tokens in the tub mix, but Enemy Blinds only actually test once per move even if the second tokens is later drawn.
The test is a simple throw of a 1x6D.
On a result of 1-3. Blind remains stationary.
On a 3-4 Blind moved forwards four inches with a direction test made based on IMP.
On a 5-6 Blind moves four inches plus 1xAveD in inches towards nearest Patriot force/unit.
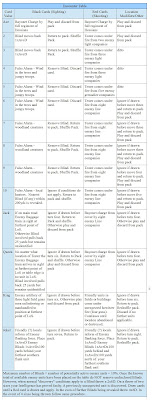
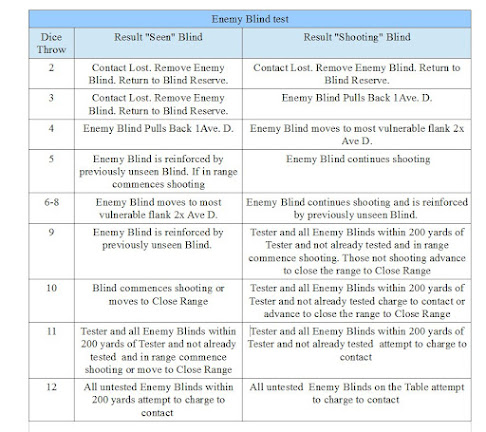
Once a friendly unit moves to within clear LoS of a Blind a test on a standard card deck is made as follows (right click, open and expand).
Other Thoughts:
Below are some ideas that came to me during the game, for me to ponder over at some time....
Panic: Thinking here about F&I war variant..? More research needed.Units which are in themselves within 100 yards of hidden Enemy Blinds or which have come under fire while in Woodland or in or within 25 yards of Thickets may be subject to Panic Firing.
Test 2x6D per move per appropriate unit.
On a result of 2 or 12 Theatre-Trained Regular infantry will fall to panic firing.
Veteran Militia riflemen or Theatre-Trained troops on a throw of 2.
On a result of 7-8 all others will fall to panic firing.
A unit which fails a Panic Firing Test will halt, suffer 1 Disruption Point per move, remain stationary and fire in a direction (dictated by 2x6D dice throw - see below) using double ammunition until rallied.
On a result of 2 to 3 half the unit deploys to refuse its left flank, receives an additional Disruption Point and shoots half it's strength to that flank and half to it's front. Neighbouring friendly units in range may take casualties.
On a result of 11 to 12 half the unit deploys to refuse its right flank, receives an additional Disruption Point and shoots half it's strength to that flank and half to it's front. Neighbouring friendly units in range may take casualties.
On a result of 3-10 unite fires to it's full front. Neighbouring friendly units in range may take proportionate casualties.
Any unit in woodland or thicket taking casualties from unseen shooters (including from friendly fire) will take twice the number of Disruption Points (but not casualties) inflicted on it that move.

Baggage/Artillery Train: Thinking about baggage...
A heavy baggage train can only move at full speed on tracks. It operates at half speed in fields. The train cannot climb steep slopes. It cannot enter thickets. It cannot enter very rocky ground.
If operating off-track (other than in fields; so thus in woodland) it moves at one quarter speed and MUST be preceded/accompanied by a full regiment; which is assumed to be manhandling wagons, cutting and laying timber to allow it to progress at all etc. etc.
This regiment becomes, effectively, part of the train. It cannot fire or attack or move away from the train while so committed. It cannot separate itself from the train without spending a whole move doing so. If it separates itself from the train the train cannot move - not even to retrace its steps. While part of the train, and until subsequently rallied if it detaches itself, it is already considered Disrupted to level two (note; this disruption level does not affect movement of the train).
Heavy to medium artillery cannot deploy in Woodland. Light guns can, but must be manhandled and not use limbers.
Further Thoughts on Scouts and Spotting:
Thoughts about Blind reaction tests using a table like this....? Hmm... Of is that a complication I don't need. The system above worked fine....
I thought about using Blinds for friendly units (only be placed if a friendly unit "seen" by a hostile unit subsequently moves out of LoS of hostile units). Why..? Because their presence could affect AI decisions. Maybe a thought for another day...
As with the rest of the above; thoughts etc. welcomed.


No comments:
Post a Comment